> ## Documentation Index
> Fetch the complete documentation index at: https://v0.x-docs.novu.co/llms.txt
> Use this file to discover all available pages before exploring further.
# How to use Novu to send notifications to a channel in a Discord server
> Learn to send Discord notifications swiftly with Novu
# Introduction
In this guide, you'll learn how to use Novu to send notifications to any channel in a Discord server. But before coding anything up, we just need to go over a couple of setup steps.
The corresponding docs for this guide are available on our [docs](https://docs.novu.co/channels-and-providers/chat/discord).
The entire code for this app is available on our [GitHub](https://github.com/novuhq/discord-chat-app).
So let's begin!
# Set up Discord
Setting up Discord is fairly straightforward. You just need the `webhook Url`. It is pretty simple and can be done in the following easy steps:
1. Go to the channel you want to add the webhook to (you need to be an admin of the discord server).
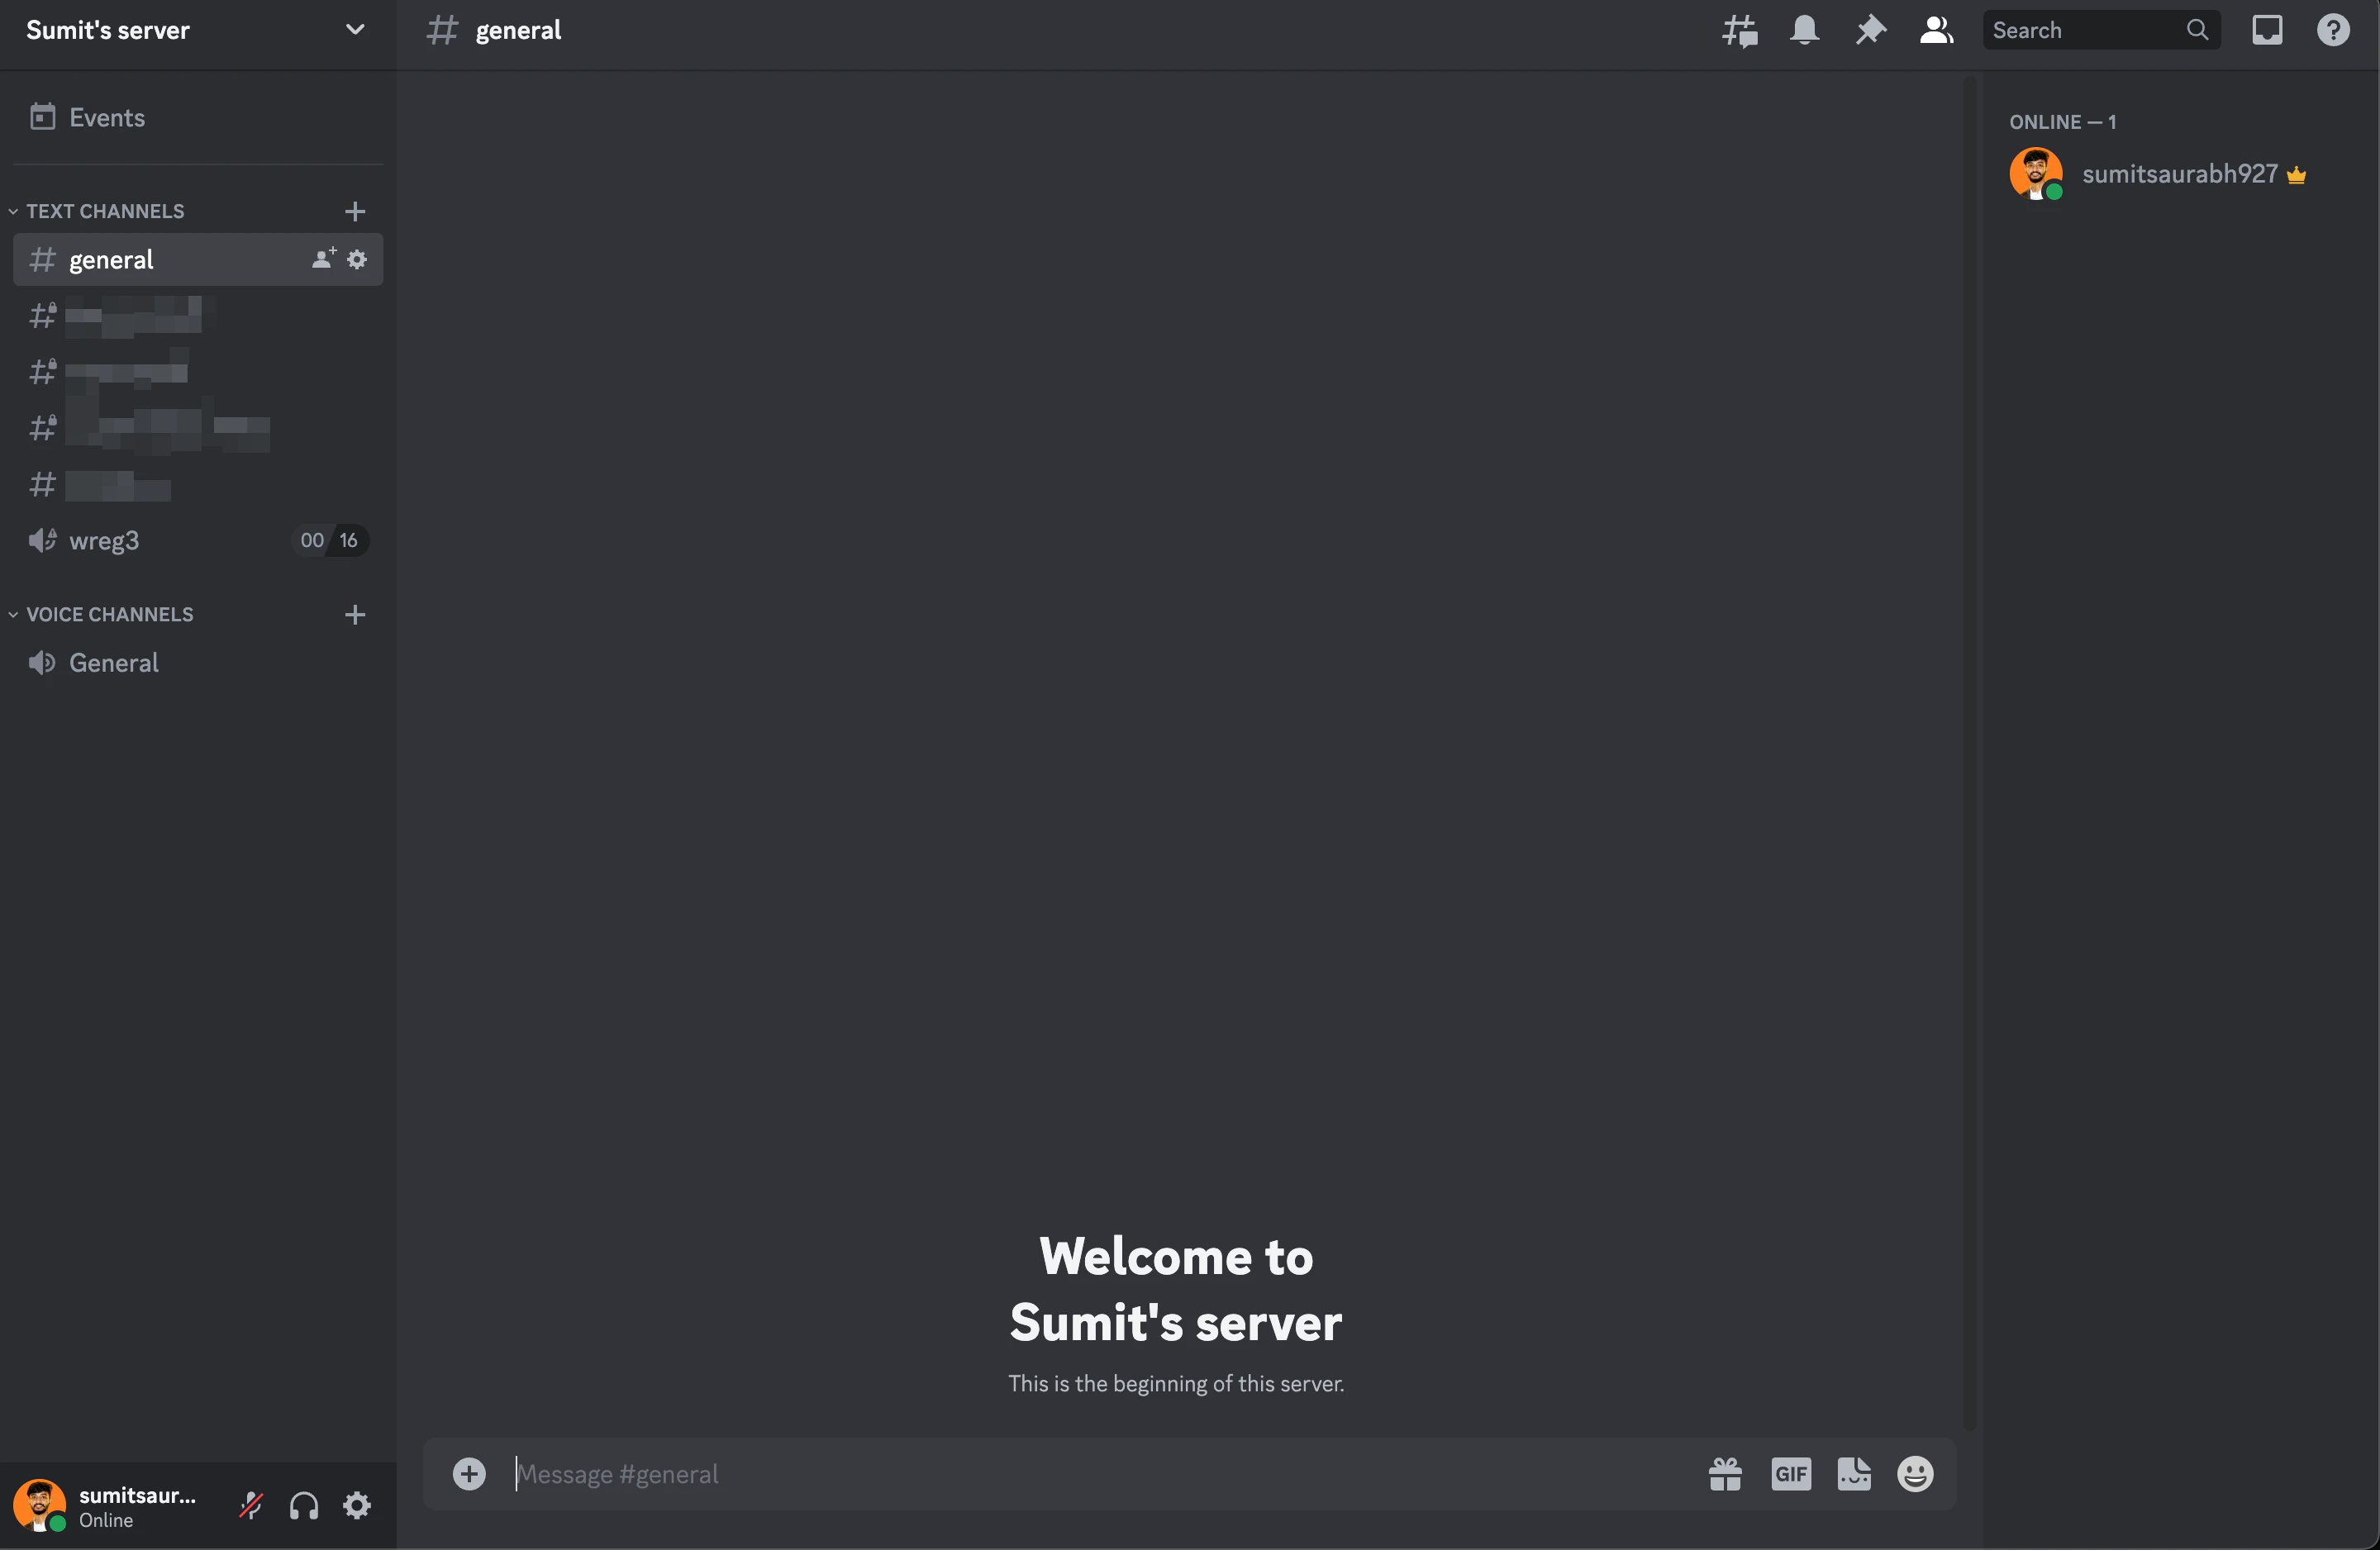 2. Right-click the channel and select “Edit Channel”.
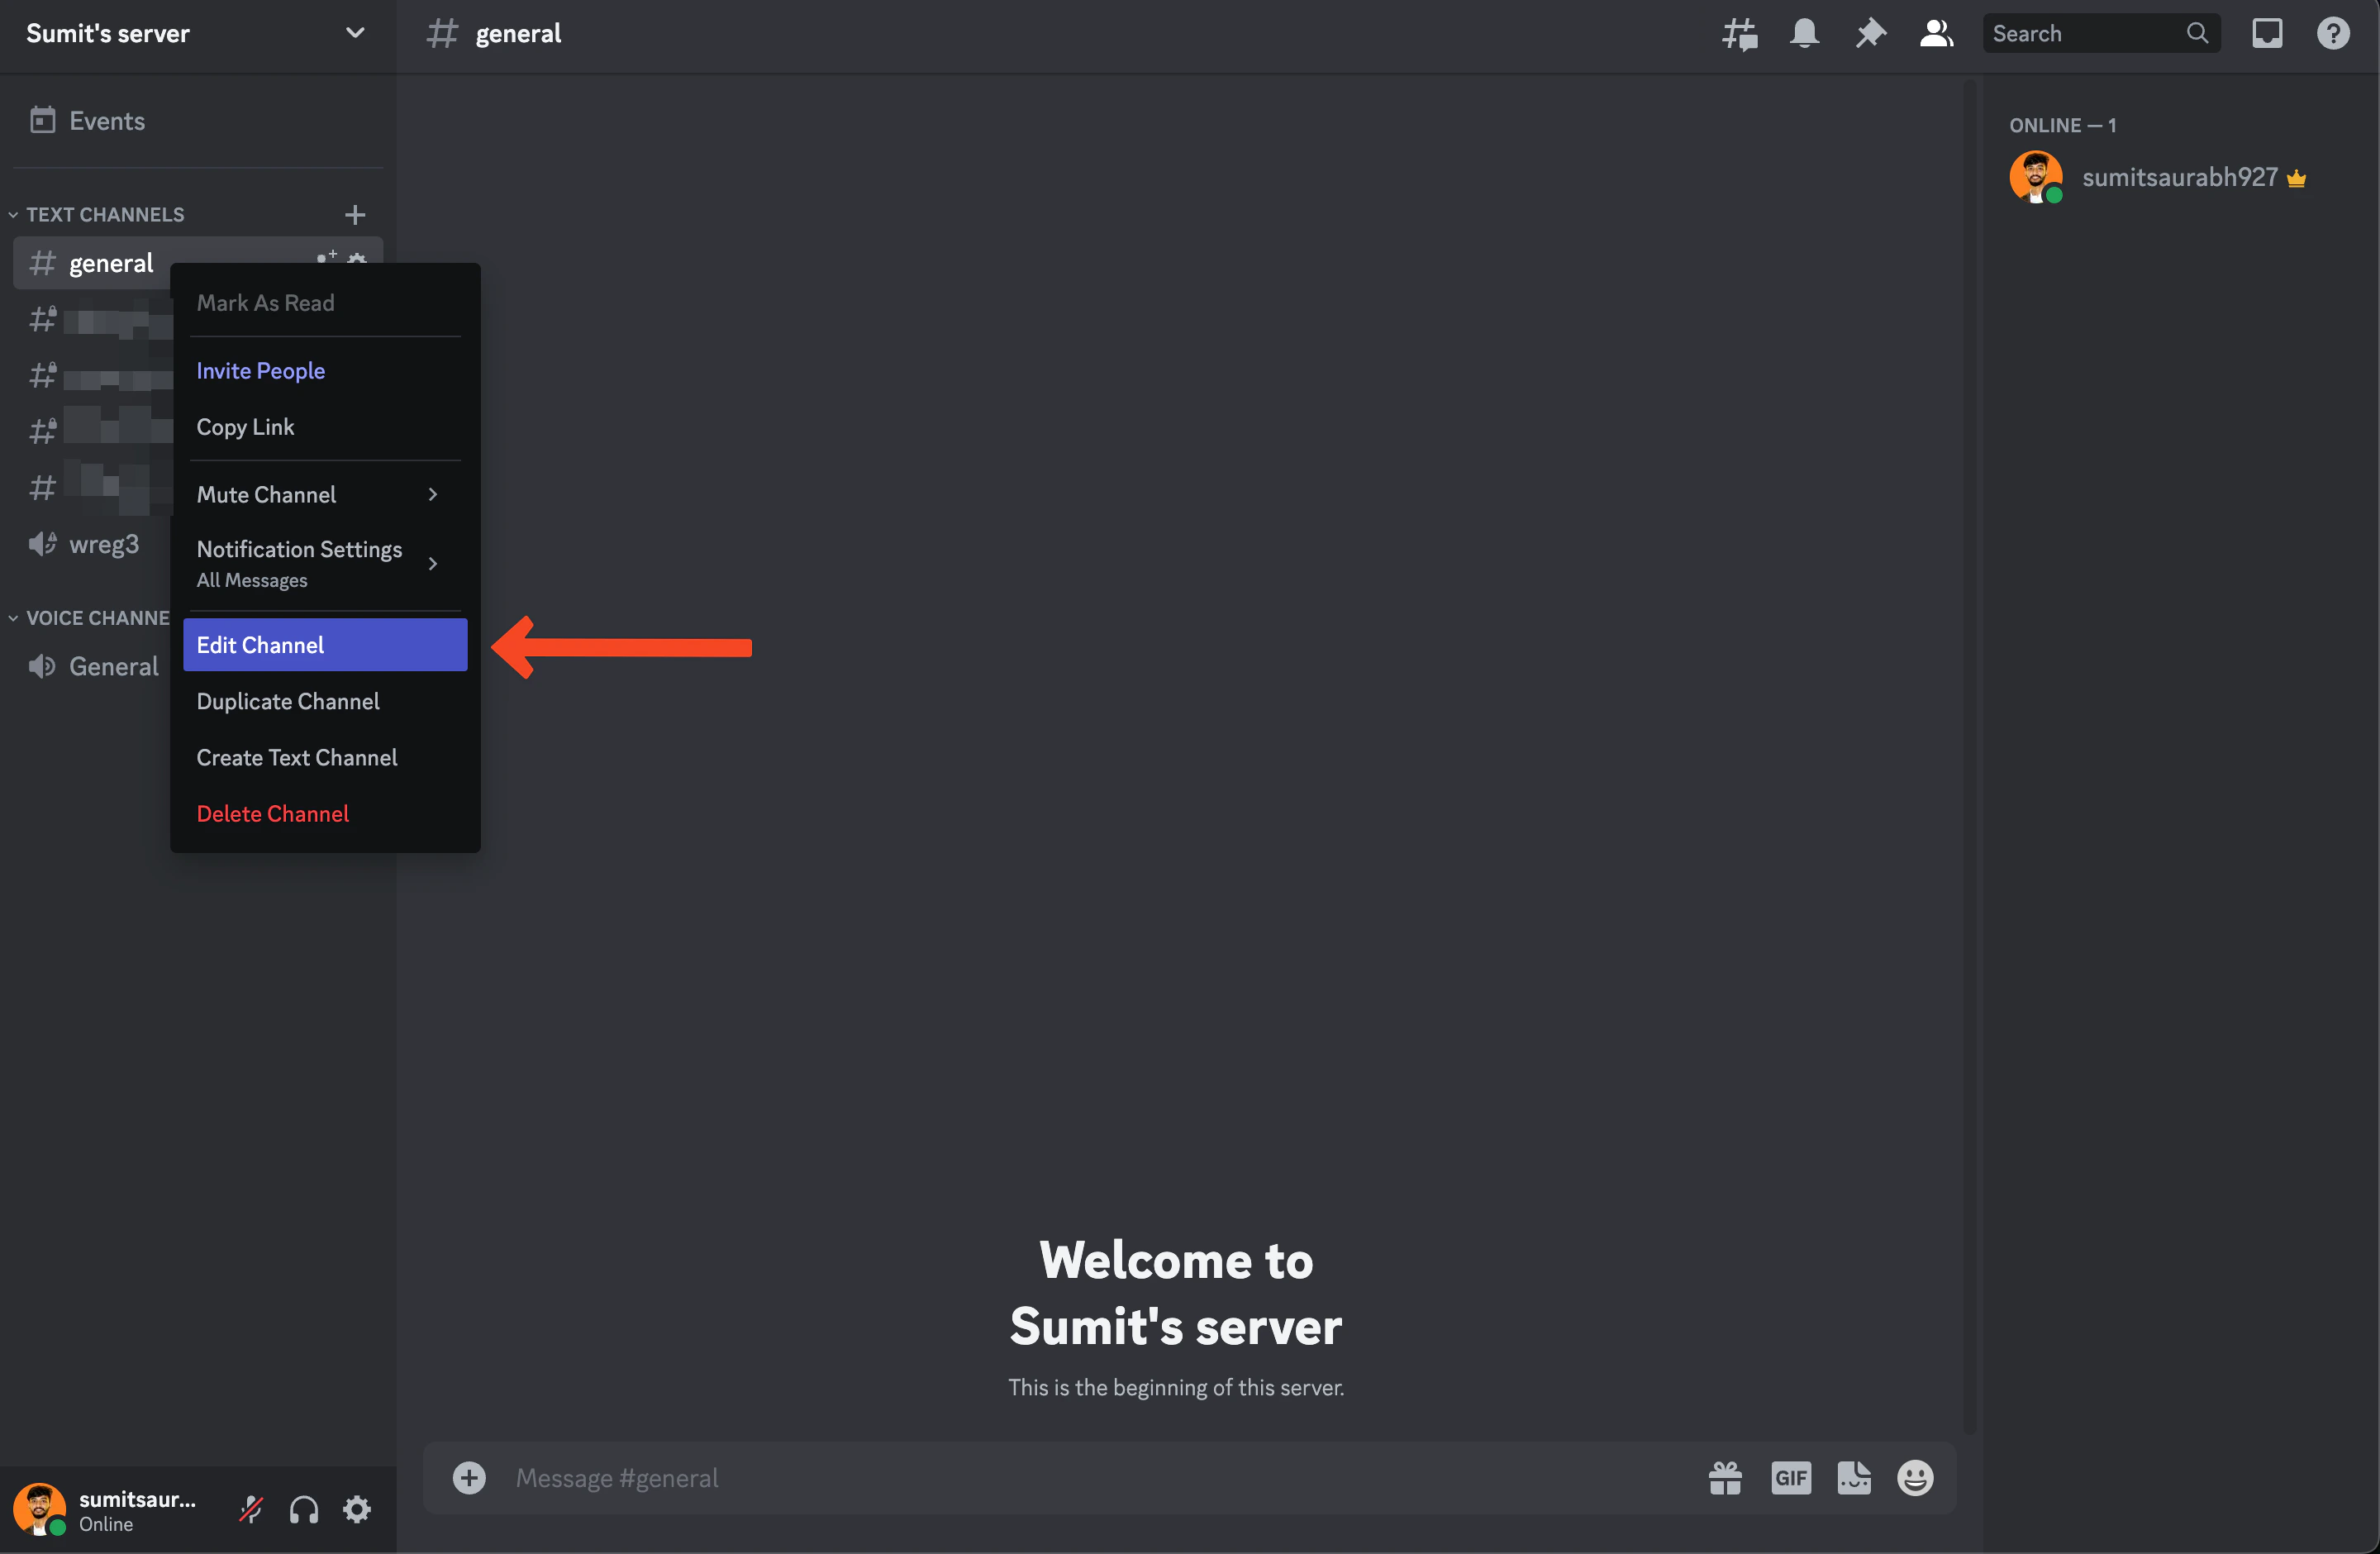 3. Select Integrations -> Webhooks -> Create Webhook
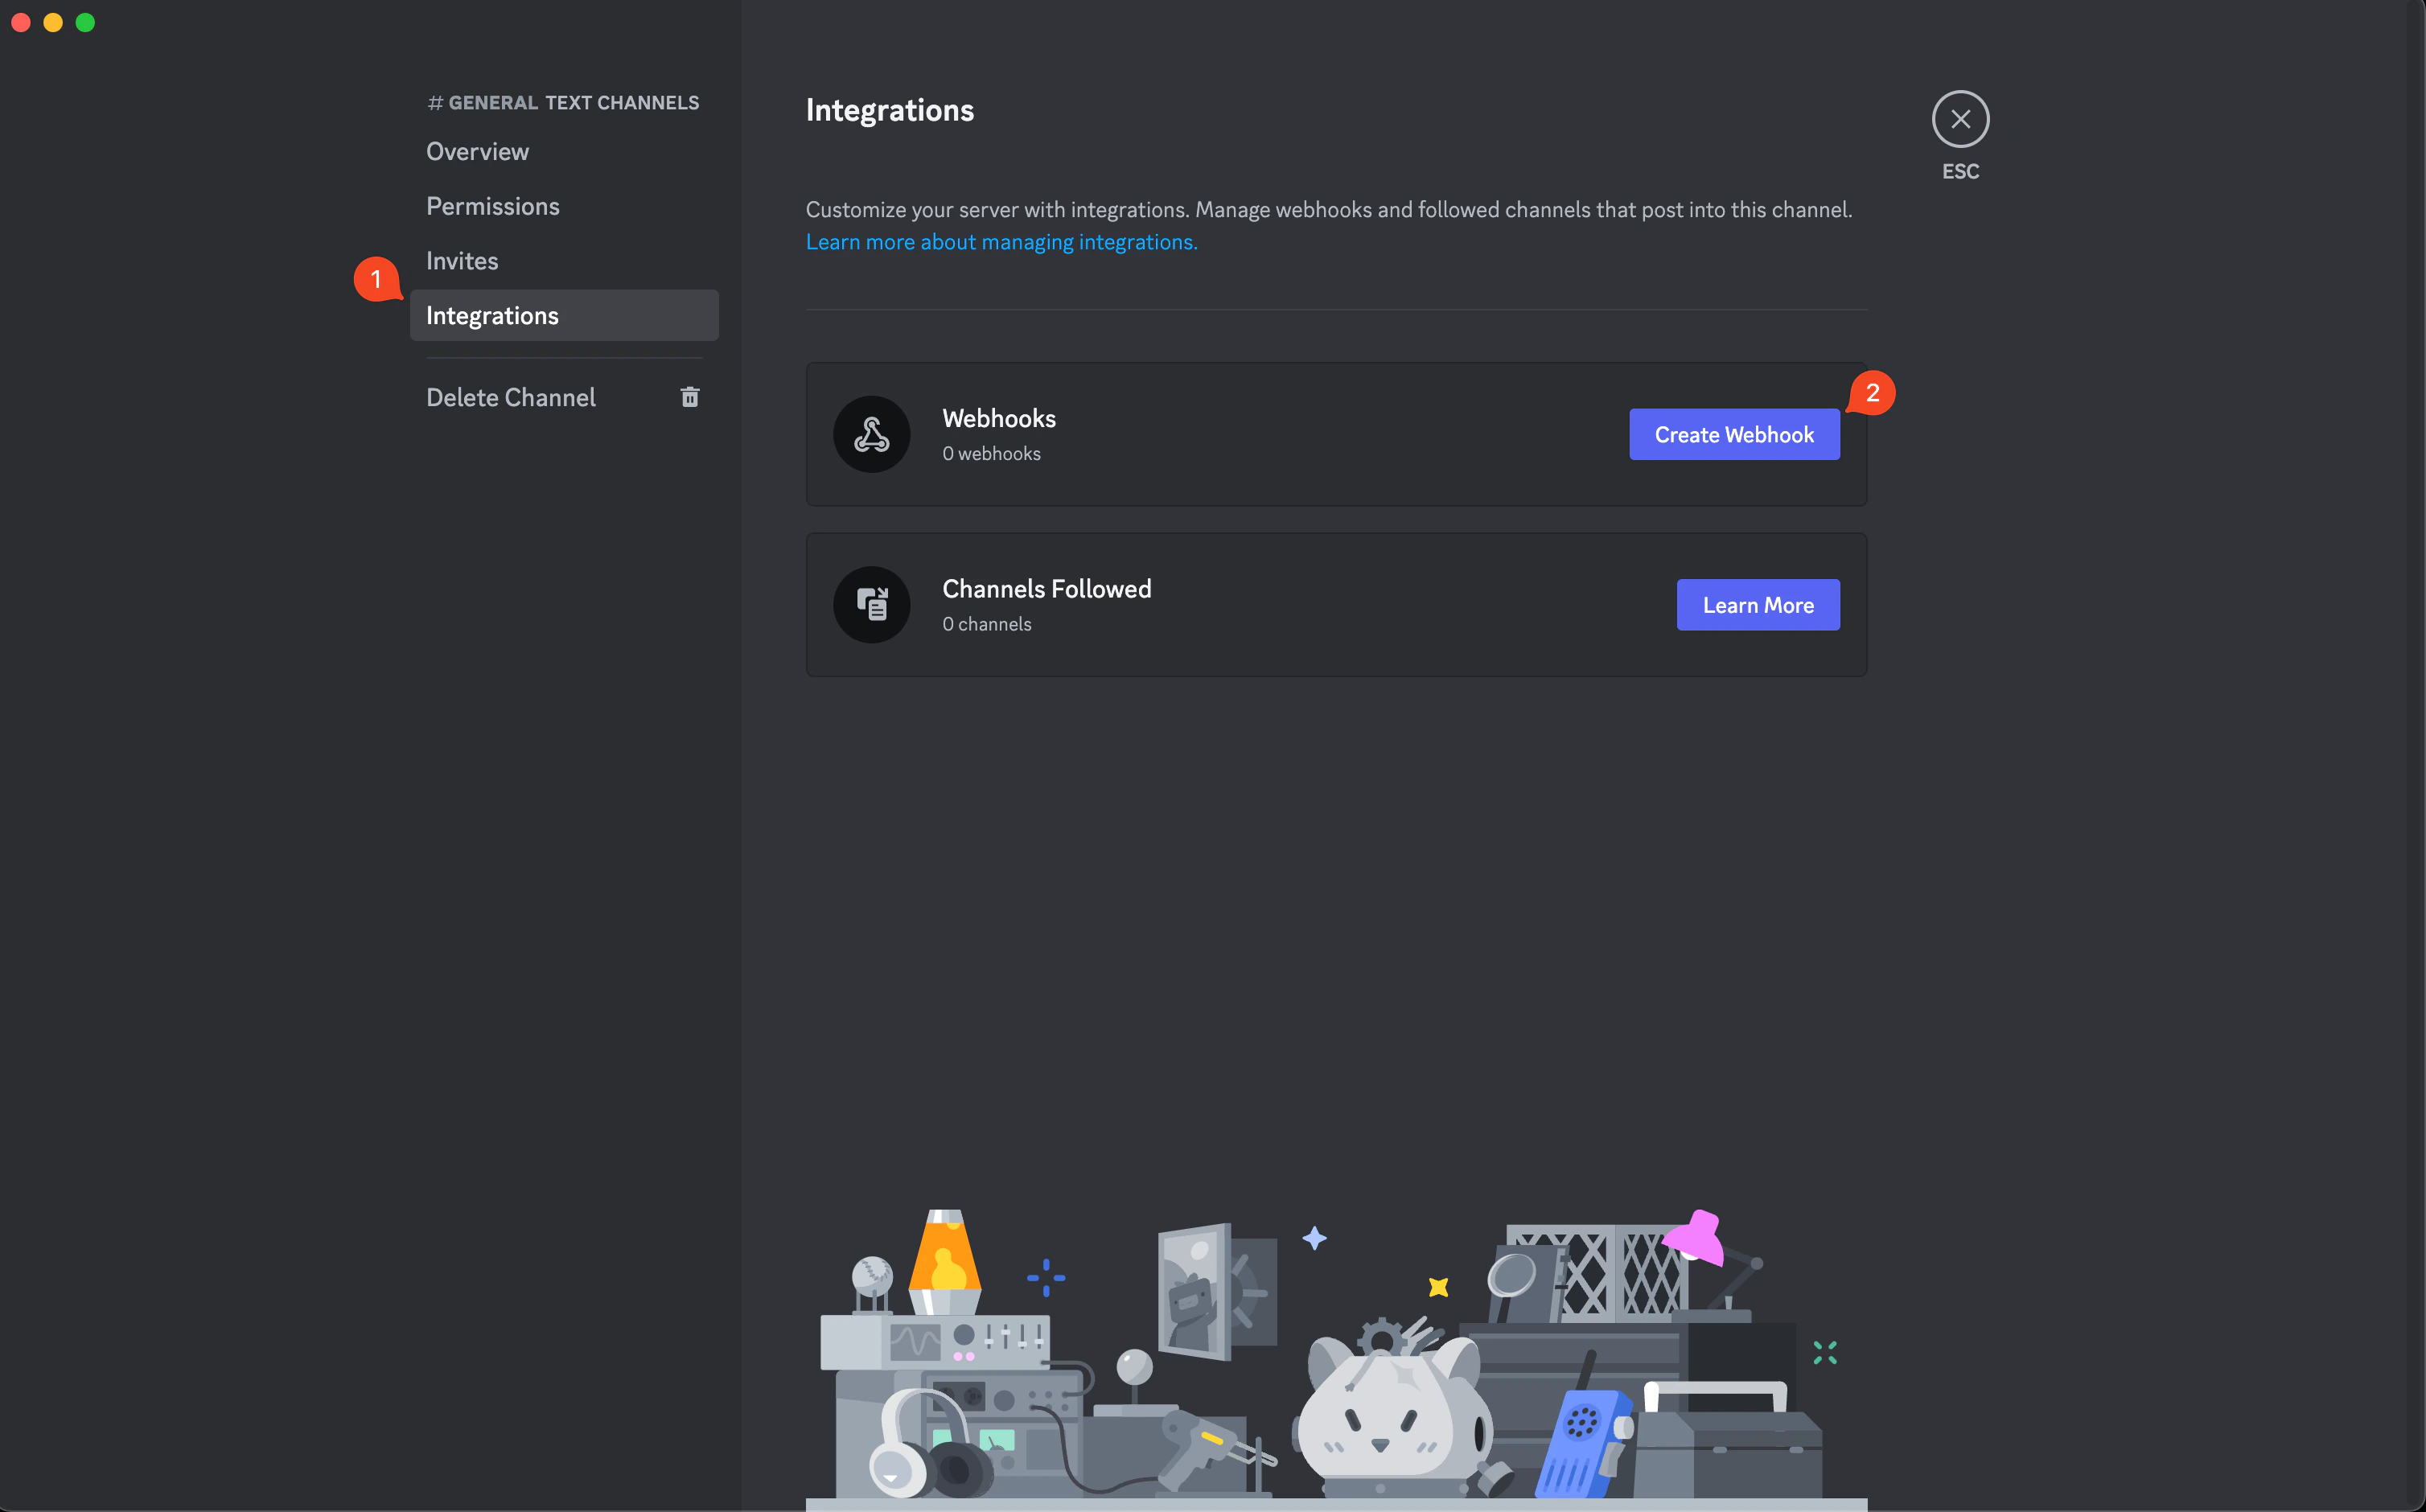 4. Edit the Bot name to your liking, copy the webhook URL and store it somewhere. We'll need it in the future.
 # Set up Novu
In this part, we'll set up a workflow that will be triggered when we send a notification. Workflows are like blueprints and hold the entire flow of notifications. You can read more about them on our [docs](https://docs.novu.co/workflows/notification-workflows). To set up a notification workflow for our app, follow these steps:
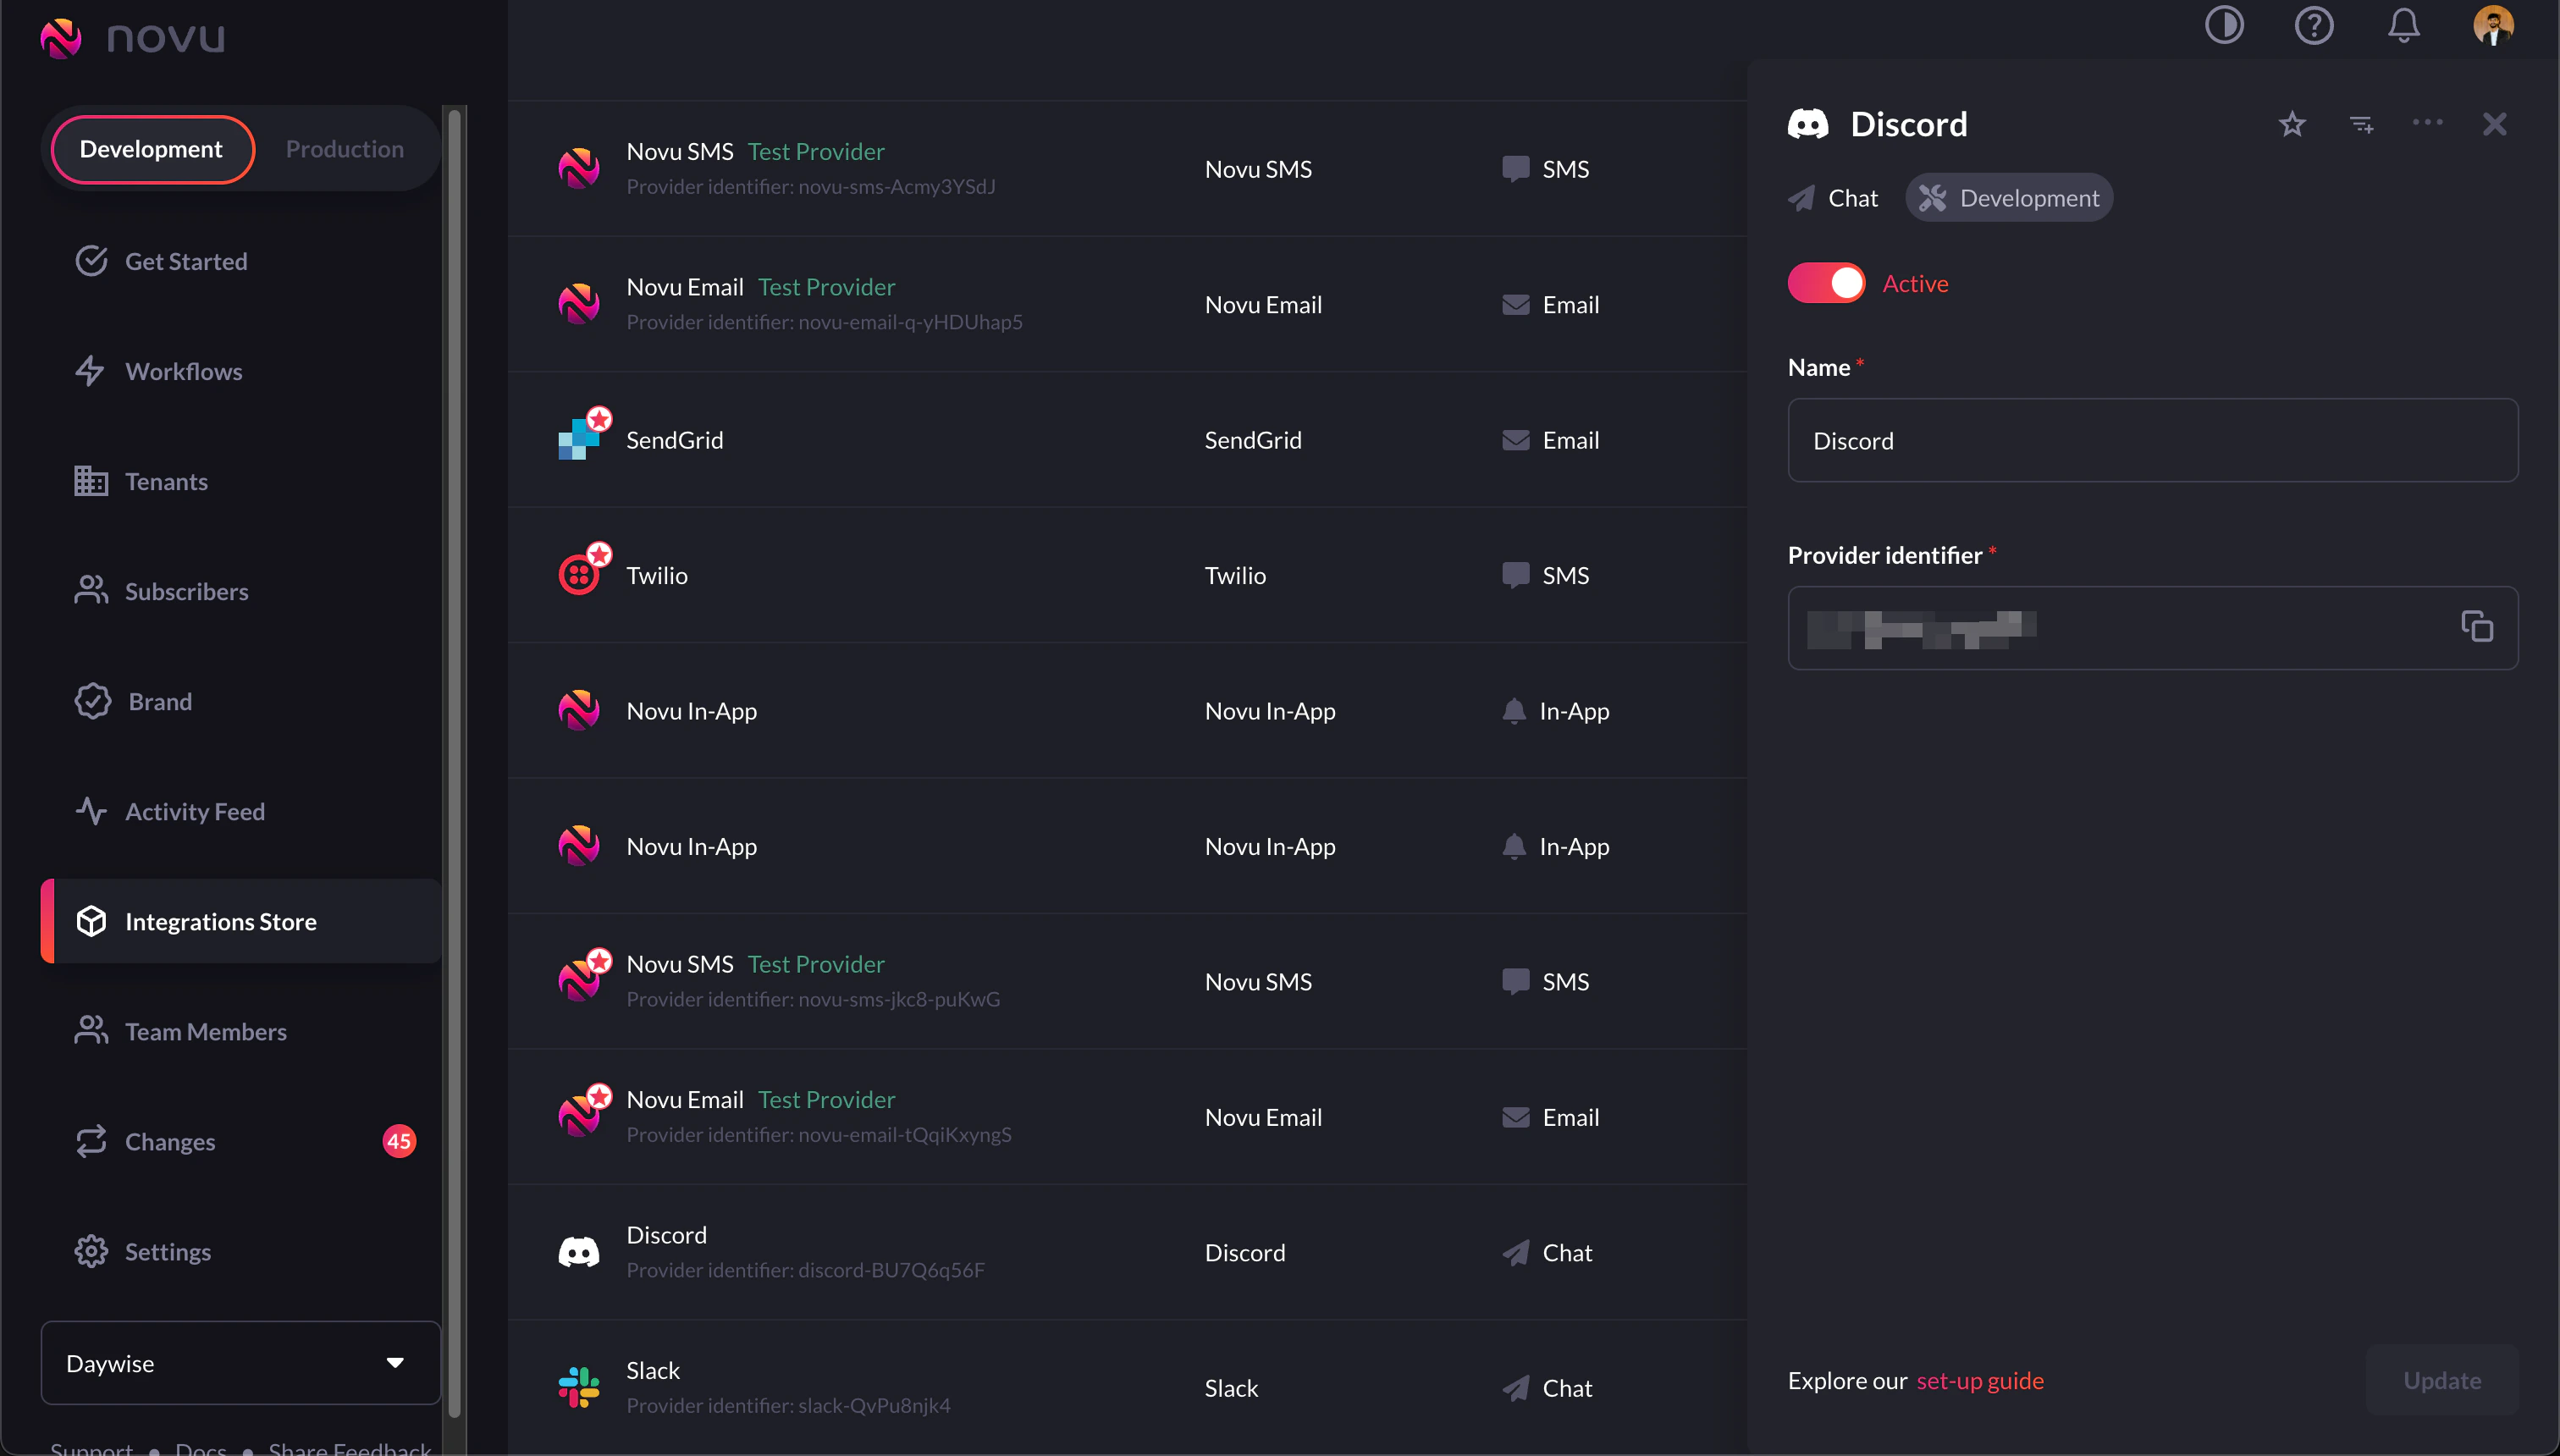
1. Make sure that you've set the Discord Integration as active from the [Novu Integrations Store](https://web.novu.co/integrations?utm_campaign=docs-discordnotifications).
# Set up Novu
In this part, we'll set up a workflow that will be triggered when we send a notification. Workflows are like blueprints and hold the entire flow of notifications. You can read more about them on our [docs](https://docs.novu.co/workflows/notification-workflows). To set up a notification workflow for our app, follow these steps:
1. Make sure that you've set the Discord Integration as active from the [Novu Integrations Store](https://web.novu.co/integrations?utm_campaign=docs-discordnotifications).
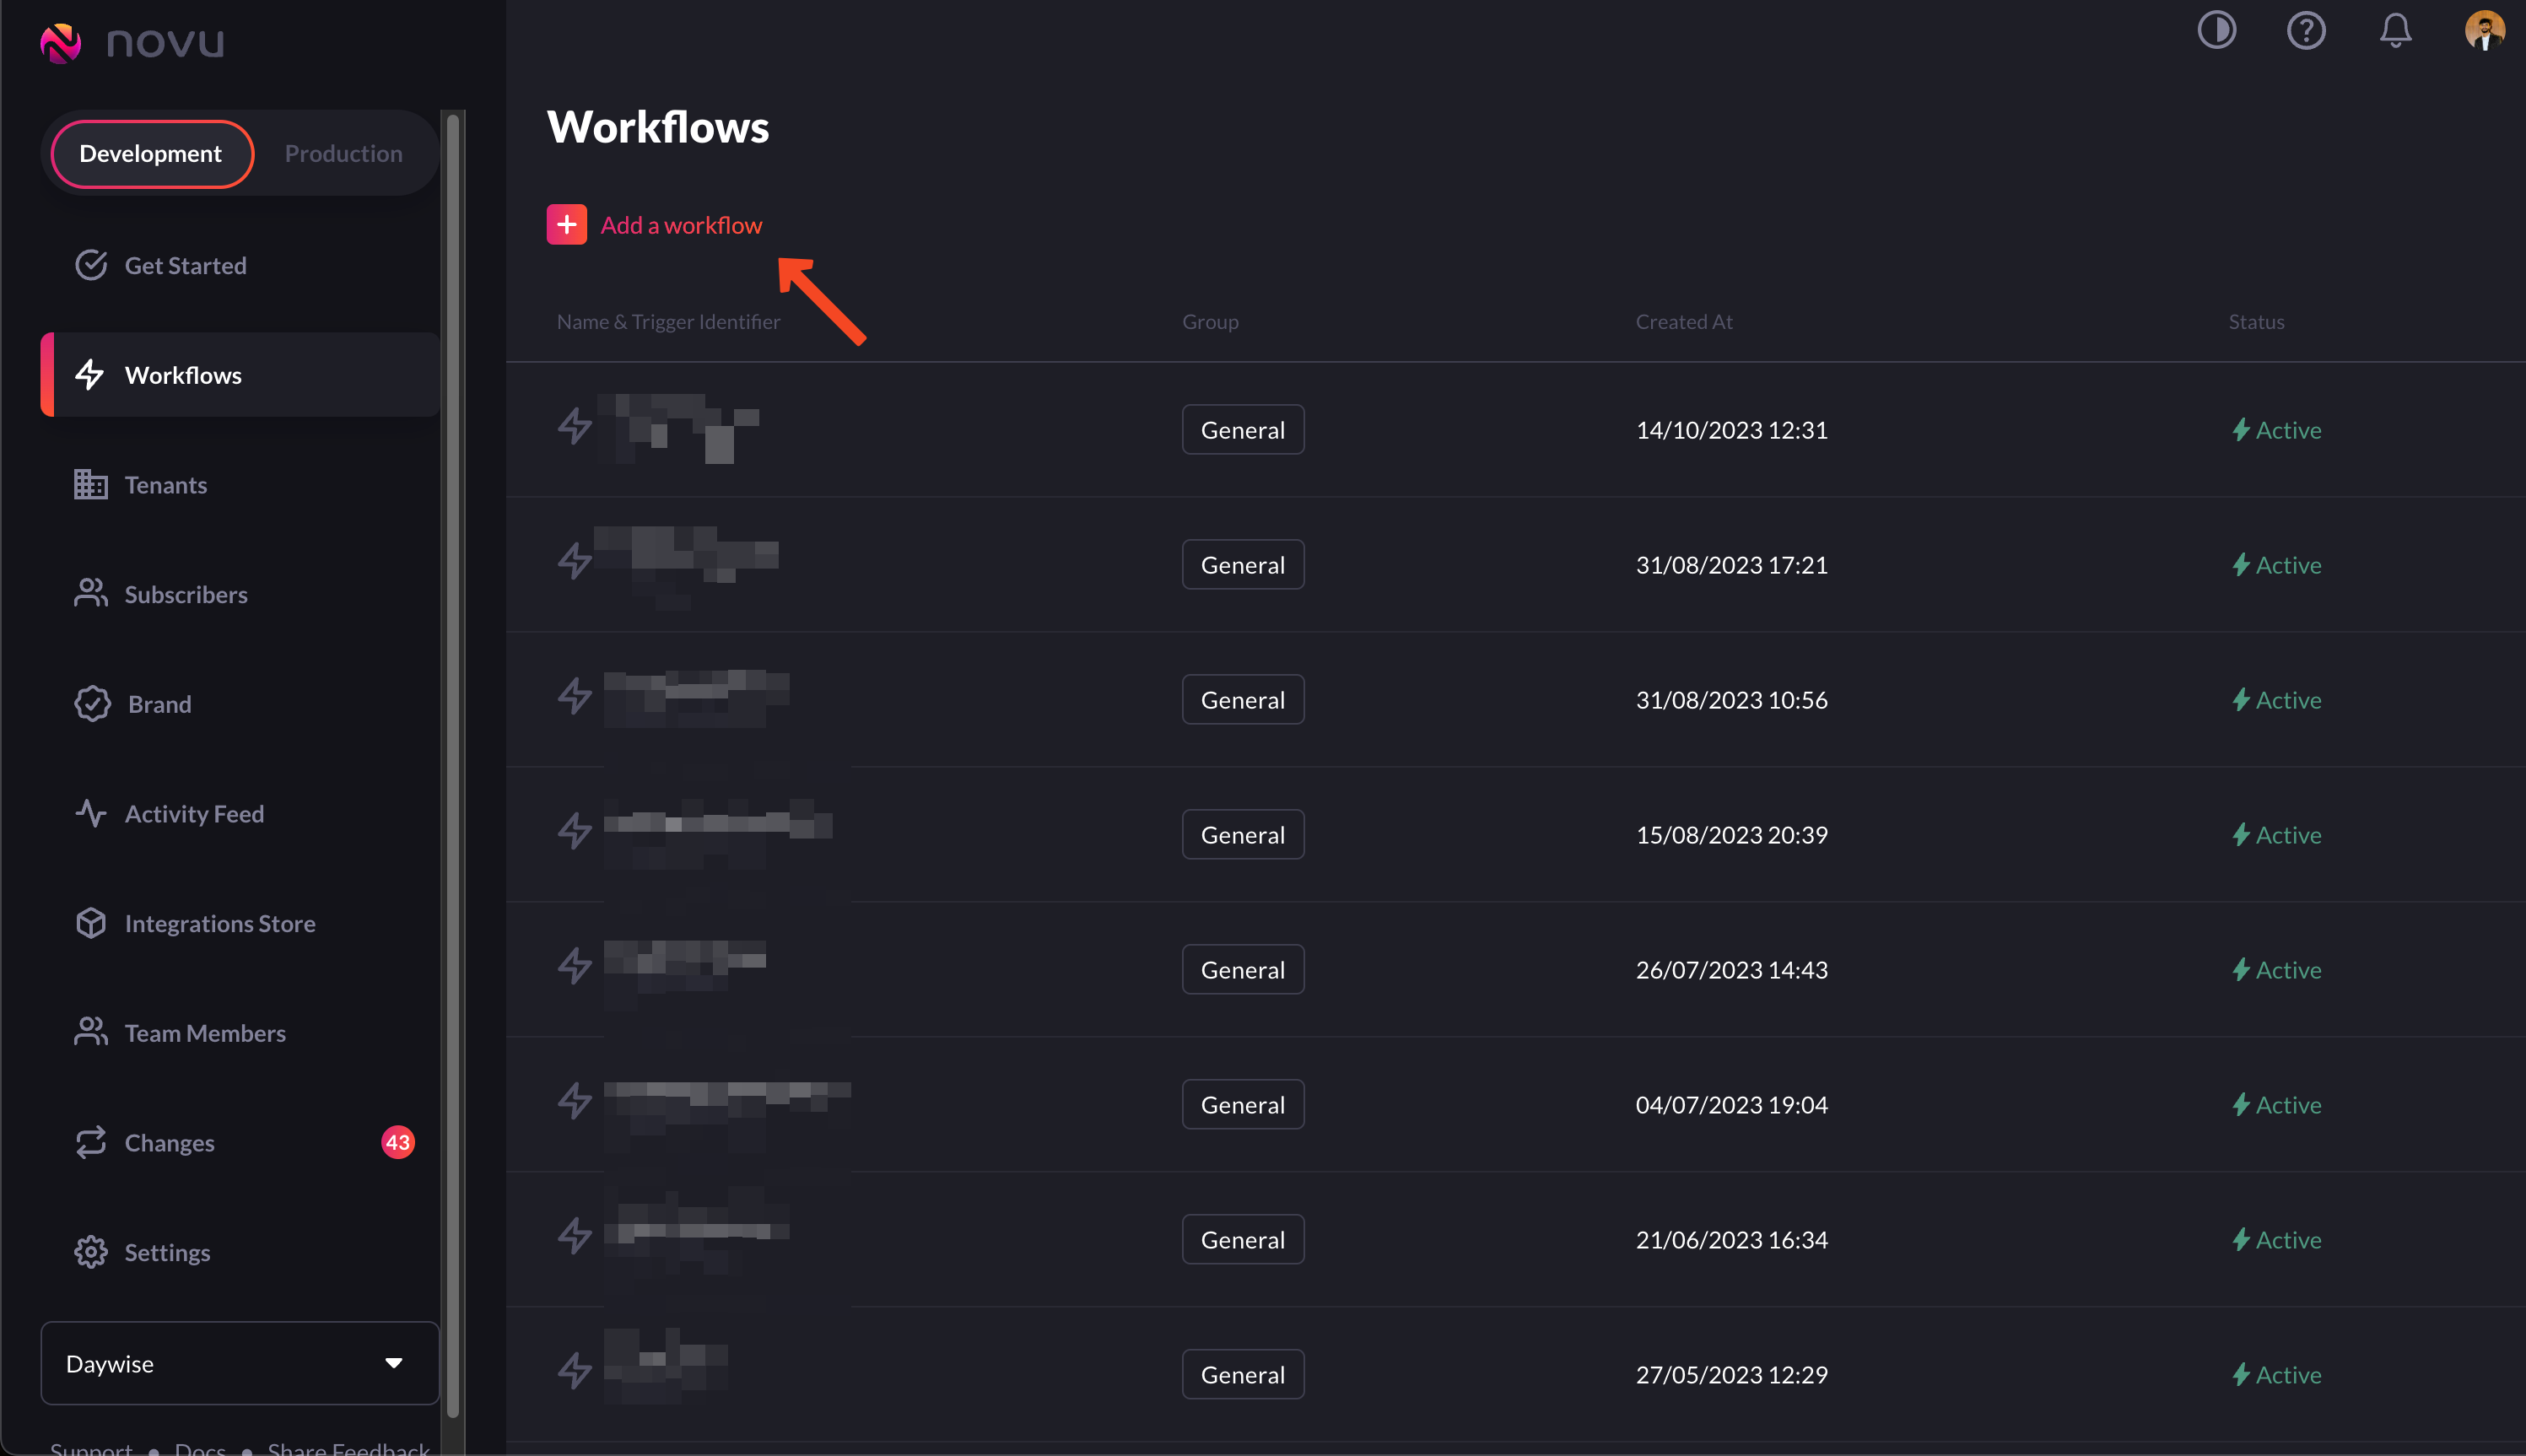
 2. Goto the [Novu Web Dashboard](https://web.novu.co/workflows?utm_campaign=docs-discordnotifications).
3. Click on the 'Add a workflow' button and select 'Blank workflow' from the dropdown.
2. Goto the [Novu Web Dashboard](https://web.novu.co/workflows?utm_campaign=docs-discordnotifications).
3. Click on the 'Add a workflow' button and select 'Blank workflow' from the dropdown.
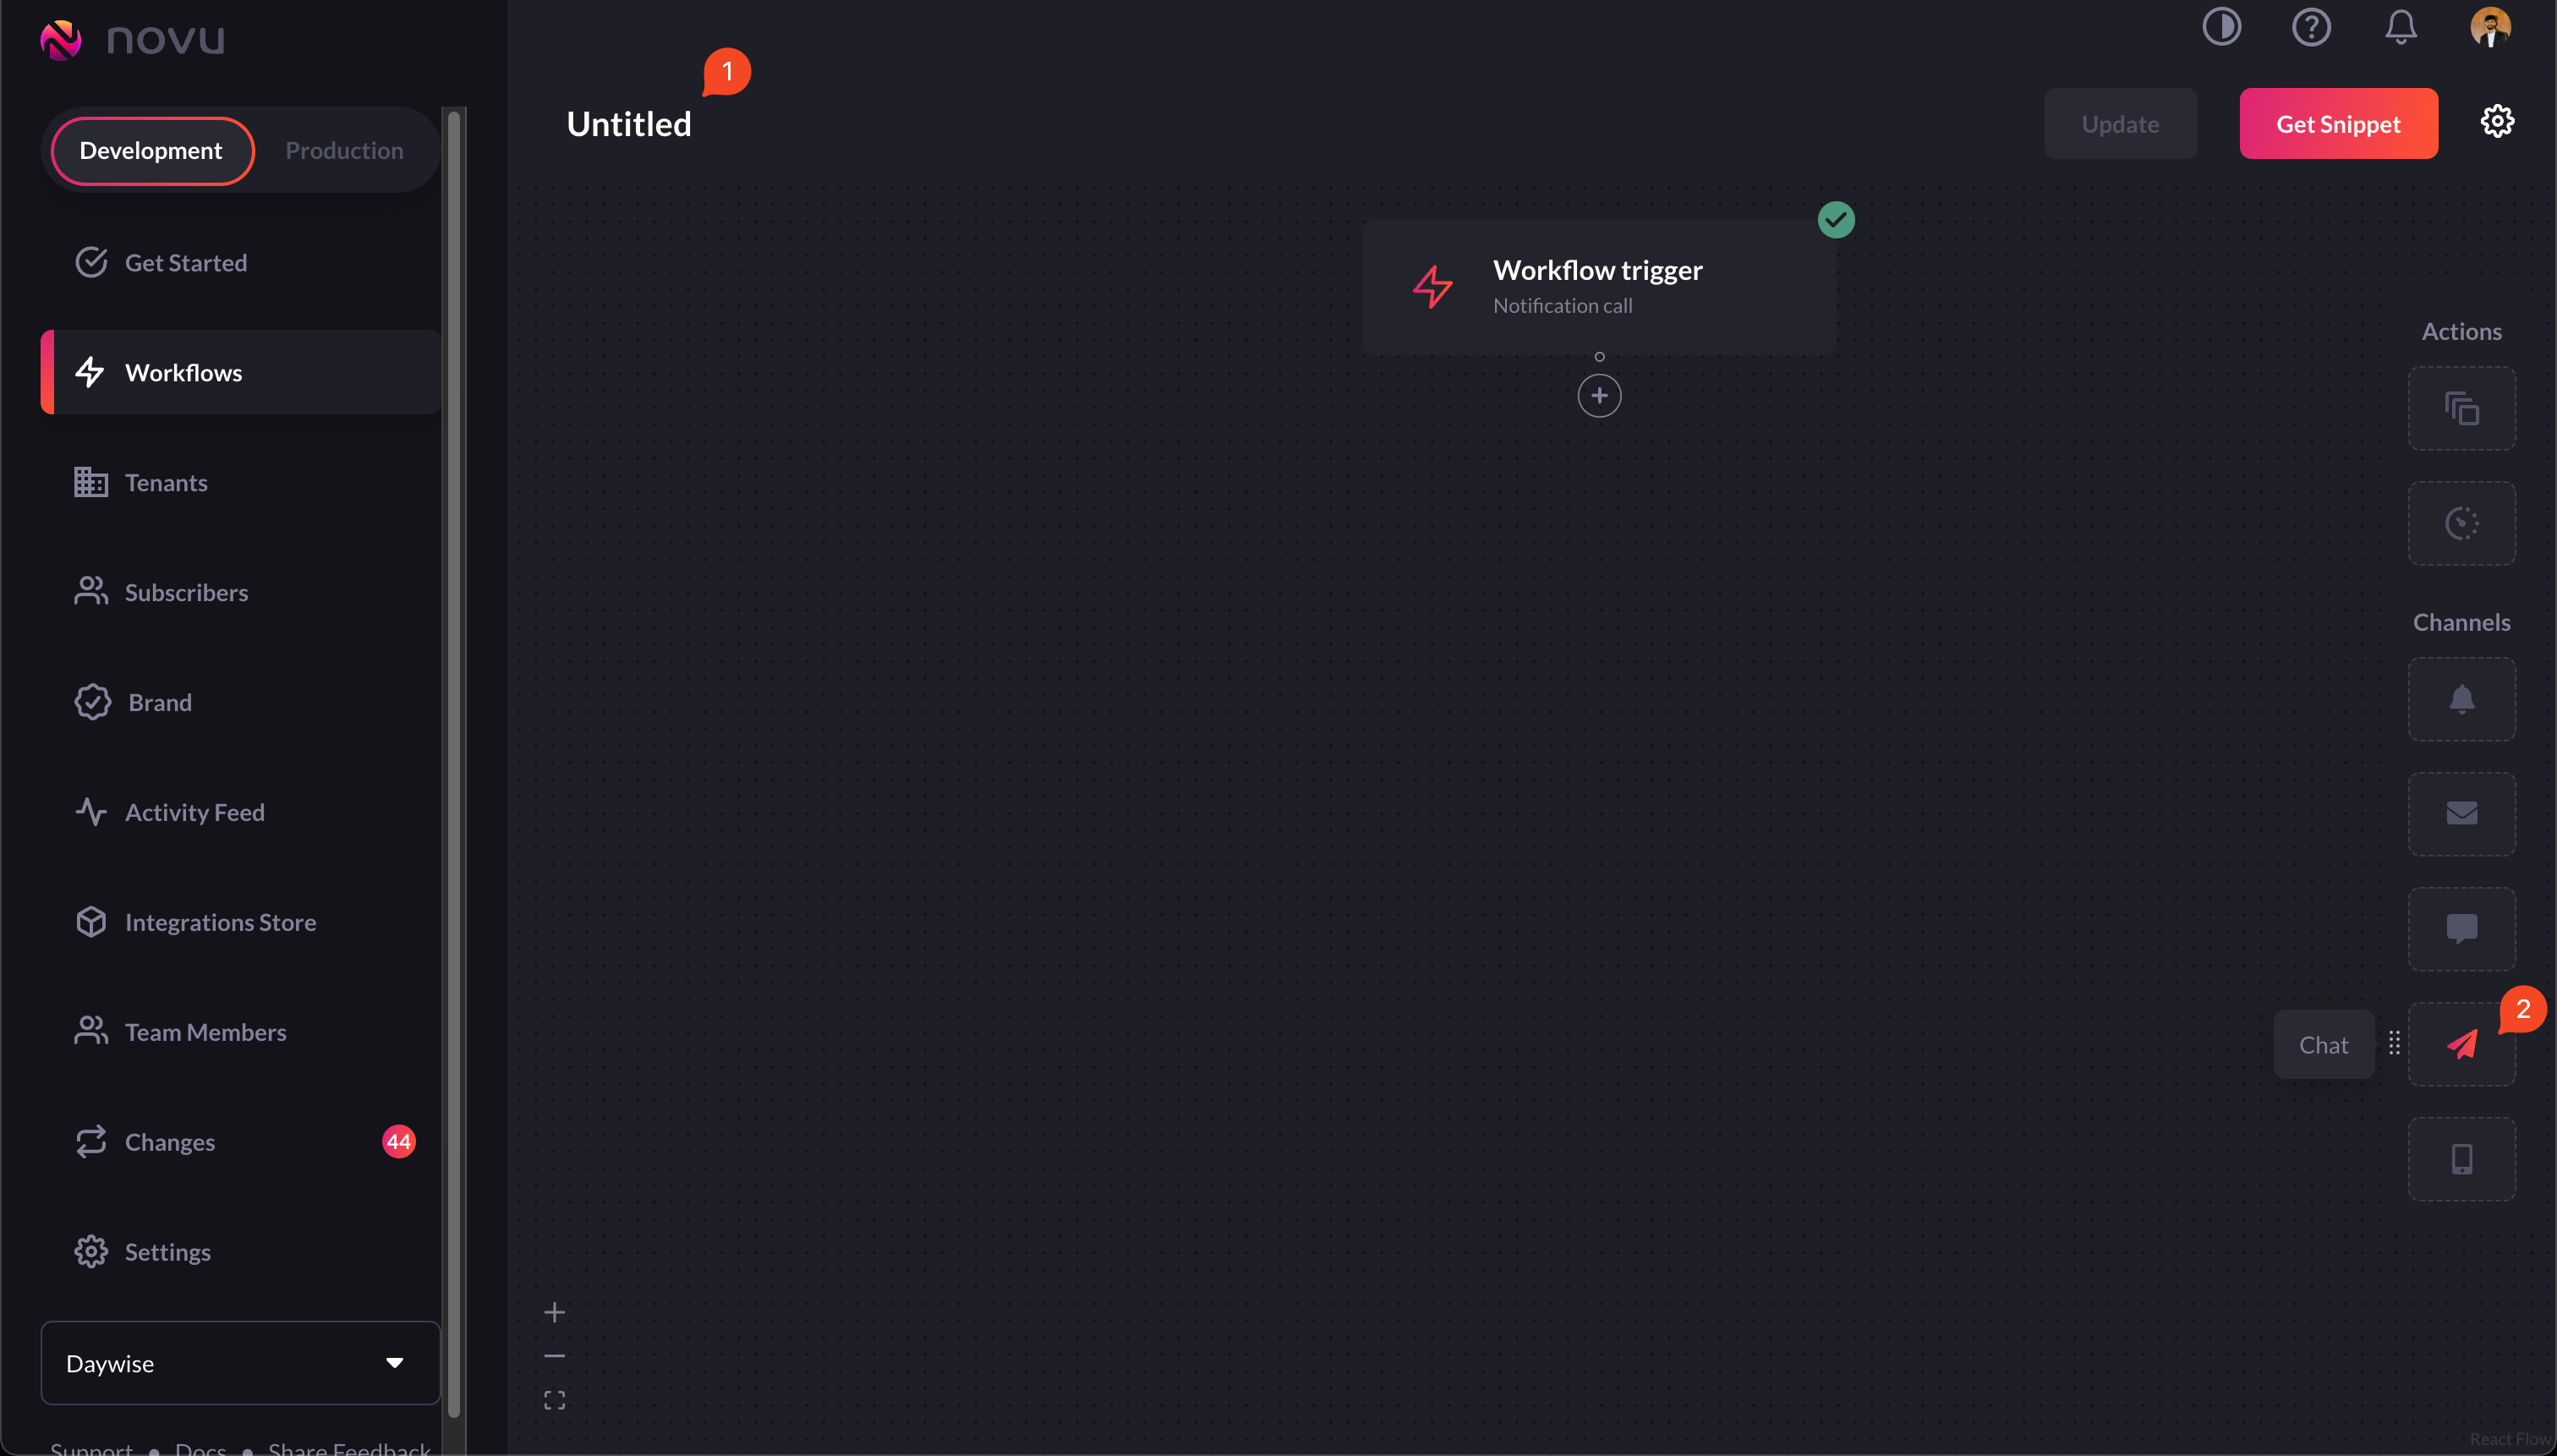
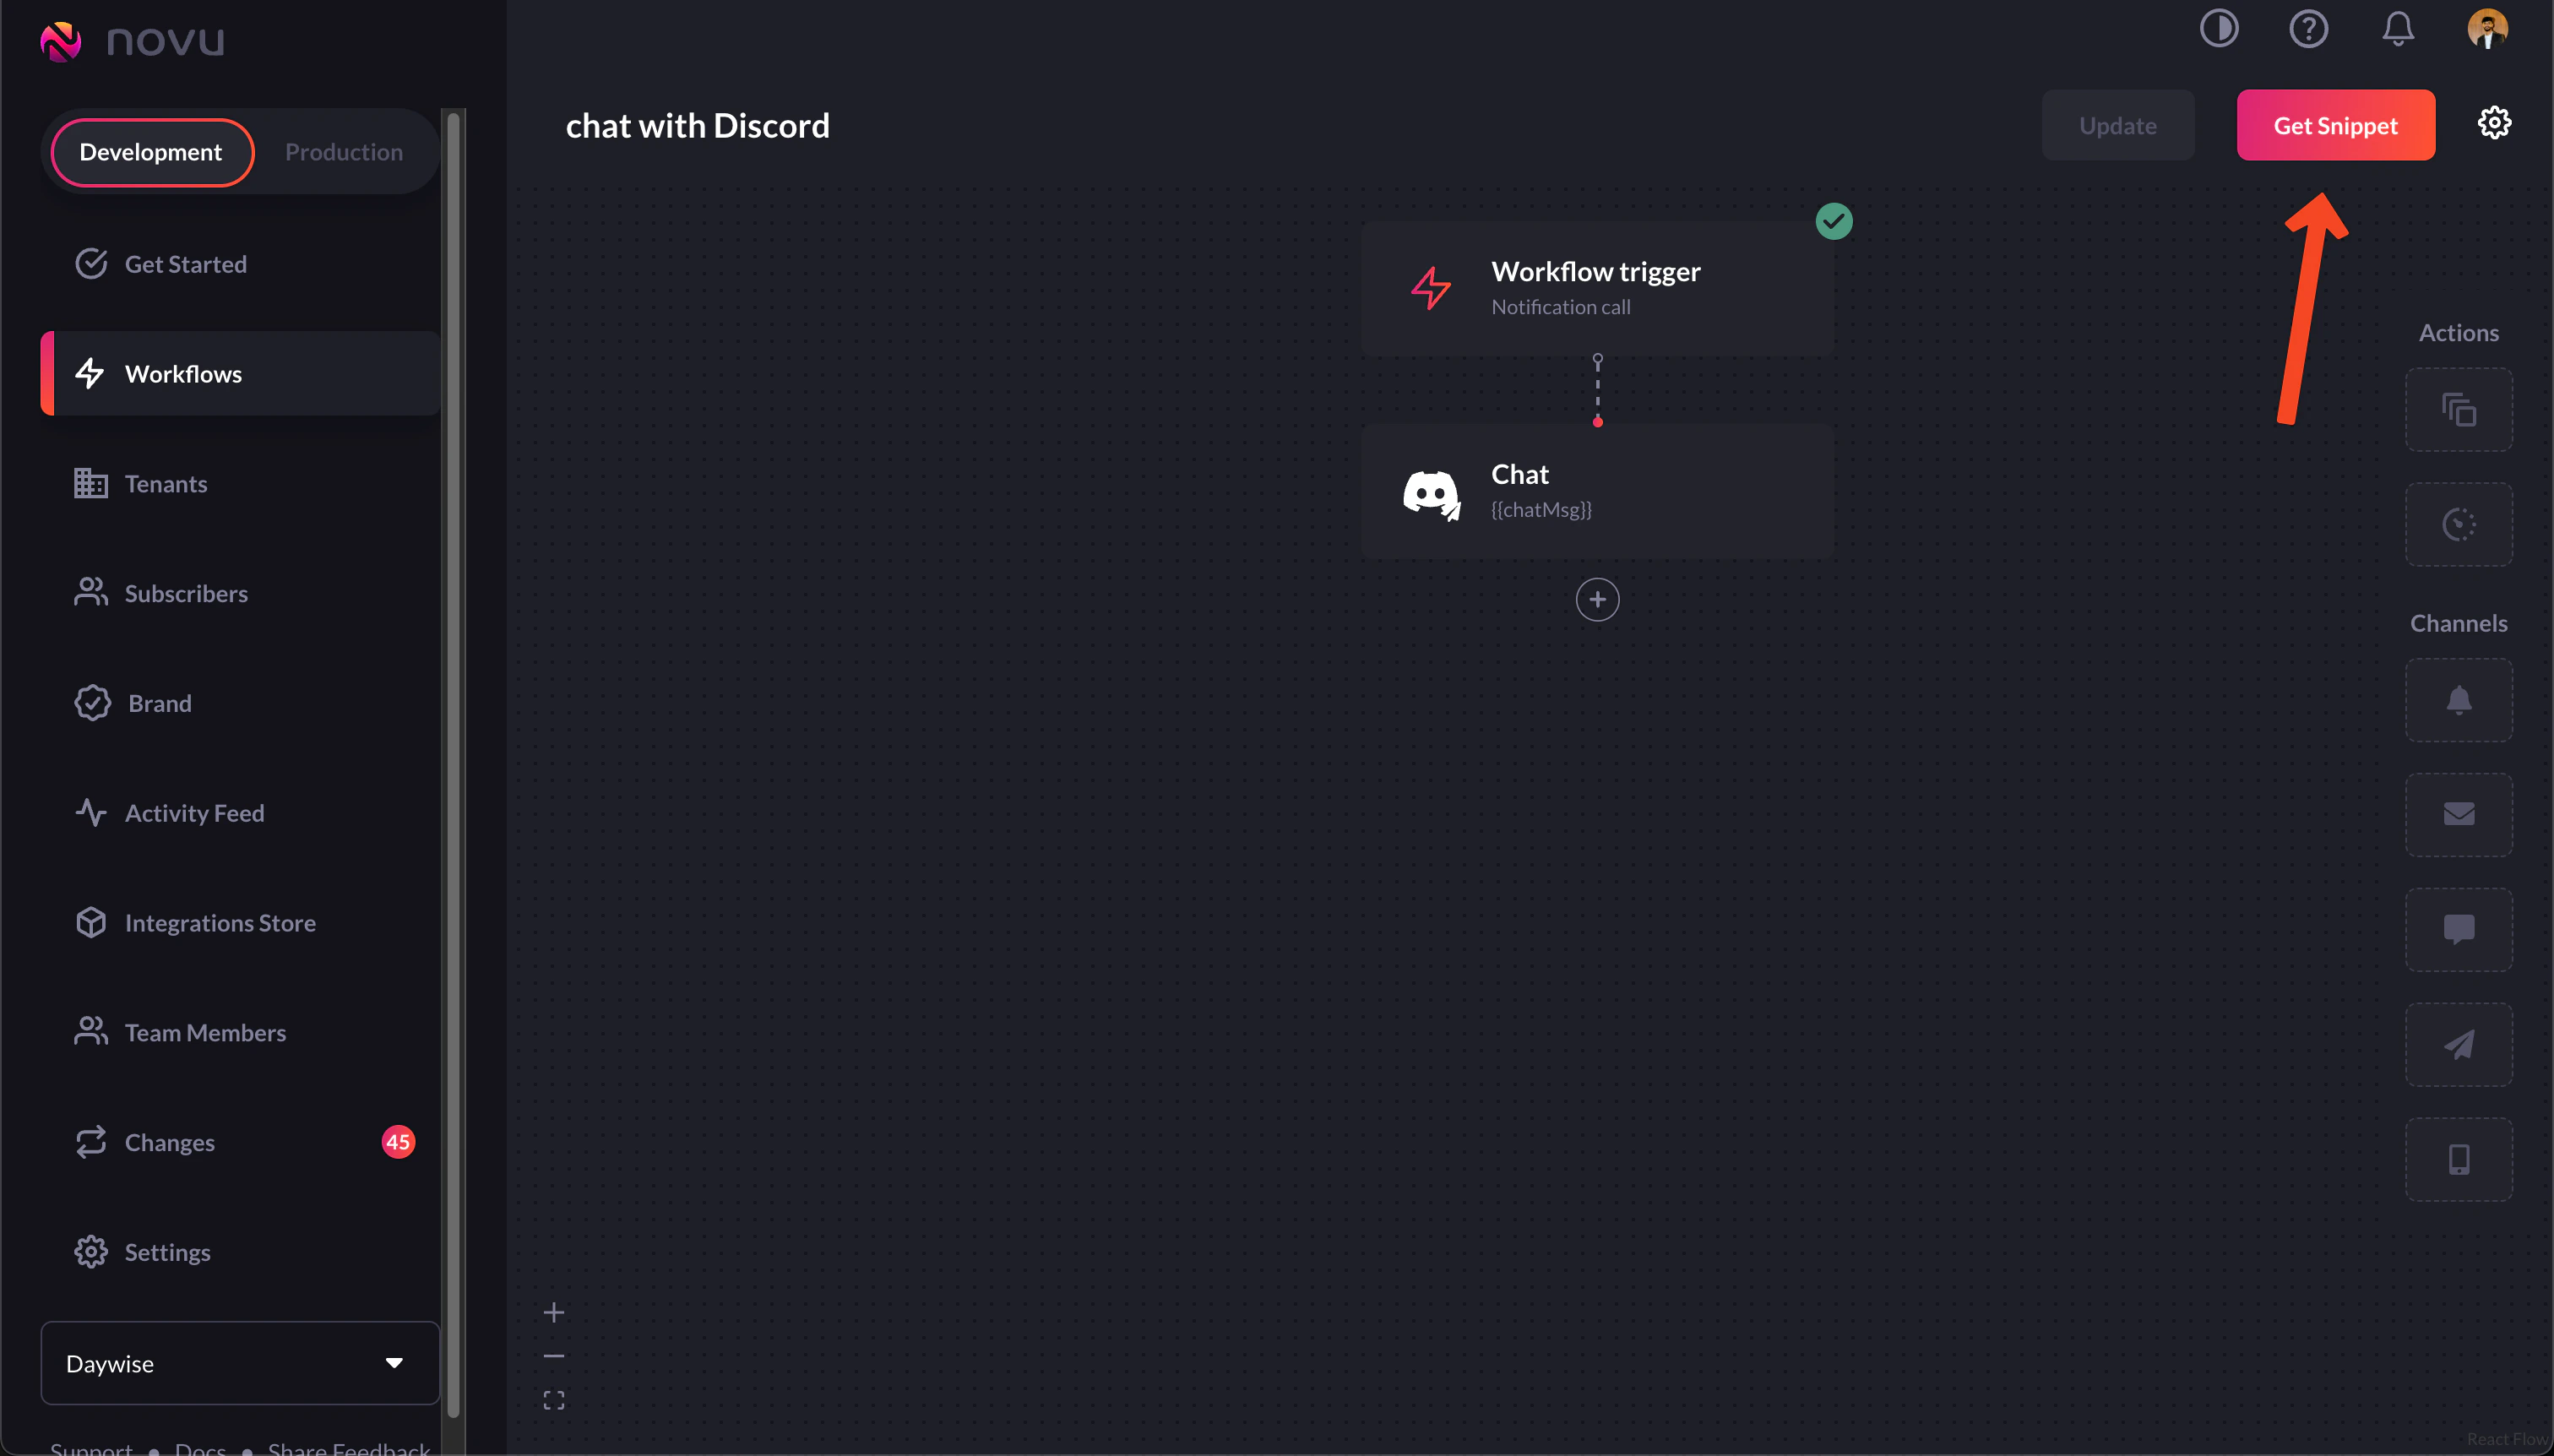
 4. Once there, give your workflow a name and drag and drop the 'chat' option below the 'workflow trigger' step.
 5. You can also add variables in the Workflow Editor. For example, here I've added 'chatMsg' as a variable as I'll be sending data using it.
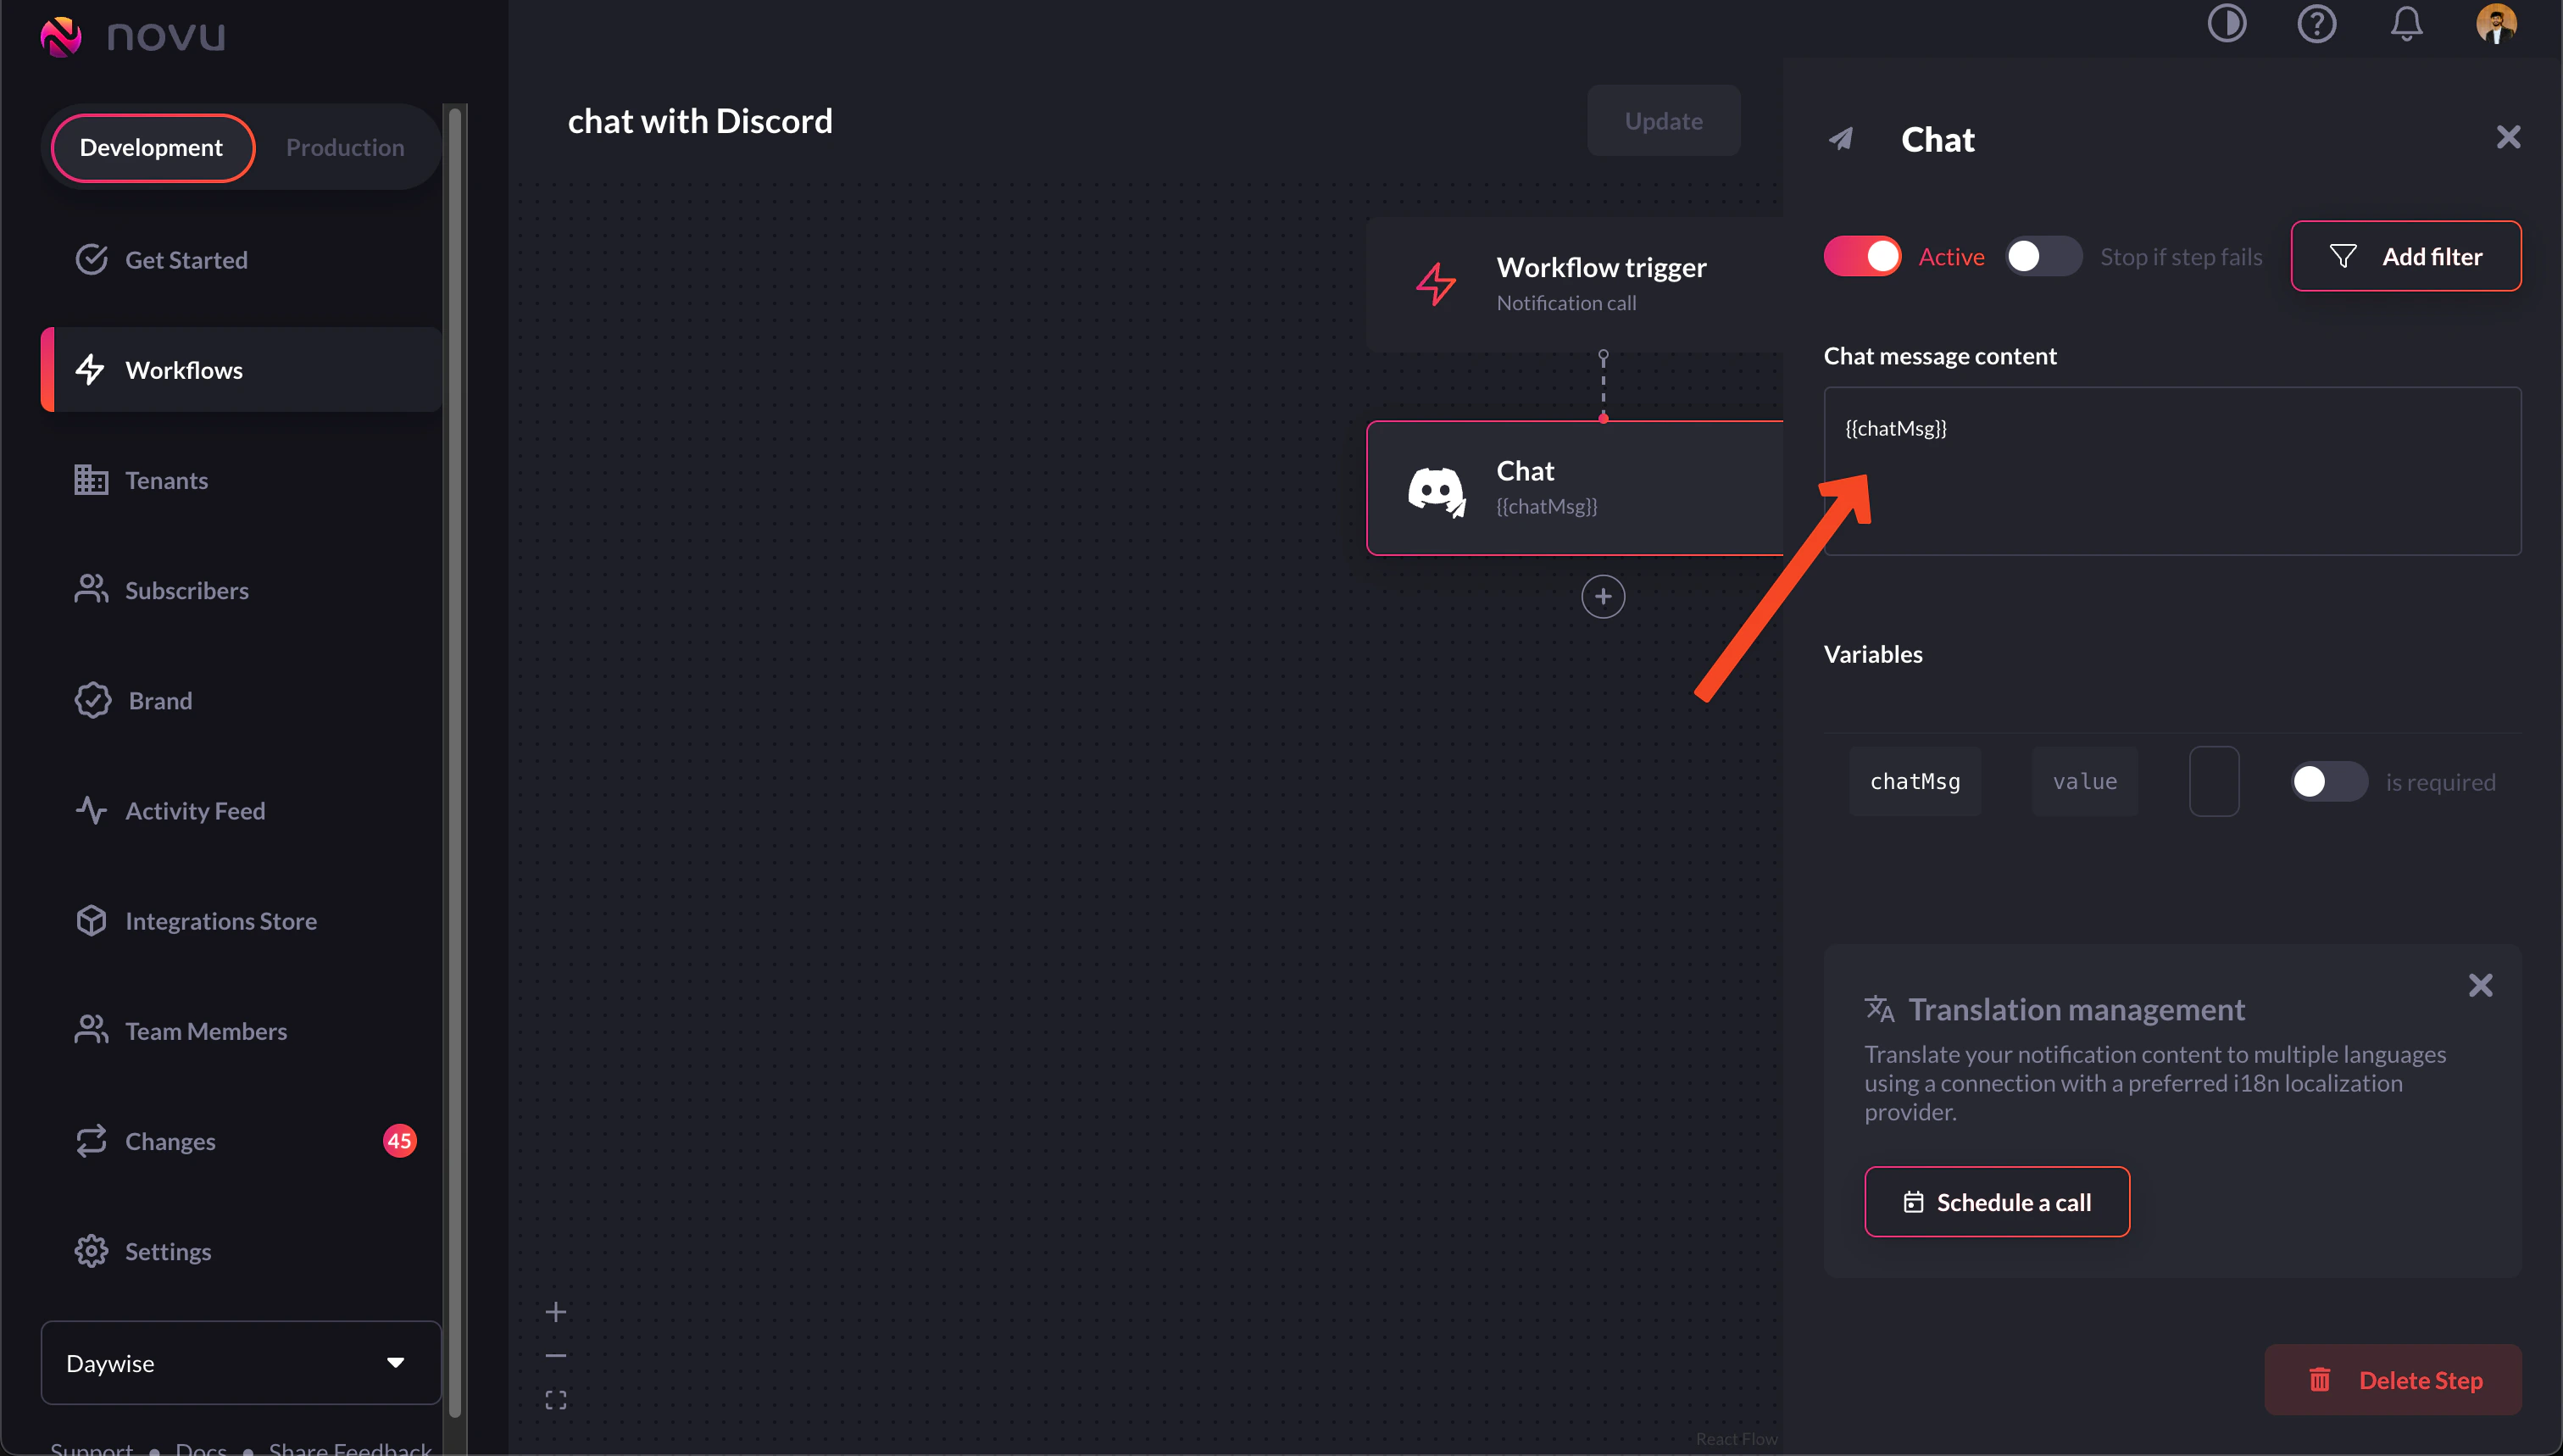 Whatever is placed inside double braces is a variable.
6\. Click the 'Get Snippet' button, copy the trigger code and keep it somewhere. We'll need this to trigger this workflow.
Whatever is placed inside double braces is a variable.
6\. Click the 'Get Snippet' button, copy the trigger code and keep it somewhere. We'll need this to trigger this workflow.
 Now, we've completed all the setup required and can move to coding!
# Create the backend
The backend for this app is quite simple. Simply install the Novu package:
```bash theme={null}
npm install @novu/node
```
Now, create a route that you'll hit when called from the front end. For our demo app, this is the route I've created:
```jsx theme={null}
import express from "express";
import { chatController } from "../controller/chat.js";
const router = express.Router();
router.post("/sendChat",chatController);
export default router;
```
Now, we need a controller function to handle what is to be sent in the trigger's function payload. Here's the controller I wrote:
```jsx theme={null}
import { chat } from "../novu/novu.js"
export const chatController = async (req, res) => {
const { chatMsg } = req.body;
try {
await chat(chatMsg);
res.status(201).json({ message: "Message sent successfully" });
} catch (error) {
console.log("notifController error:", error);
res.status(500).json({ message: error.message })
}
}
```
Notice how we're expecting 'chatMsg' in our payload. This is why we added it as a variable in the workflow created earlier.
To make it modular, we’ll keep the trigger code in a separate function in a separate file, `novu.js`, in our case, which is as follows:
```jsx theme={null}
import { Novu, ChatProviderIdEnum } from '@novu/node';
export const chat = async (chatMsg) => {
try {
const novu = new Novu(process.env.YOUR_NOVU_API_KEY_HERE);
await novu.subscribers.identify(process.env.SUB_ID, {
firstName: 'newSubForDiscordChat',
});
await novu.subscribers.setCredentials(process.env.SUB_ID, ChatProviderIdEnum.Discord, {
webhookUrl: process.env.WEBHOOK_URL
});
} catch (error) {
console.log(error);
}
}
```
Add the trigger code you'd copied earlier:
```jsx theme={null}
import { Novu } from '@novu/node';
const novu = new Novu('');
novu.trigger('chat-with-discord', {
to: {
subscriberId: ''
},
payload: {
chatMsg: ''
}
});
```
Our final trigger code should look something like this:
```jsx theme={null}
import { Novu, ChatProviderIdEnum } from '@novu/node';
export const chat = async (chatMsg) => {
try {
const novu = new Novu(process.env.YOUR_NOVU_API_KEY_HERE);
await novu.subscribers.identify(process.env.SUB_ID, {
firstName: 'newSubForDiscordChat',
});
await novu.subscribers.setCredentials(process.env.SUB_ID, ChatProviderIdEnum.Discord, {
webhookUrl: process.env.WEBHOOK_URL
});
await novu.trigger('chat-with-discord', {
to: {
subscriberId: process.env.SUB_ID
},
payload: {
chatMsg: chatMsg
}
});
} catch (error) {
console.log(error);
}
}
```
We're keeping all the sensitive data in a `.env` file to avoid hardcoding as a good practice
In this code snippet above, we're first initializing a new instance of Novu, then using it to 'identify' or [create](https://docs.novu.co/subscribers/subscribers#create-a-subscriber) a [subscriber](https://docs.novu.co/subscribers/subscribers).
The 'identify' method tries to find a subscriber with the given info. If it can't find any such subscriber, it creates a new subscriber with the supplied info.
After creating the subscriber, it runs the trigger code for the workflow we had created.
# Front end set up
For our demonstration purposes, the front-end is pretty basic. All we have to do is have an input field to take the notification text in and send the payload. The front-end code for this demo app is available on our [Github repo](https://github.com/novuhq/discord-chat-app/tree/main/frontend).
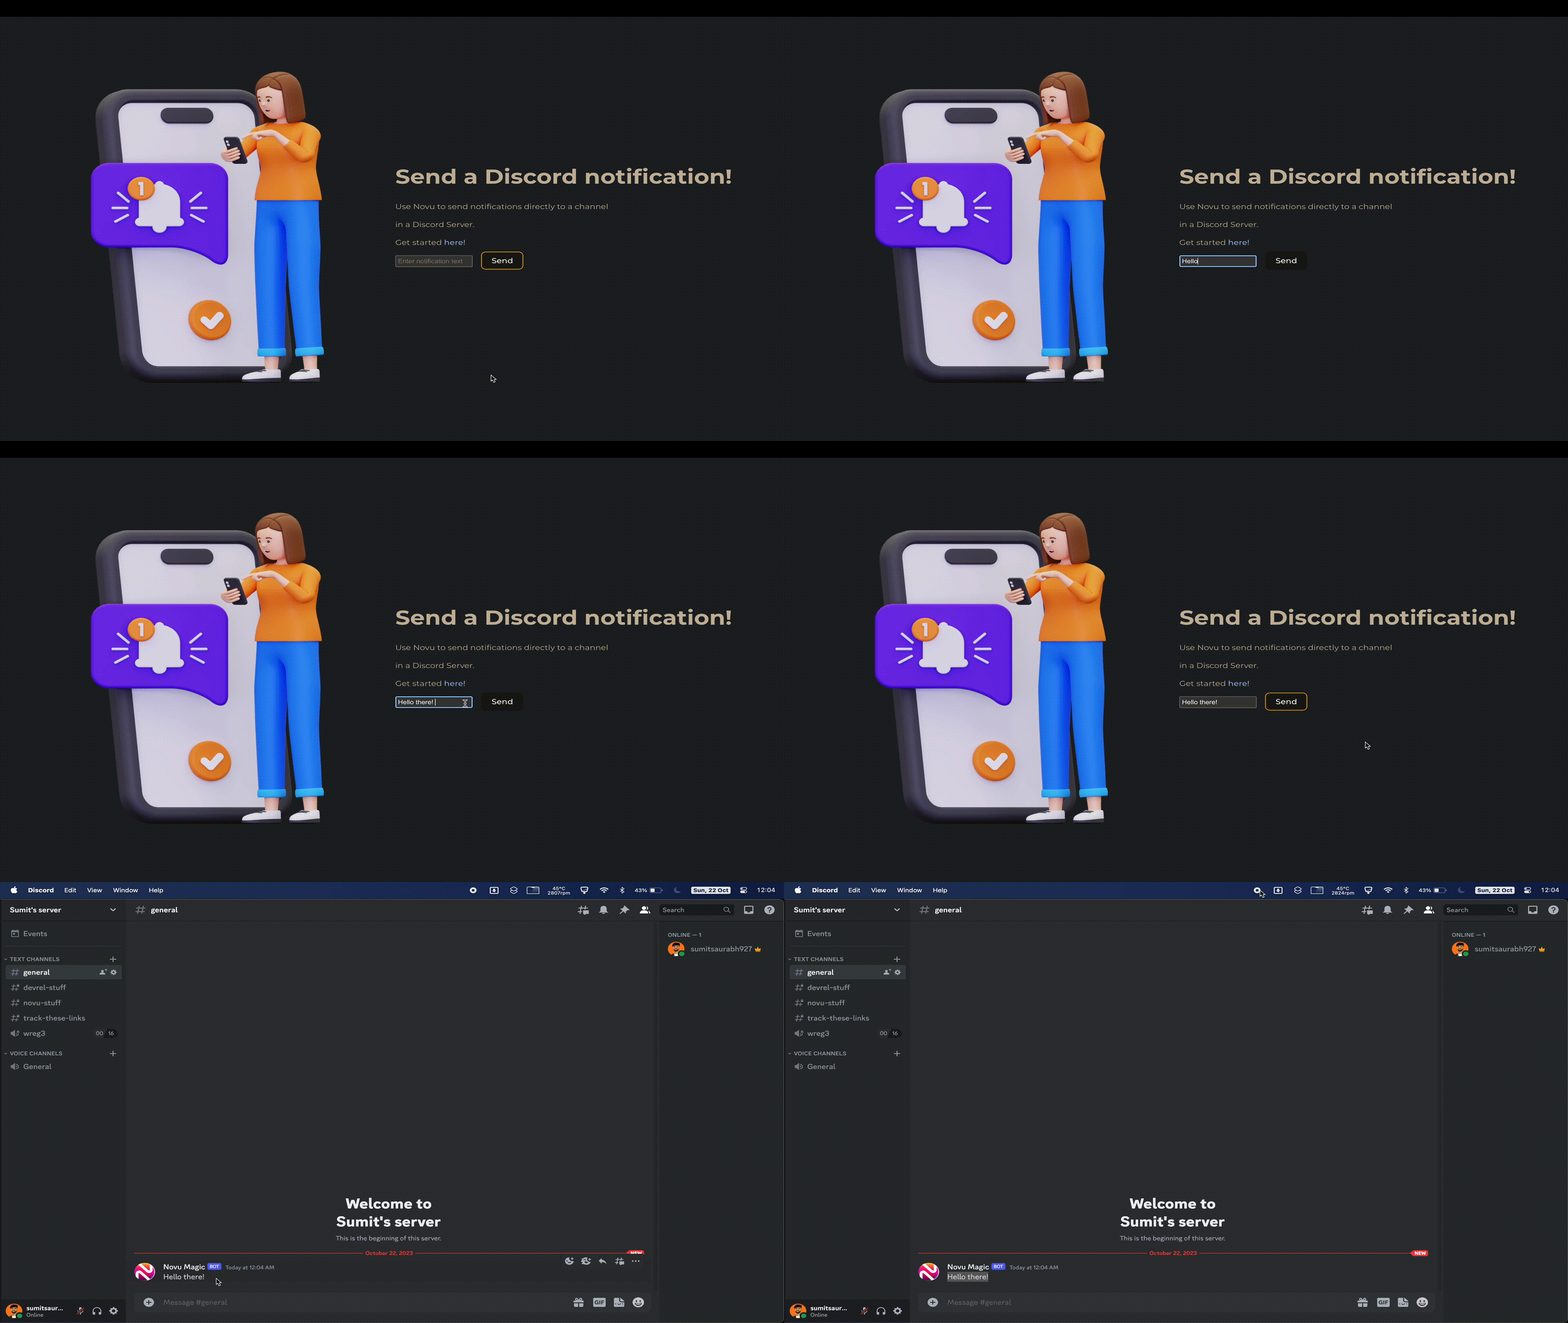
And here's our app in all its glory!
Now, we've completed all the setup required and can move to coding!
# Create the backend
The backend for this app is quite simple. Simply install the Novu package:
```bash theme={null}
npm install @novu/node
```
Now, create a route that you'll hit when called from the front end. For our demo app, this is the route I've created:
```jsx theme={null}
import express from "express";
import { chatController } from "../controller/chat.js";
const router = express.Router();
router.post("/sendChat",chatController);
export default router;
```
Now, we need a controller function to handle what is to be sent in the trigger's function payload. Here's the controller I wrote:
```jsx theme={null}
import { chat } from "../novu/novu.js"
export const chatController = async (req, res) => {
const { chatMsg } = req.body;
try {
await chat(chatMsg);
res.status(201).json({ message: "Message sent successfully" });
} catch (error) {
console.log("notifController error:", error);
res.status(500).json({ message: error.message })
}
}
```
Notice how we're expecting 'chatMsg' in our payload. This is why we added it as a variable in the workflow created earlier.
To make it modular, we’ll keep the trigger code in a separate function in a separate file, `novu.js`, in our case, which is as follows:
```jsx theme={null}
import { Novu, ChatProviderIdEnum } from '@novu/node';
export const chat = async (chatMsg) => {
try {
const novu = new Novu(process.env.YOUR_NOVU_API_KEY_HERE);
await novu.subscribers.identify(process.env.SUB_ID, {
firstName: 'newSubForDiscordChat',
});
await novu.subscribers.setCredentials(process.env.SUB_ID, ChatProviderIdEnum.Discord, {
webhookUrl: process.env.WEBHOOK_URL
});
} catch (error) {
console.log(error);
}
}
```
Add the trigger code you'd copied earlier:
```jsx theme={null}
import { Novu } from '@novu/node';
const novu = new Novu('');
novu.trigger('chat-with-discord', {
to: {
subscriberId: ''
},
payload: {
chatMsg: ''
}
});
```
Our final trigger code should look something like this:
```jsx theme={null}
import { Novu, ChatProviderIdEnum } from '@novu/node';
export const chat = async (chatMsg) => {
try {
const novu = new Novu(process.env.YOUR_NOVU_API_KEY_HERE);
await novu.subscribers.identify(process.env.SUB_ID, {
firstName: 'newSubForDiscordChat',
});
await novu.subscribers.setCredentials(process.env.SUB_ID, ChatProviderIdEnum.Discord, {
webhookUrl: process.env.WEBHOOK_URL
});
await novu.trigger('chat-with-discord', {
to: {
subscriberId: process.env.SUB_ID
},
payload: {
chatMsg: chatMsg
}
});
} catch (error) {
console.log(error);
}
}
```
We're keeping all the sensitive data in a `.env` file to avoid hardcoding as a good practice
In this code snippet above, we're first initializing a new instance of Novu, then using it to 'identify' or [create](https://docs.novu.co/subscribers/subscribers#create-a-subscriber) a [subscriber](https://docs.novu.co/subscribers/subscribers).
The 'identify' method tries to find a subscriber with the given info. If it can't find any such subscriber, it creates a new subscriber with the supplied info.
After creating the subscriber, it runs the trigger code for the workflow we had created.
# Front end set up
For our demonstration purposes, the front-end is pretty basic. All we have to do is have an input field to take the notification text in and send the payload. The front-end code for this demo app is available on our [Github repo](https://github.com/novuhq/discord-chat-app/tree/main/frontend).
And here's our app in all its glory!
 This is how we send Discord notifications using Novu!