> ## Documentation Index
> Fetch the complete documentation index at: https://v0.x-docs.novu.co/llms.txt
> Use this file to discover all available pages before exploring further.
# How to send web push notifications with FCM and Novu
> Send FCM push notifications in a React app using Novu
## Introduction
In this guide, we'll learn how to send FCM push notifications in a web app using Novu. But before exploring the actual code, let’s understand what a push notification is and how it works.
You can find the [frontend code](https://github.com/novuhq/fcmWebPushFE) as well as [backend code](https://github.com/novuhq/FCMWebPushBE) for the app on Github.
Push notifications are notifications that are sent to a user's devices whether the user is using the app or not. We'll be using Firebase Cloud Messaging (FCM) integration of Novu to send these notifications. This guide will be broken down into three parts:
1. Setting up Novu.
2. Setting up Firebase.
3. Adding Firebase to the Frontend.
4. Adding Novu to the Backend.
## Setting up Firebase
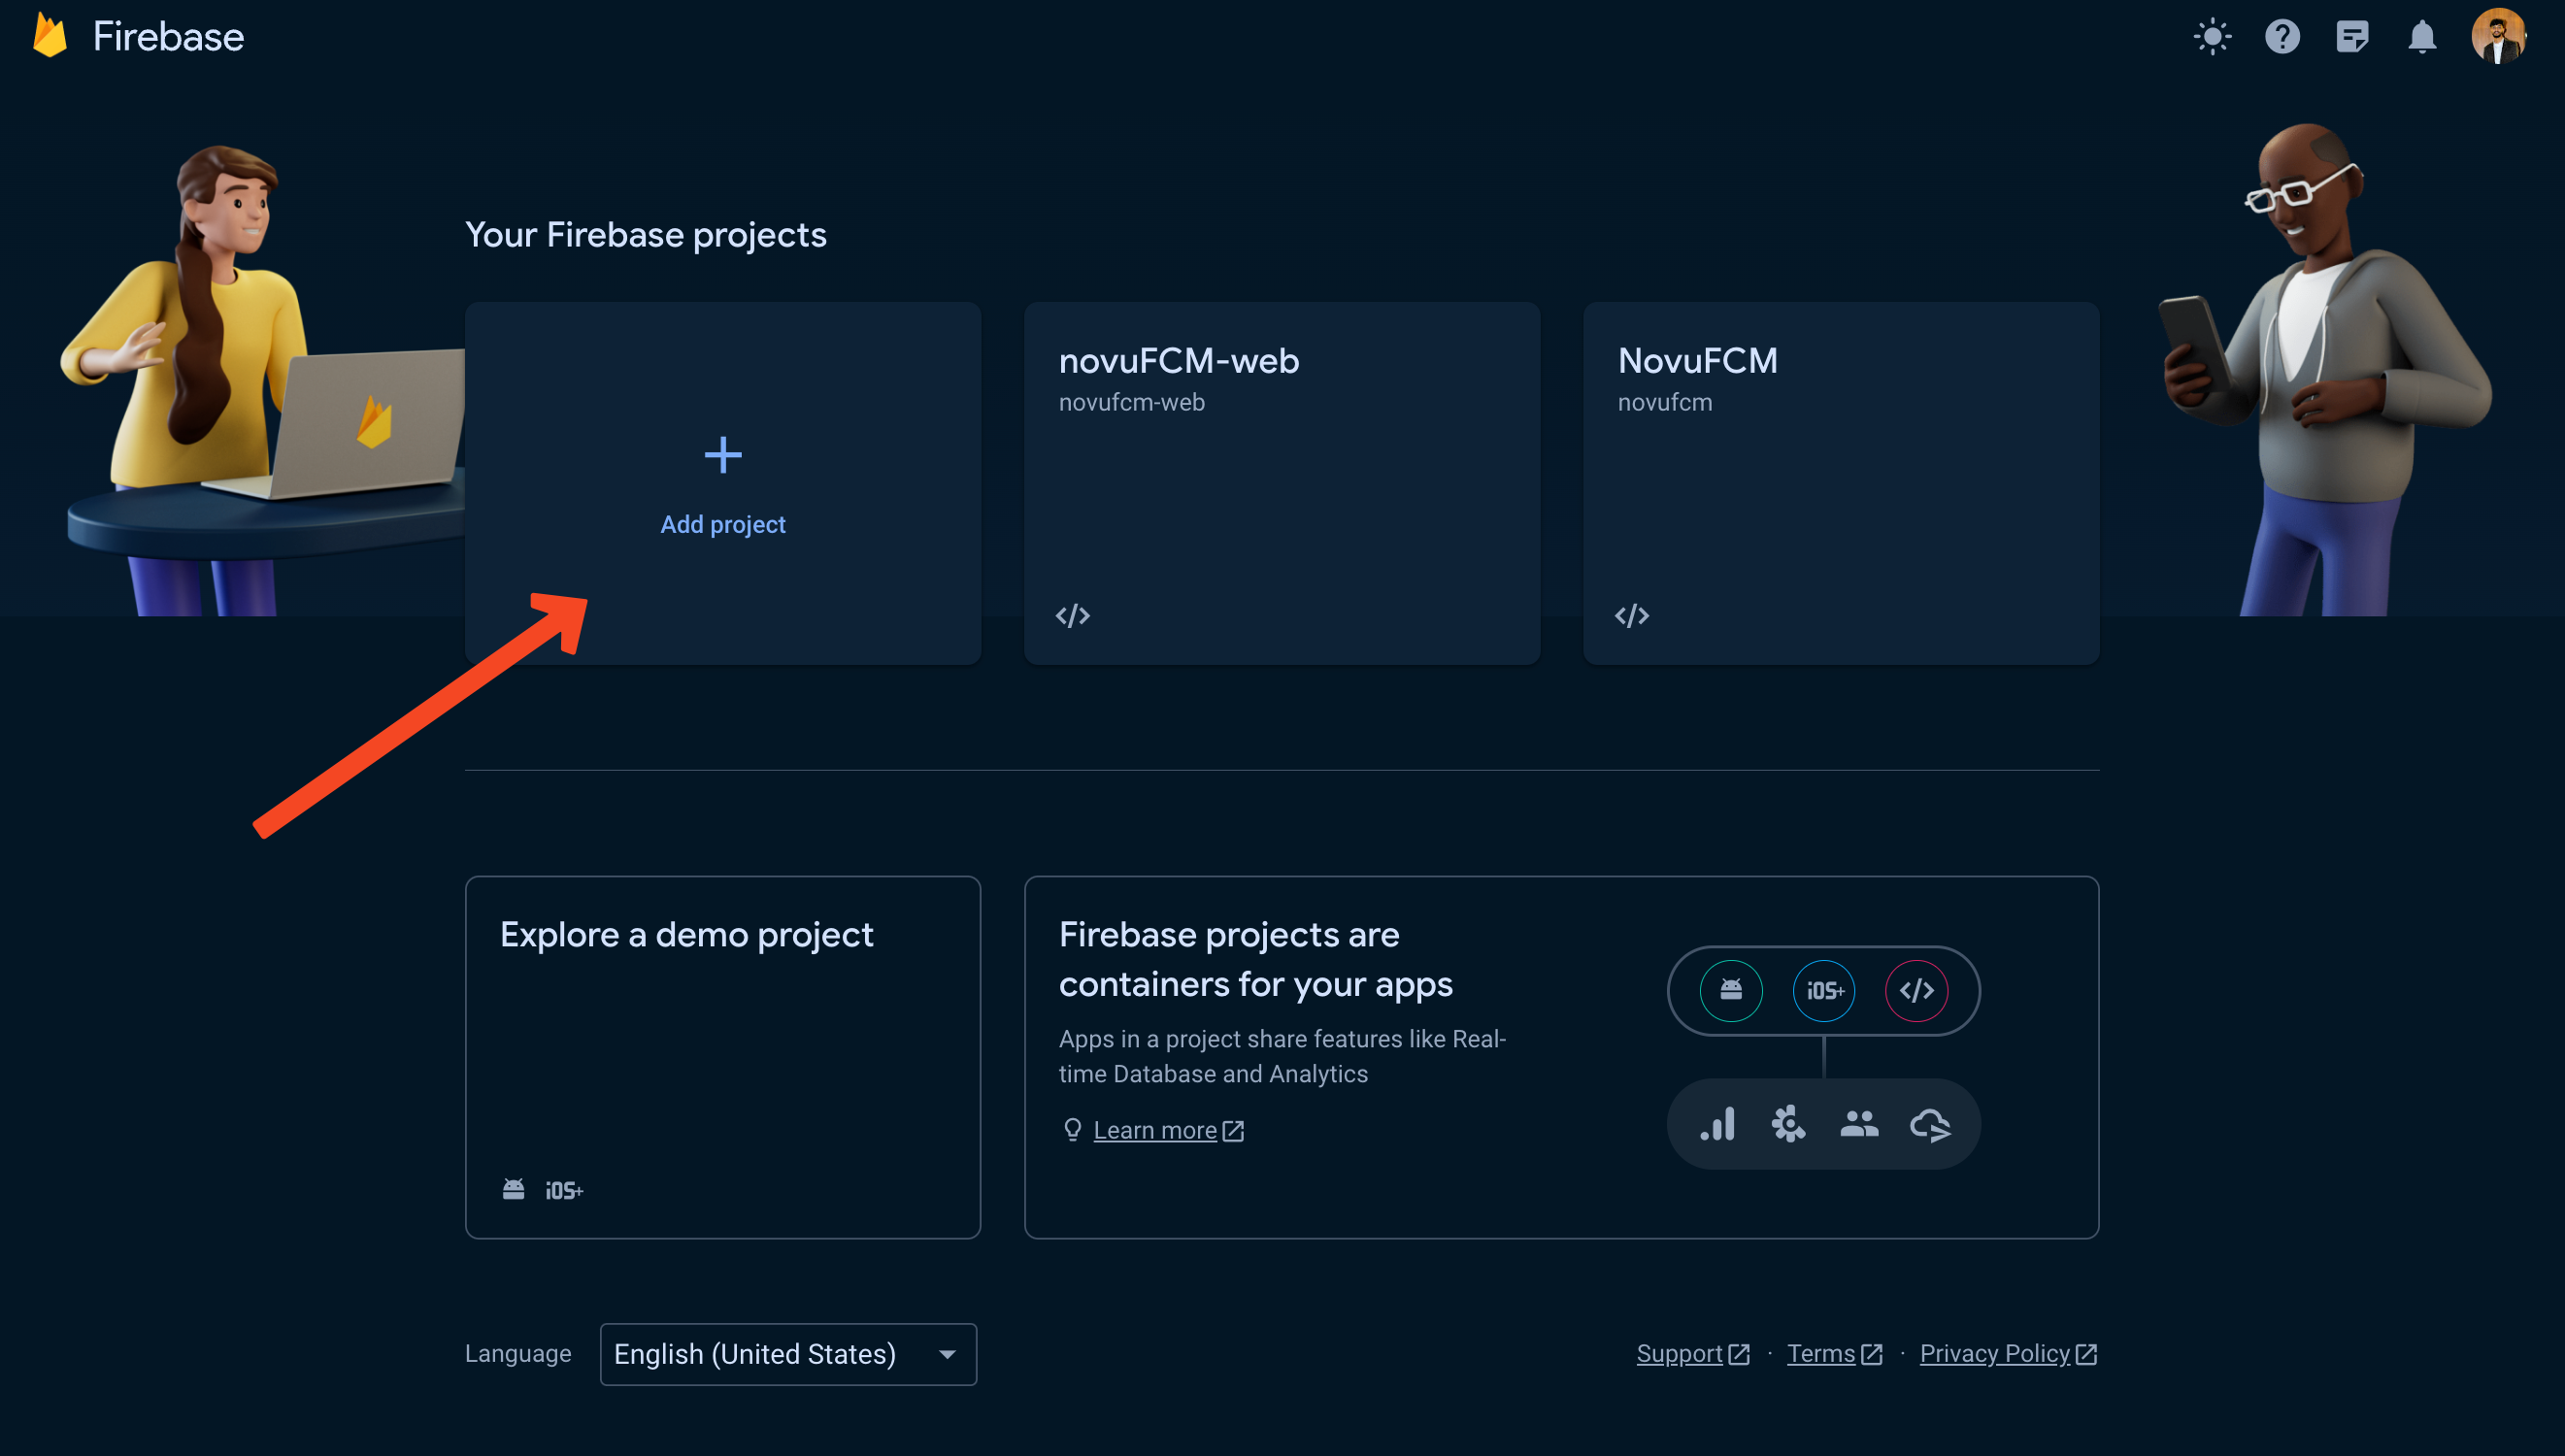
1. Create a Firebase account if you don't already have one. Then, create a new project and all the relevant details.
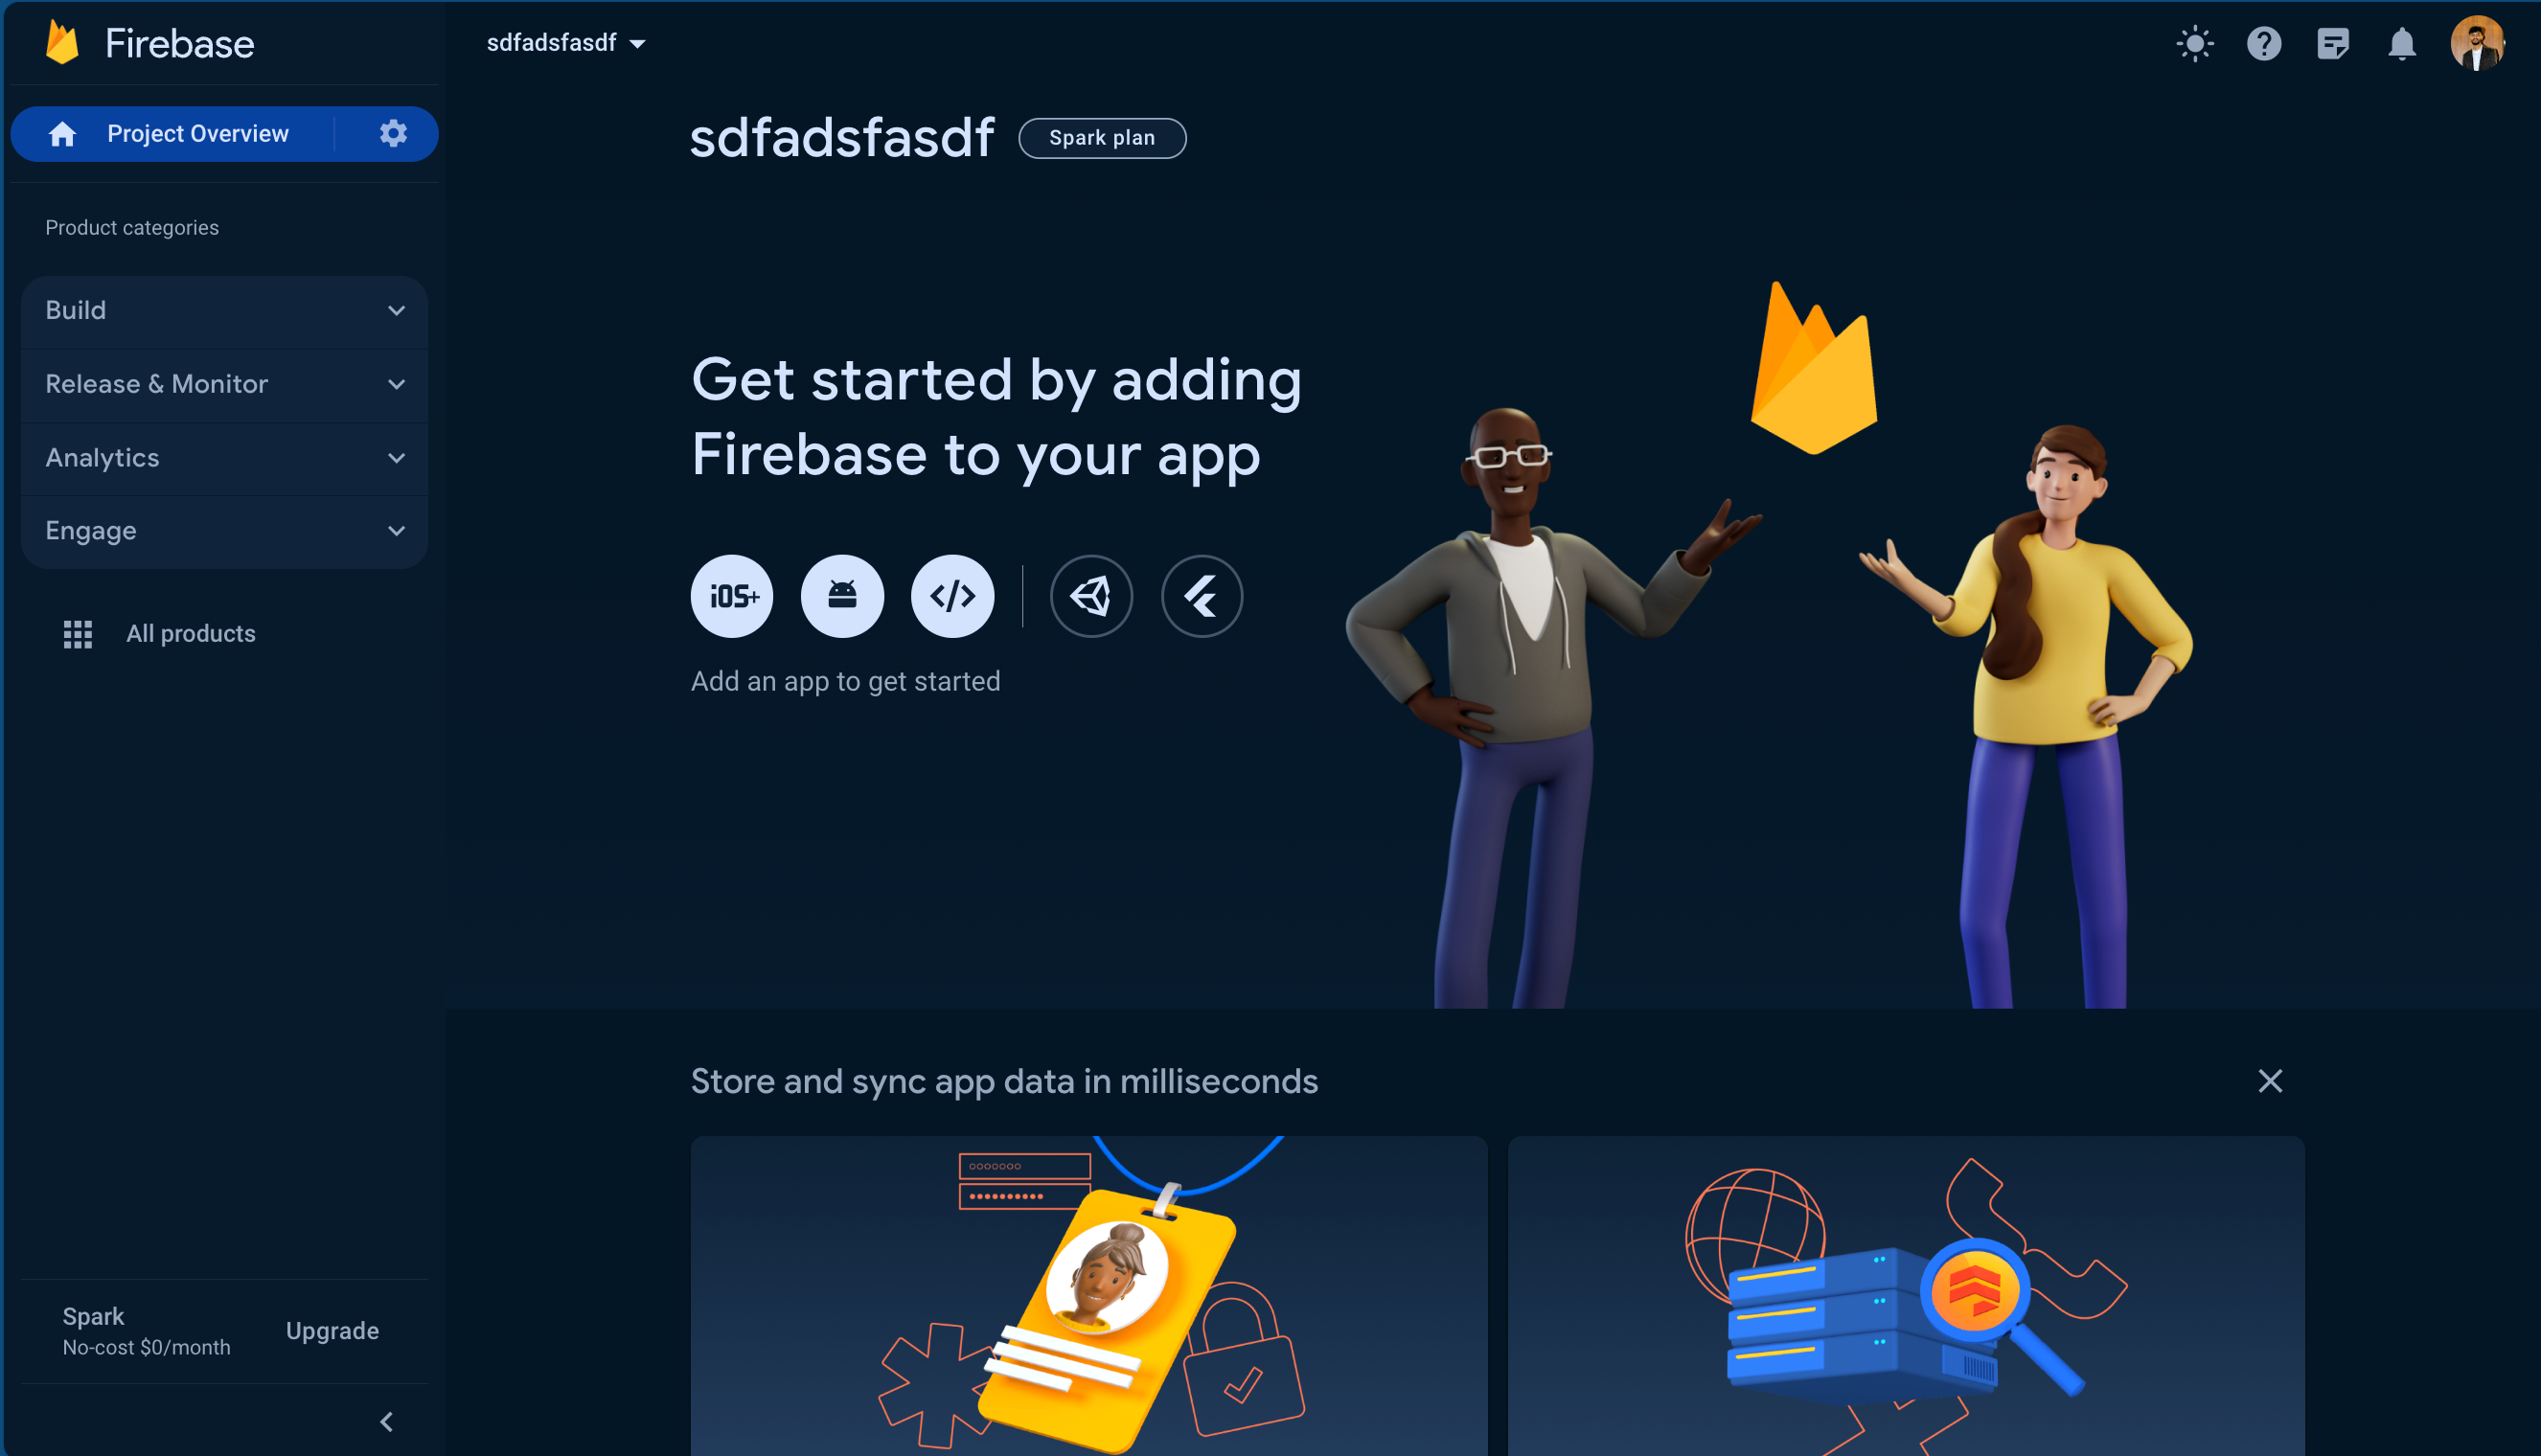
 2. Once your project has been created, you'll be greeted with this welcome screen and asked to add Firebase to your app, so let's do that.
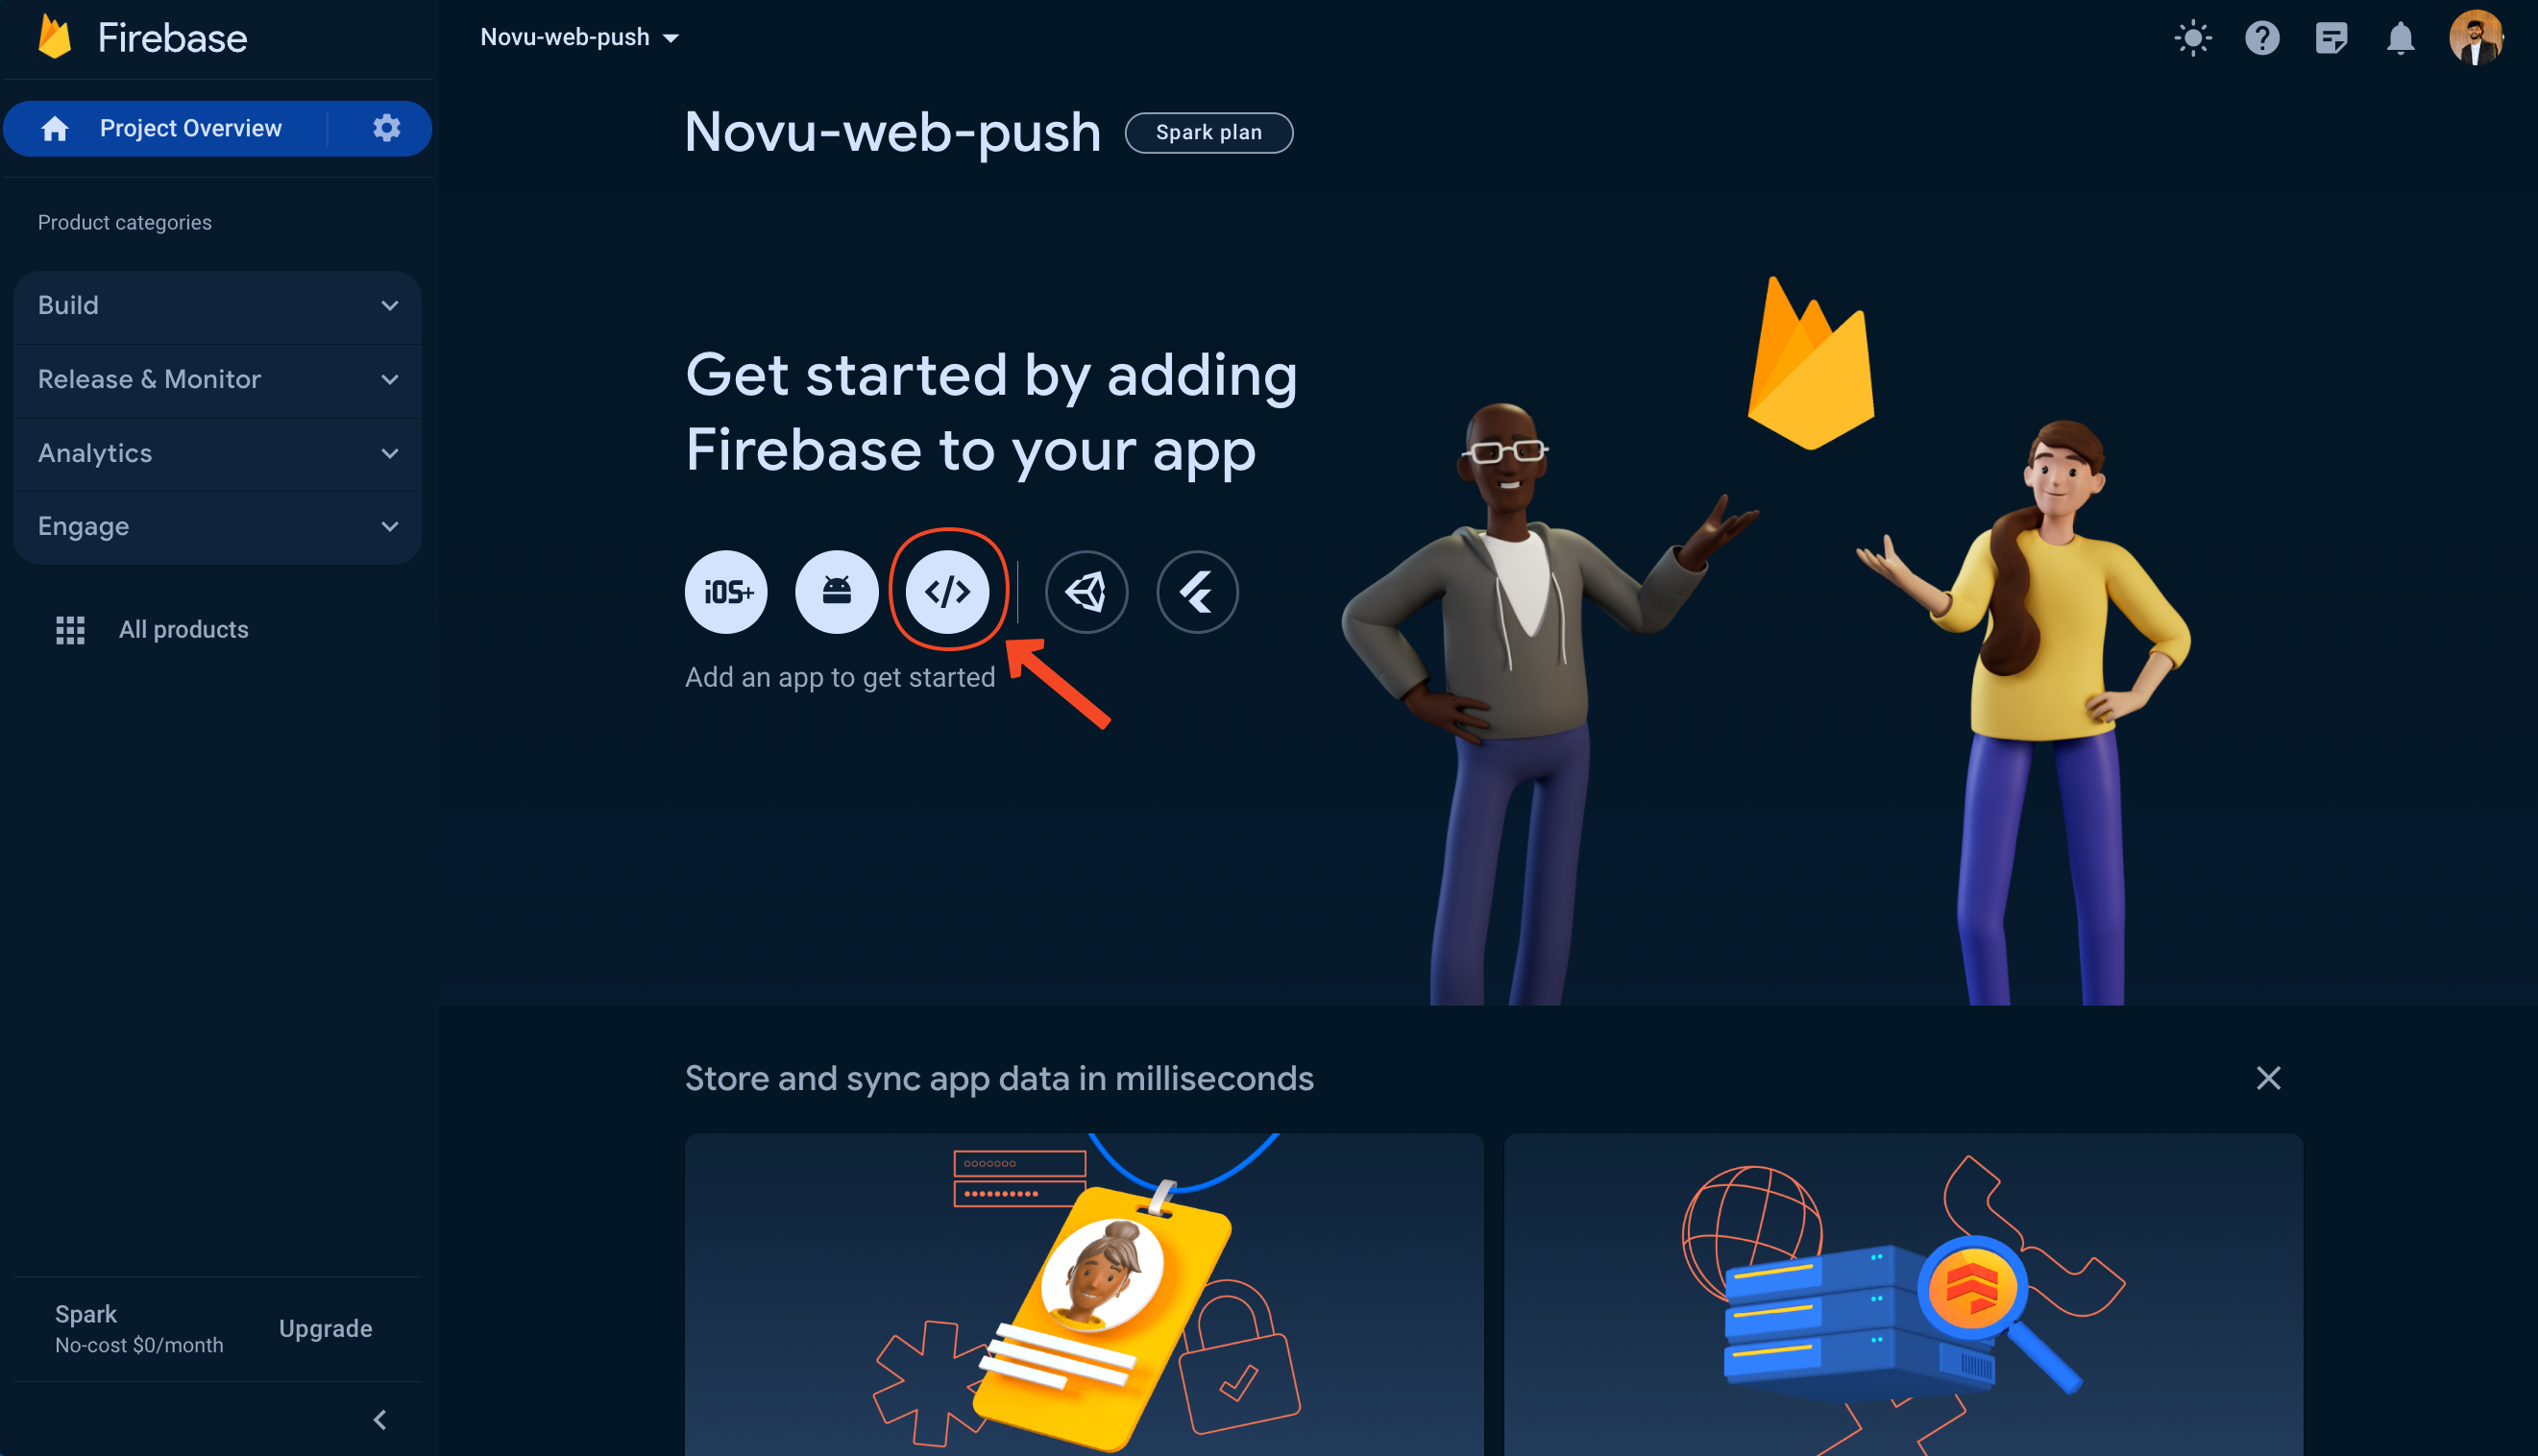
 3. We'll choose the web option because we're creating a web app.
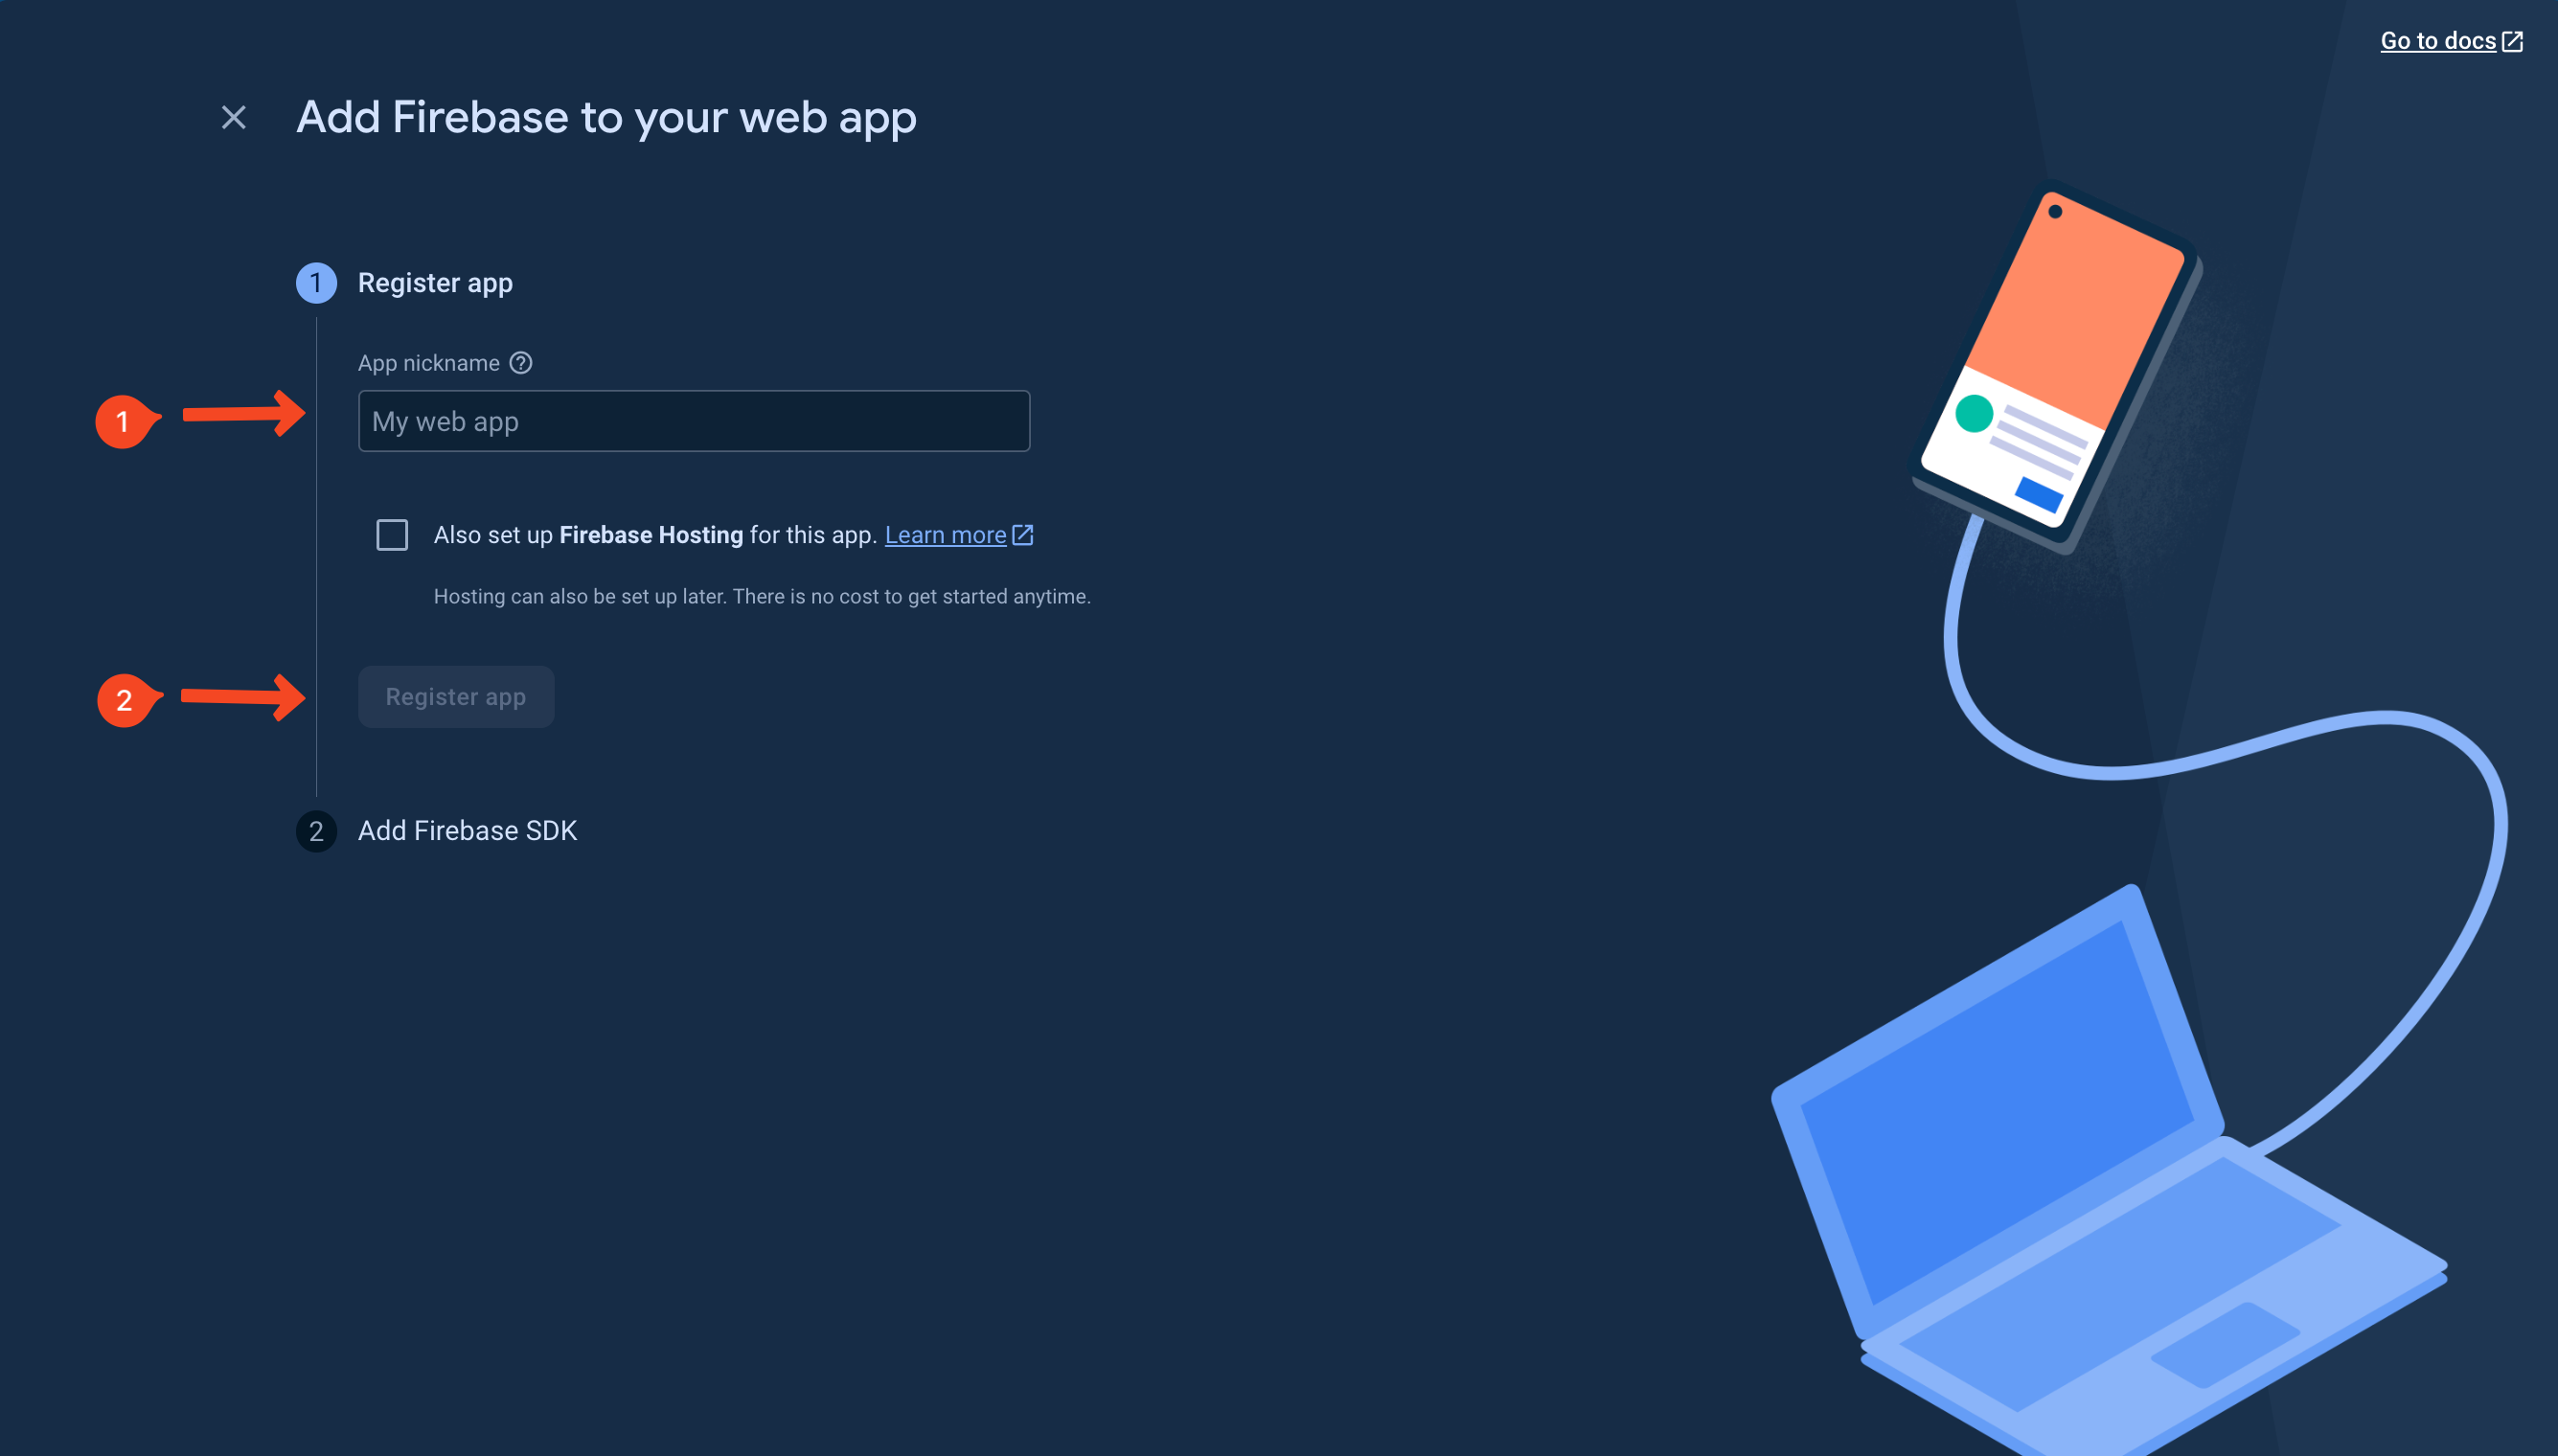
 4. Give your app a name and click on the 'Register' button.
 5. We're done with the Firebase setup! Now, we'll set up Novu and finally proceed to add both (Novu and FCM) to our app.
## Setting up Novu
We'll need a workflow to trigger notifications to our user's devices. Follow the steps below to create one to ensure we are on the path to make FCM work as expected:
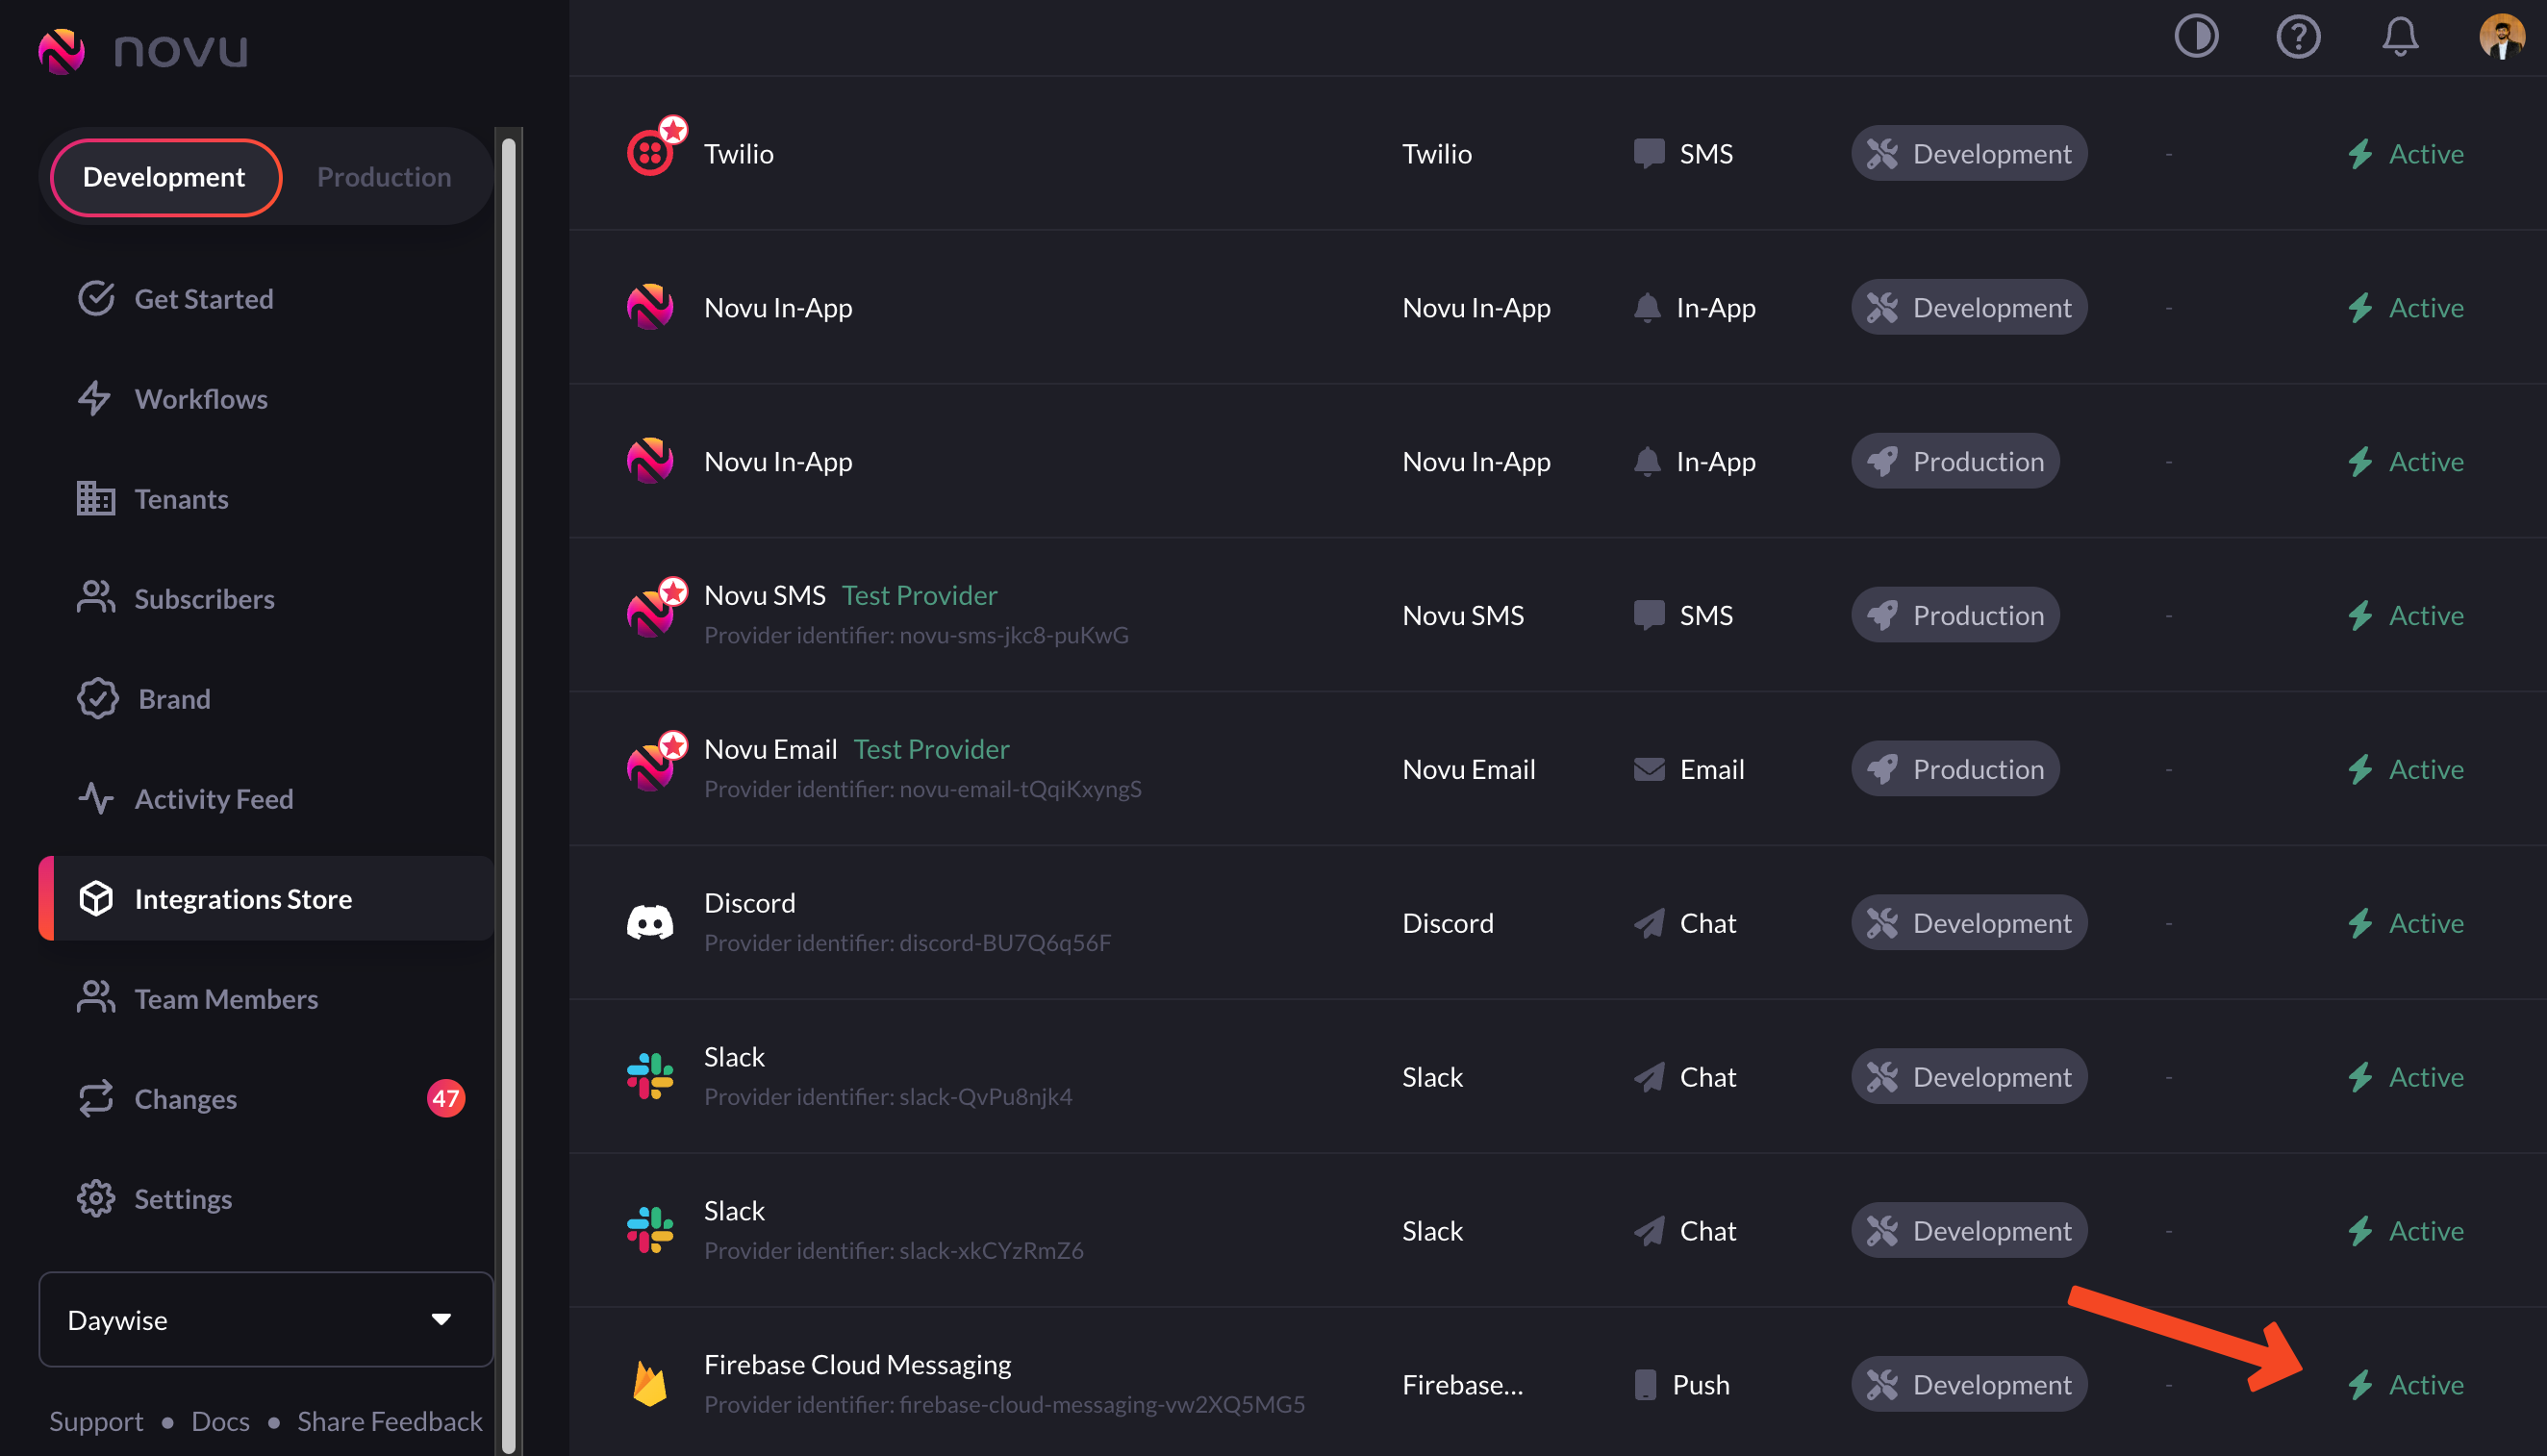
1. Head over to the [Integrations Store](https://web.novu.co/integrations?utm_campaign=docs-guides-fcm-web) on the Novu Web Dashboard and make sure that you've turned on the 'Firebase Cloud Messaging' integration.
5. We're done with the Firebase setup! Now, we'll set up Novu and finally proceed to add both (Novu and FCM) to our app.
## Setting up Novu
We'll need a workflow to trigger notifications to our user's devices. Follow the steps below to create one to ensure we are on the path to make FCM work as expected:
1. Head over to the [Integrations Store](https://web.novu.co/integrations?utm_campaign=docs-guides-fcm-web) on the Novu Web Dashboard and make sure that you've turned on the 'Firebase Cloud Messaging' integration.
 If you're doing this for the first time, you'll need to get your service account key from the [Firebase Console](https://console.firebase.google.com/). Read more about it in our [FCM provider docs.](https://docs.novu.co/channels-and-providers/push/fcm)
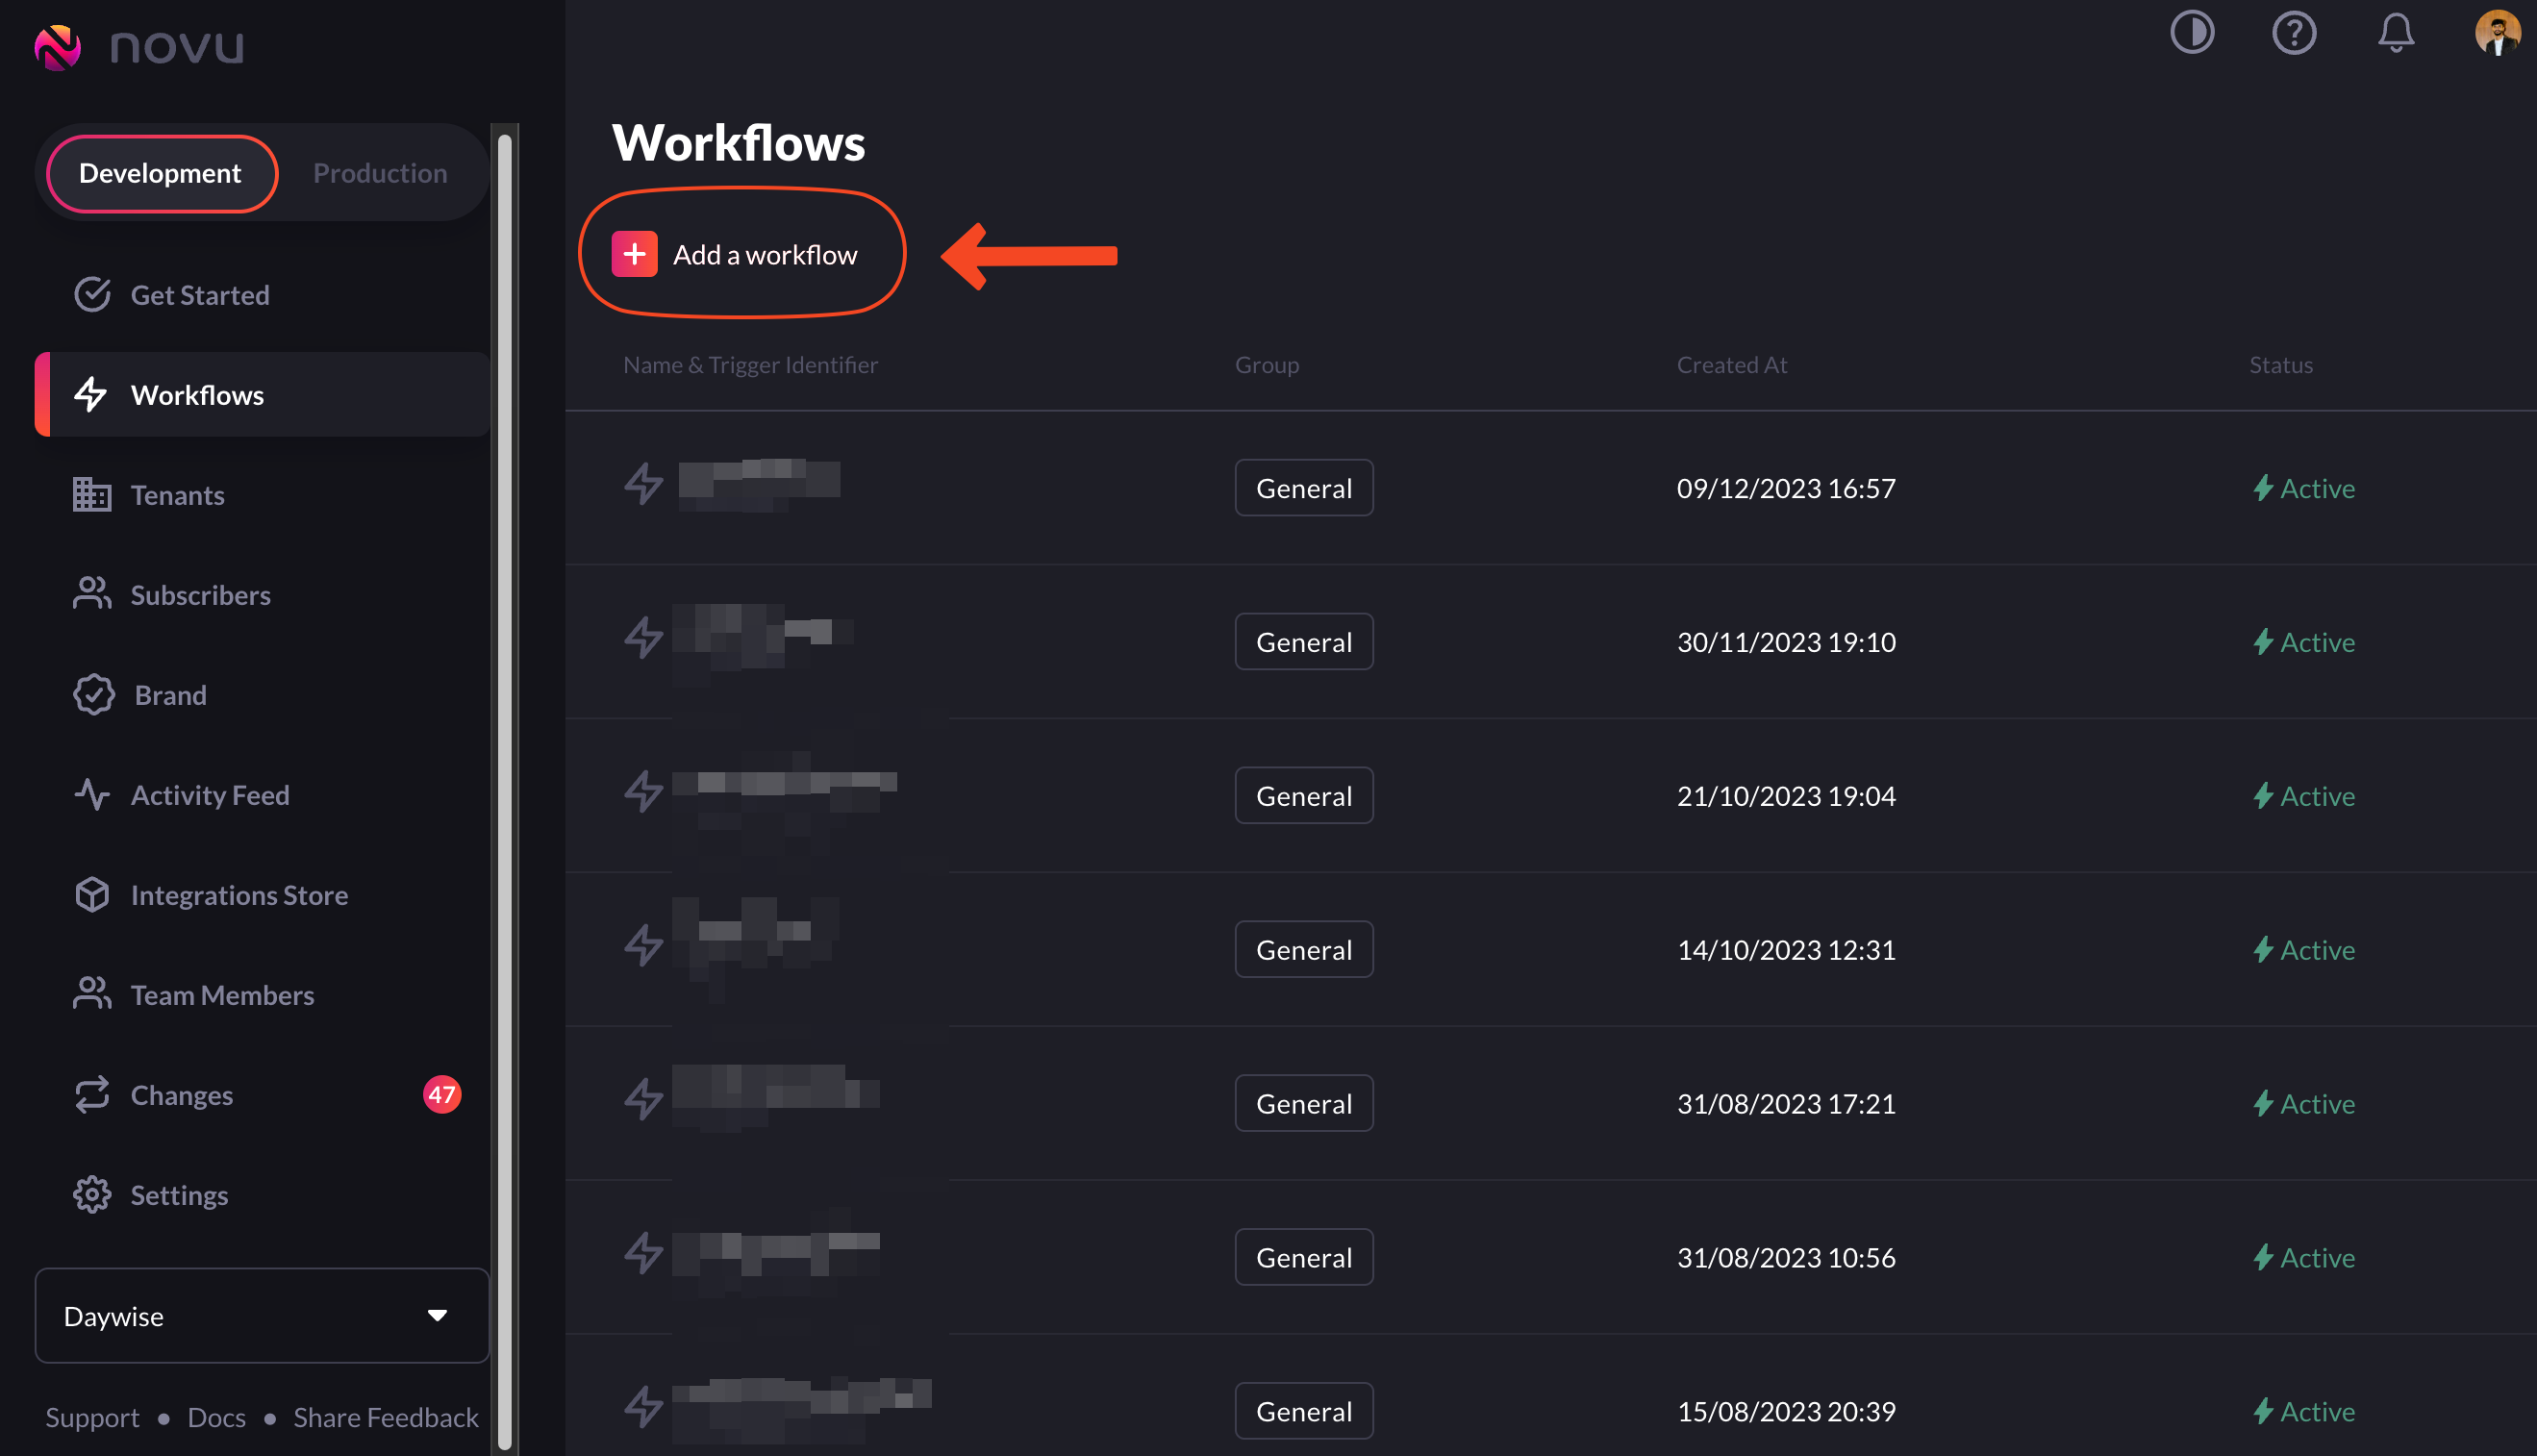
2\. Now, we need to create a workflow that we'll trigger from our app to send notifications. Head over to [workflows in the Novu Web Dashboard](https://web.novu.co/workflows?utm_campaign=docs-guides-fcm-web) and click on the 'Add a workflow' button.
If you're doing this for the first time, you'll need to get your service account key from the [Firebase Console](https://console.firebase.google.com/). Read more about it in our [FCM provider docs.](https://docs.novu.co/channels-and-providers/push/fcm)
2\. Now, we need to create a workflow that we'll trigger from our app to send notifications. Head over to [workflows in the Novu Web Dashboard](https://web.novu.co/workflows?utm_campaign=docs-guides-fcm-web) and click on the 'Add a workflow' button.
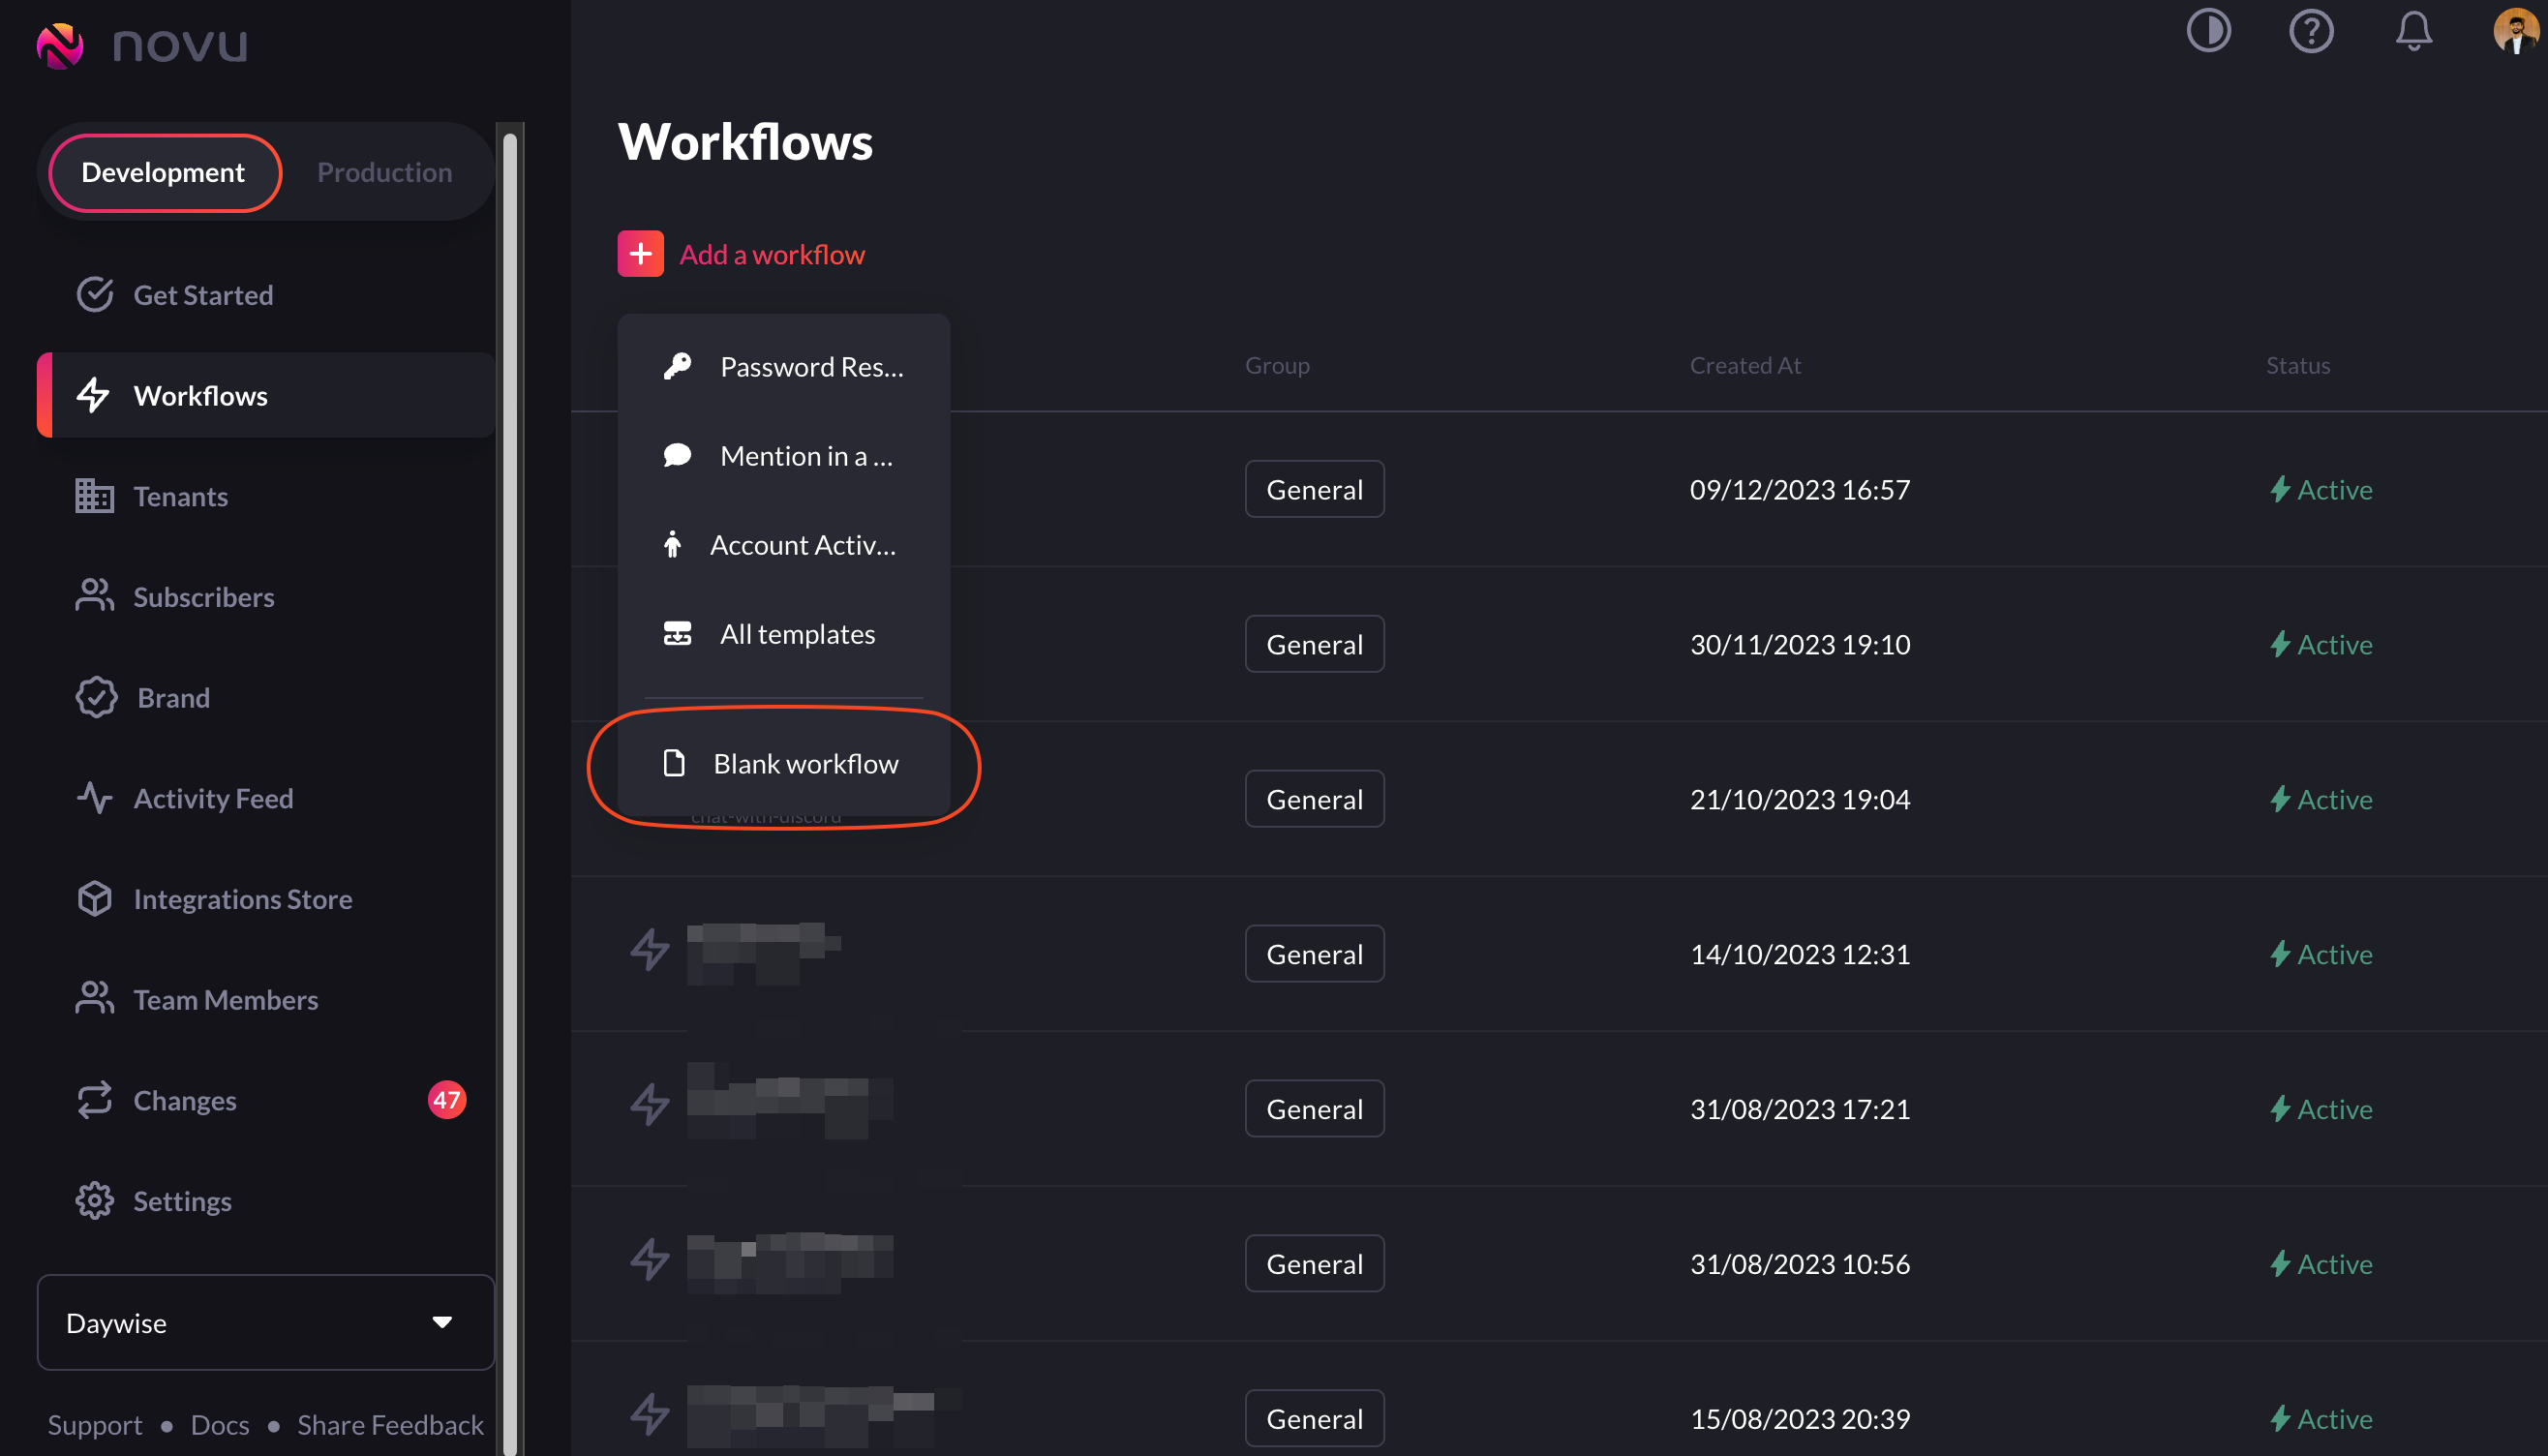
 3. Choose the 'blank workflow' option from the dropdown menu.
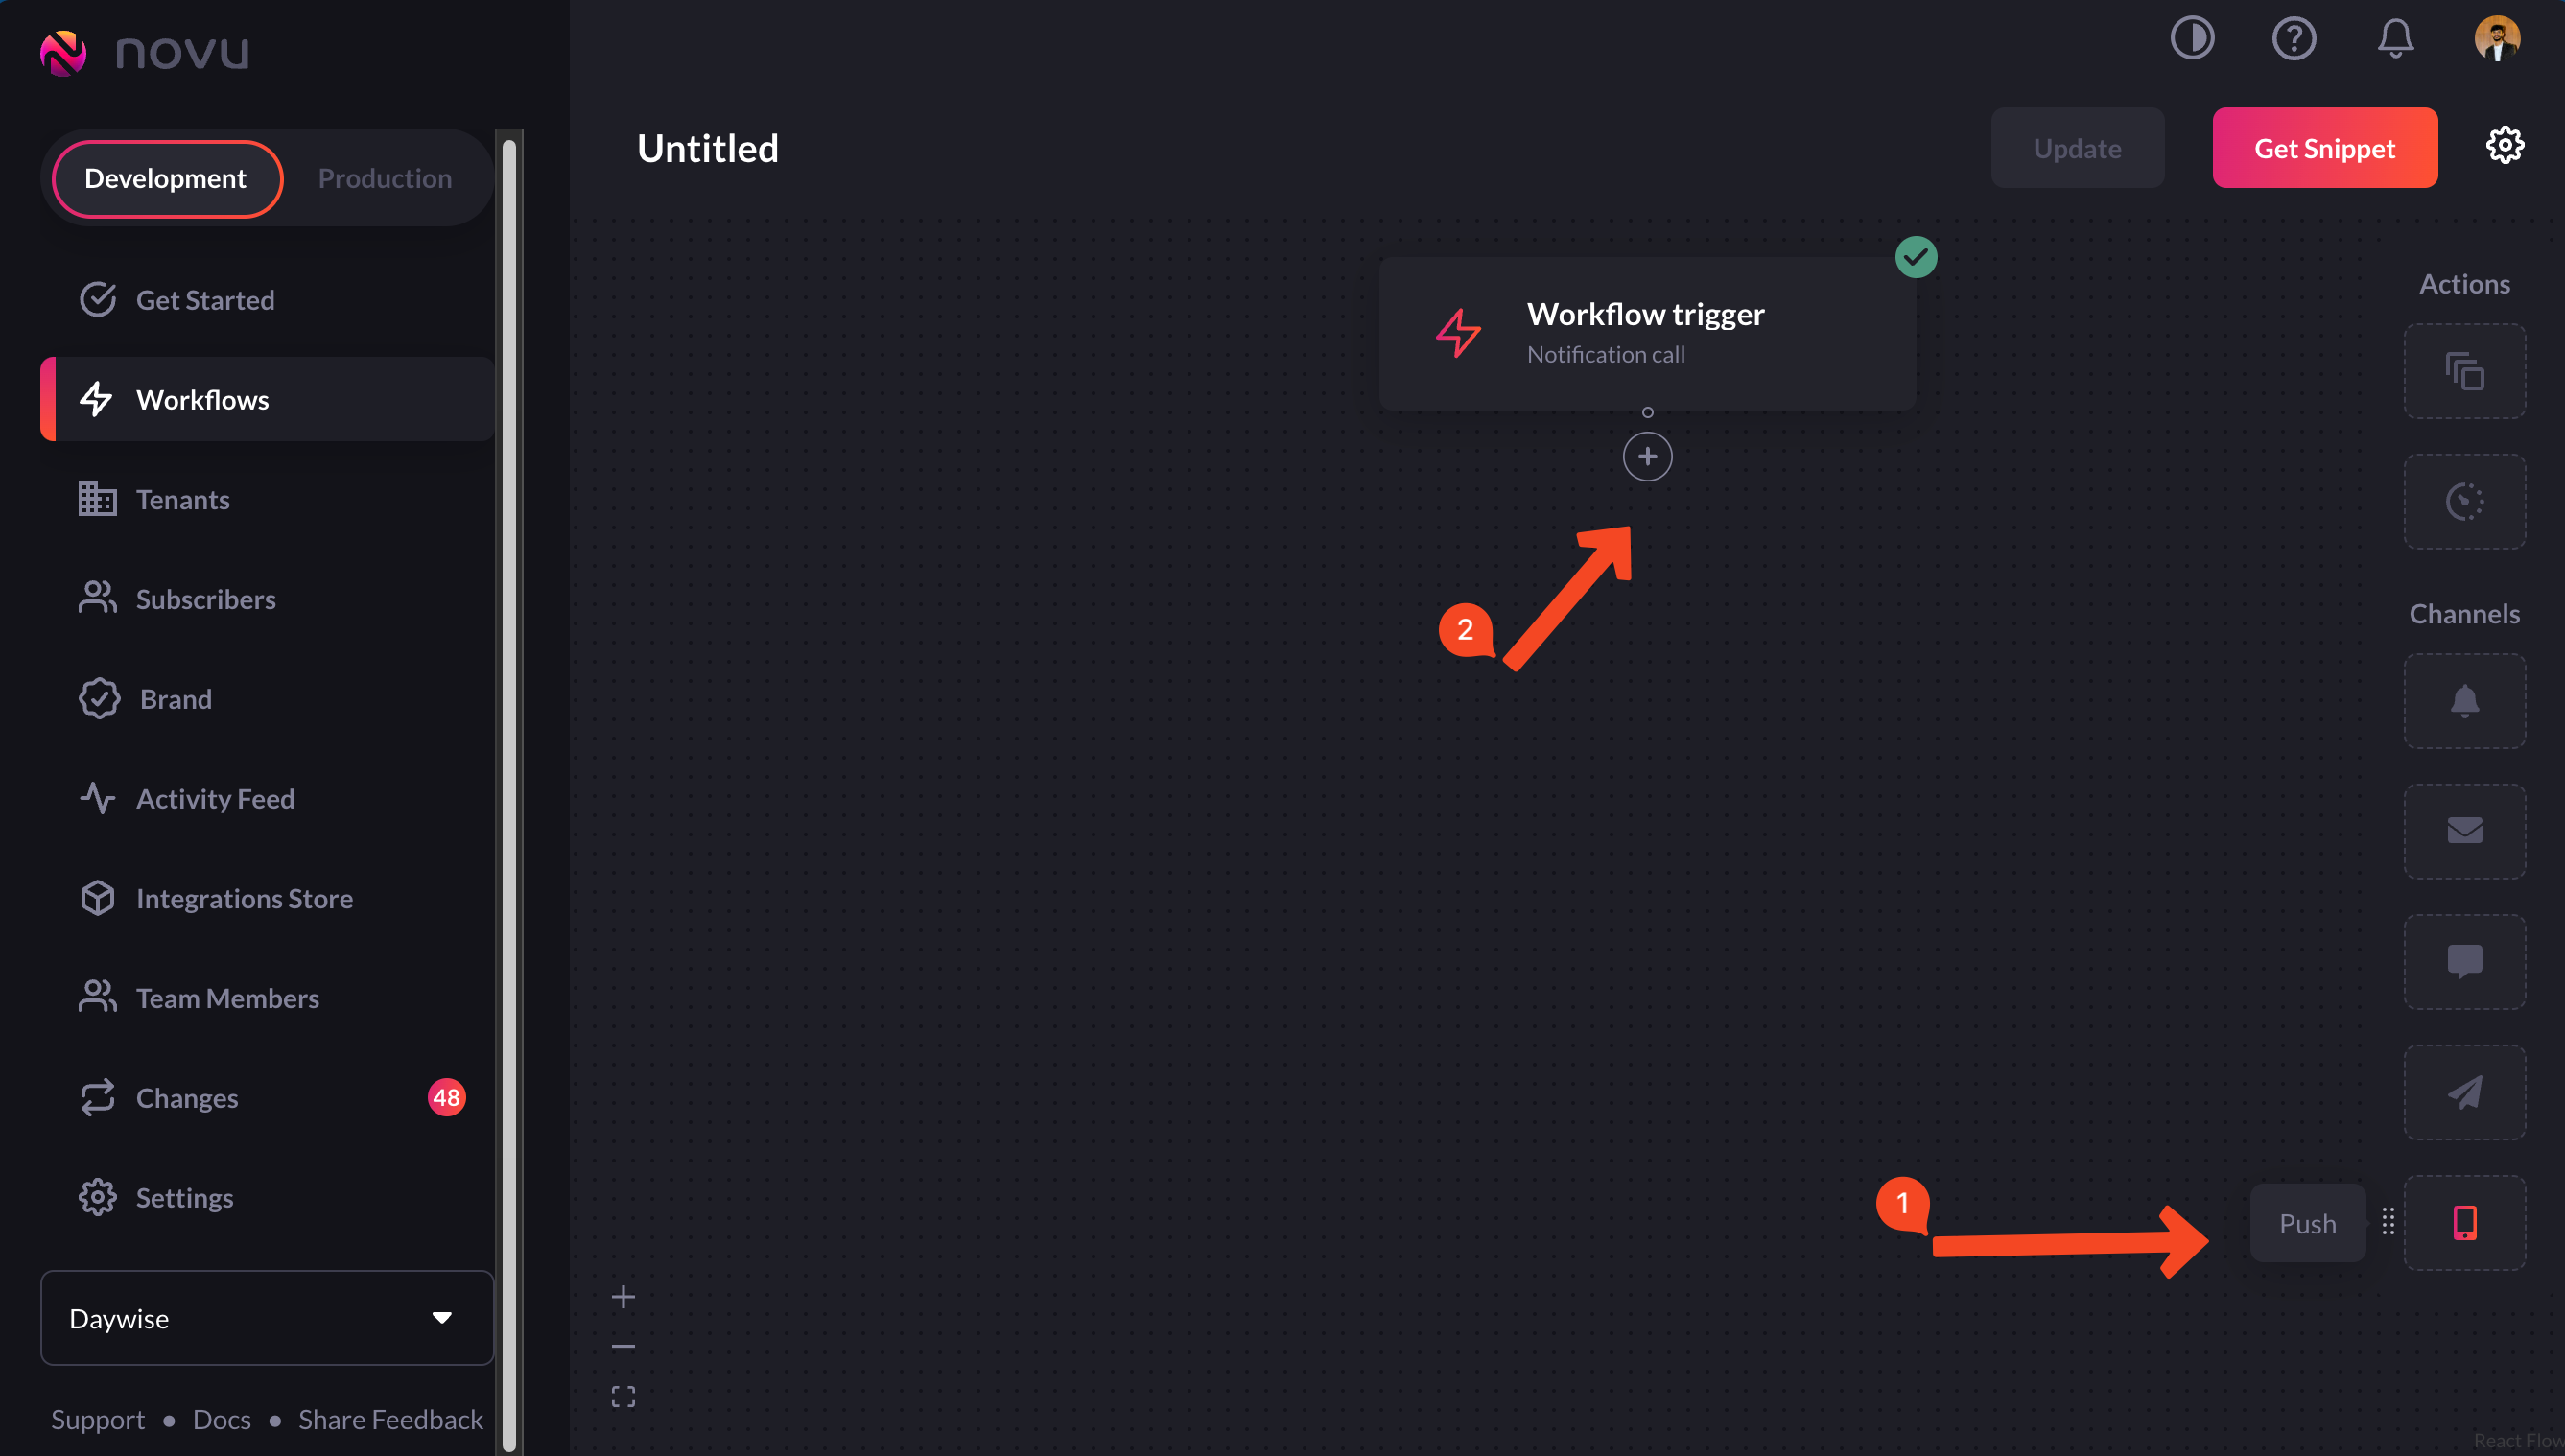
 3. Drag and drop the 'Push' node below the Workflow Trigger node.
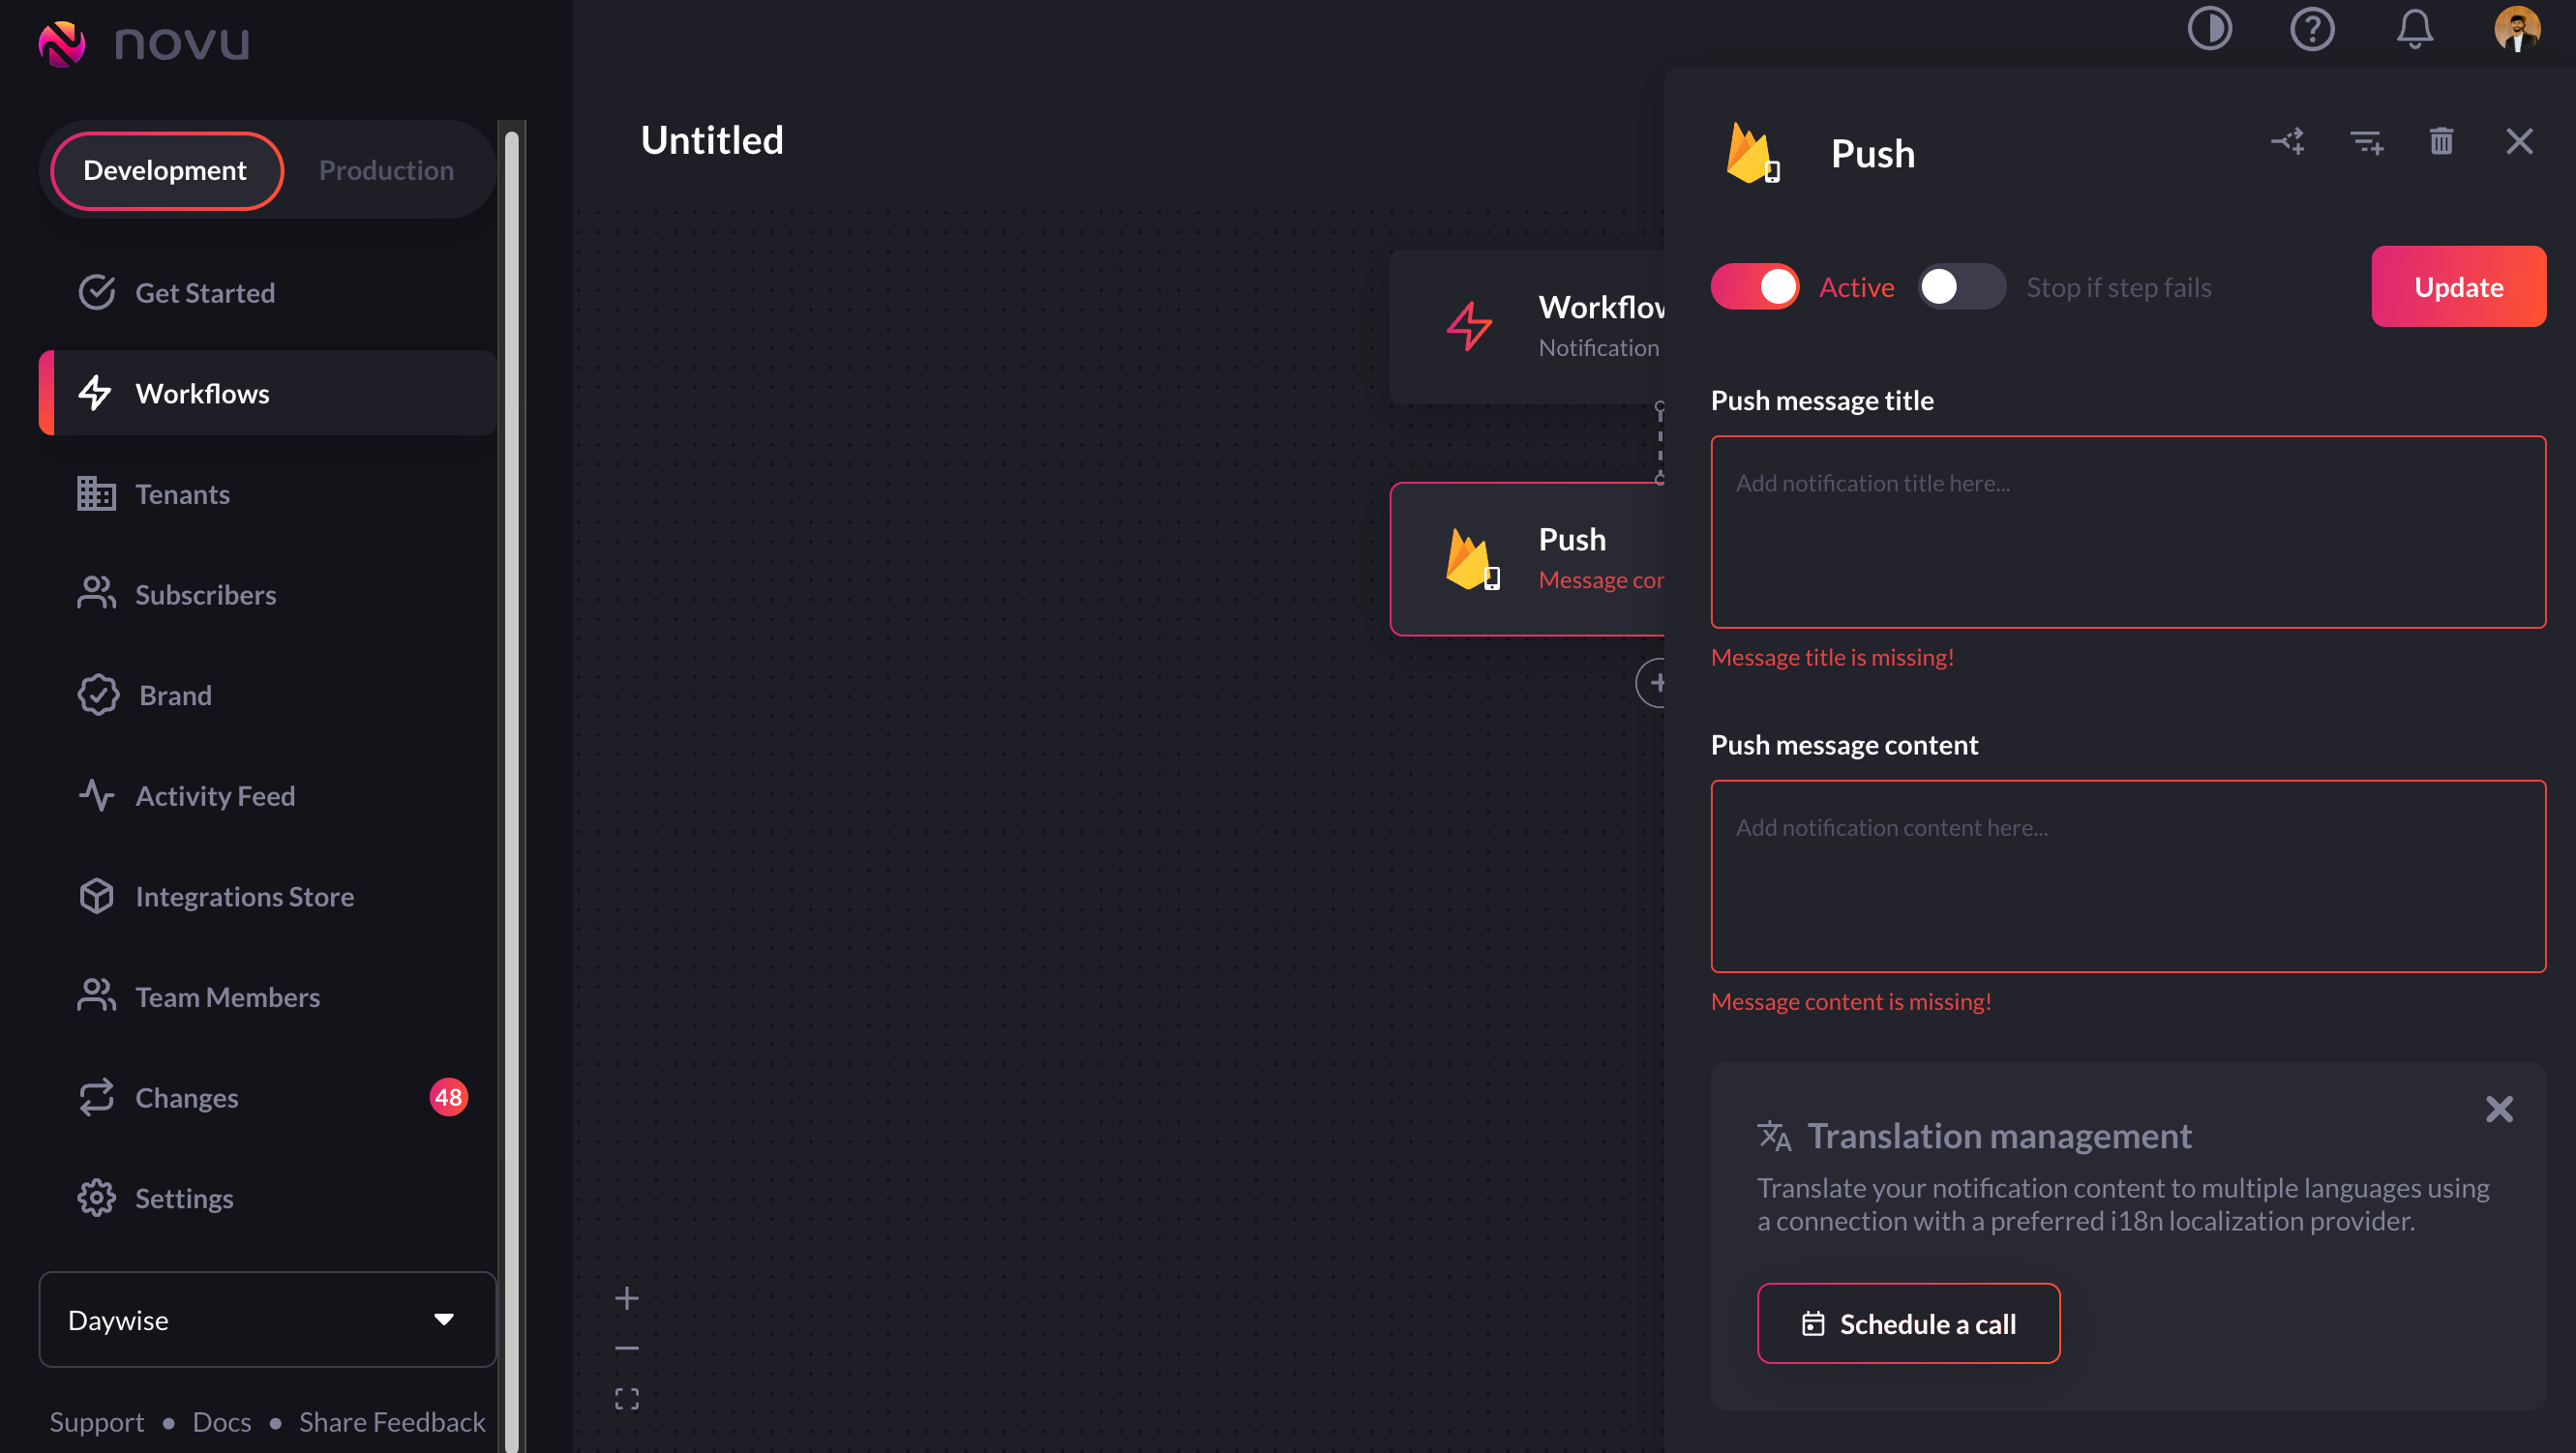
 4. If you hover over the newly added 'Push' node, you'll see an error saying 'Message content and title are missing'.
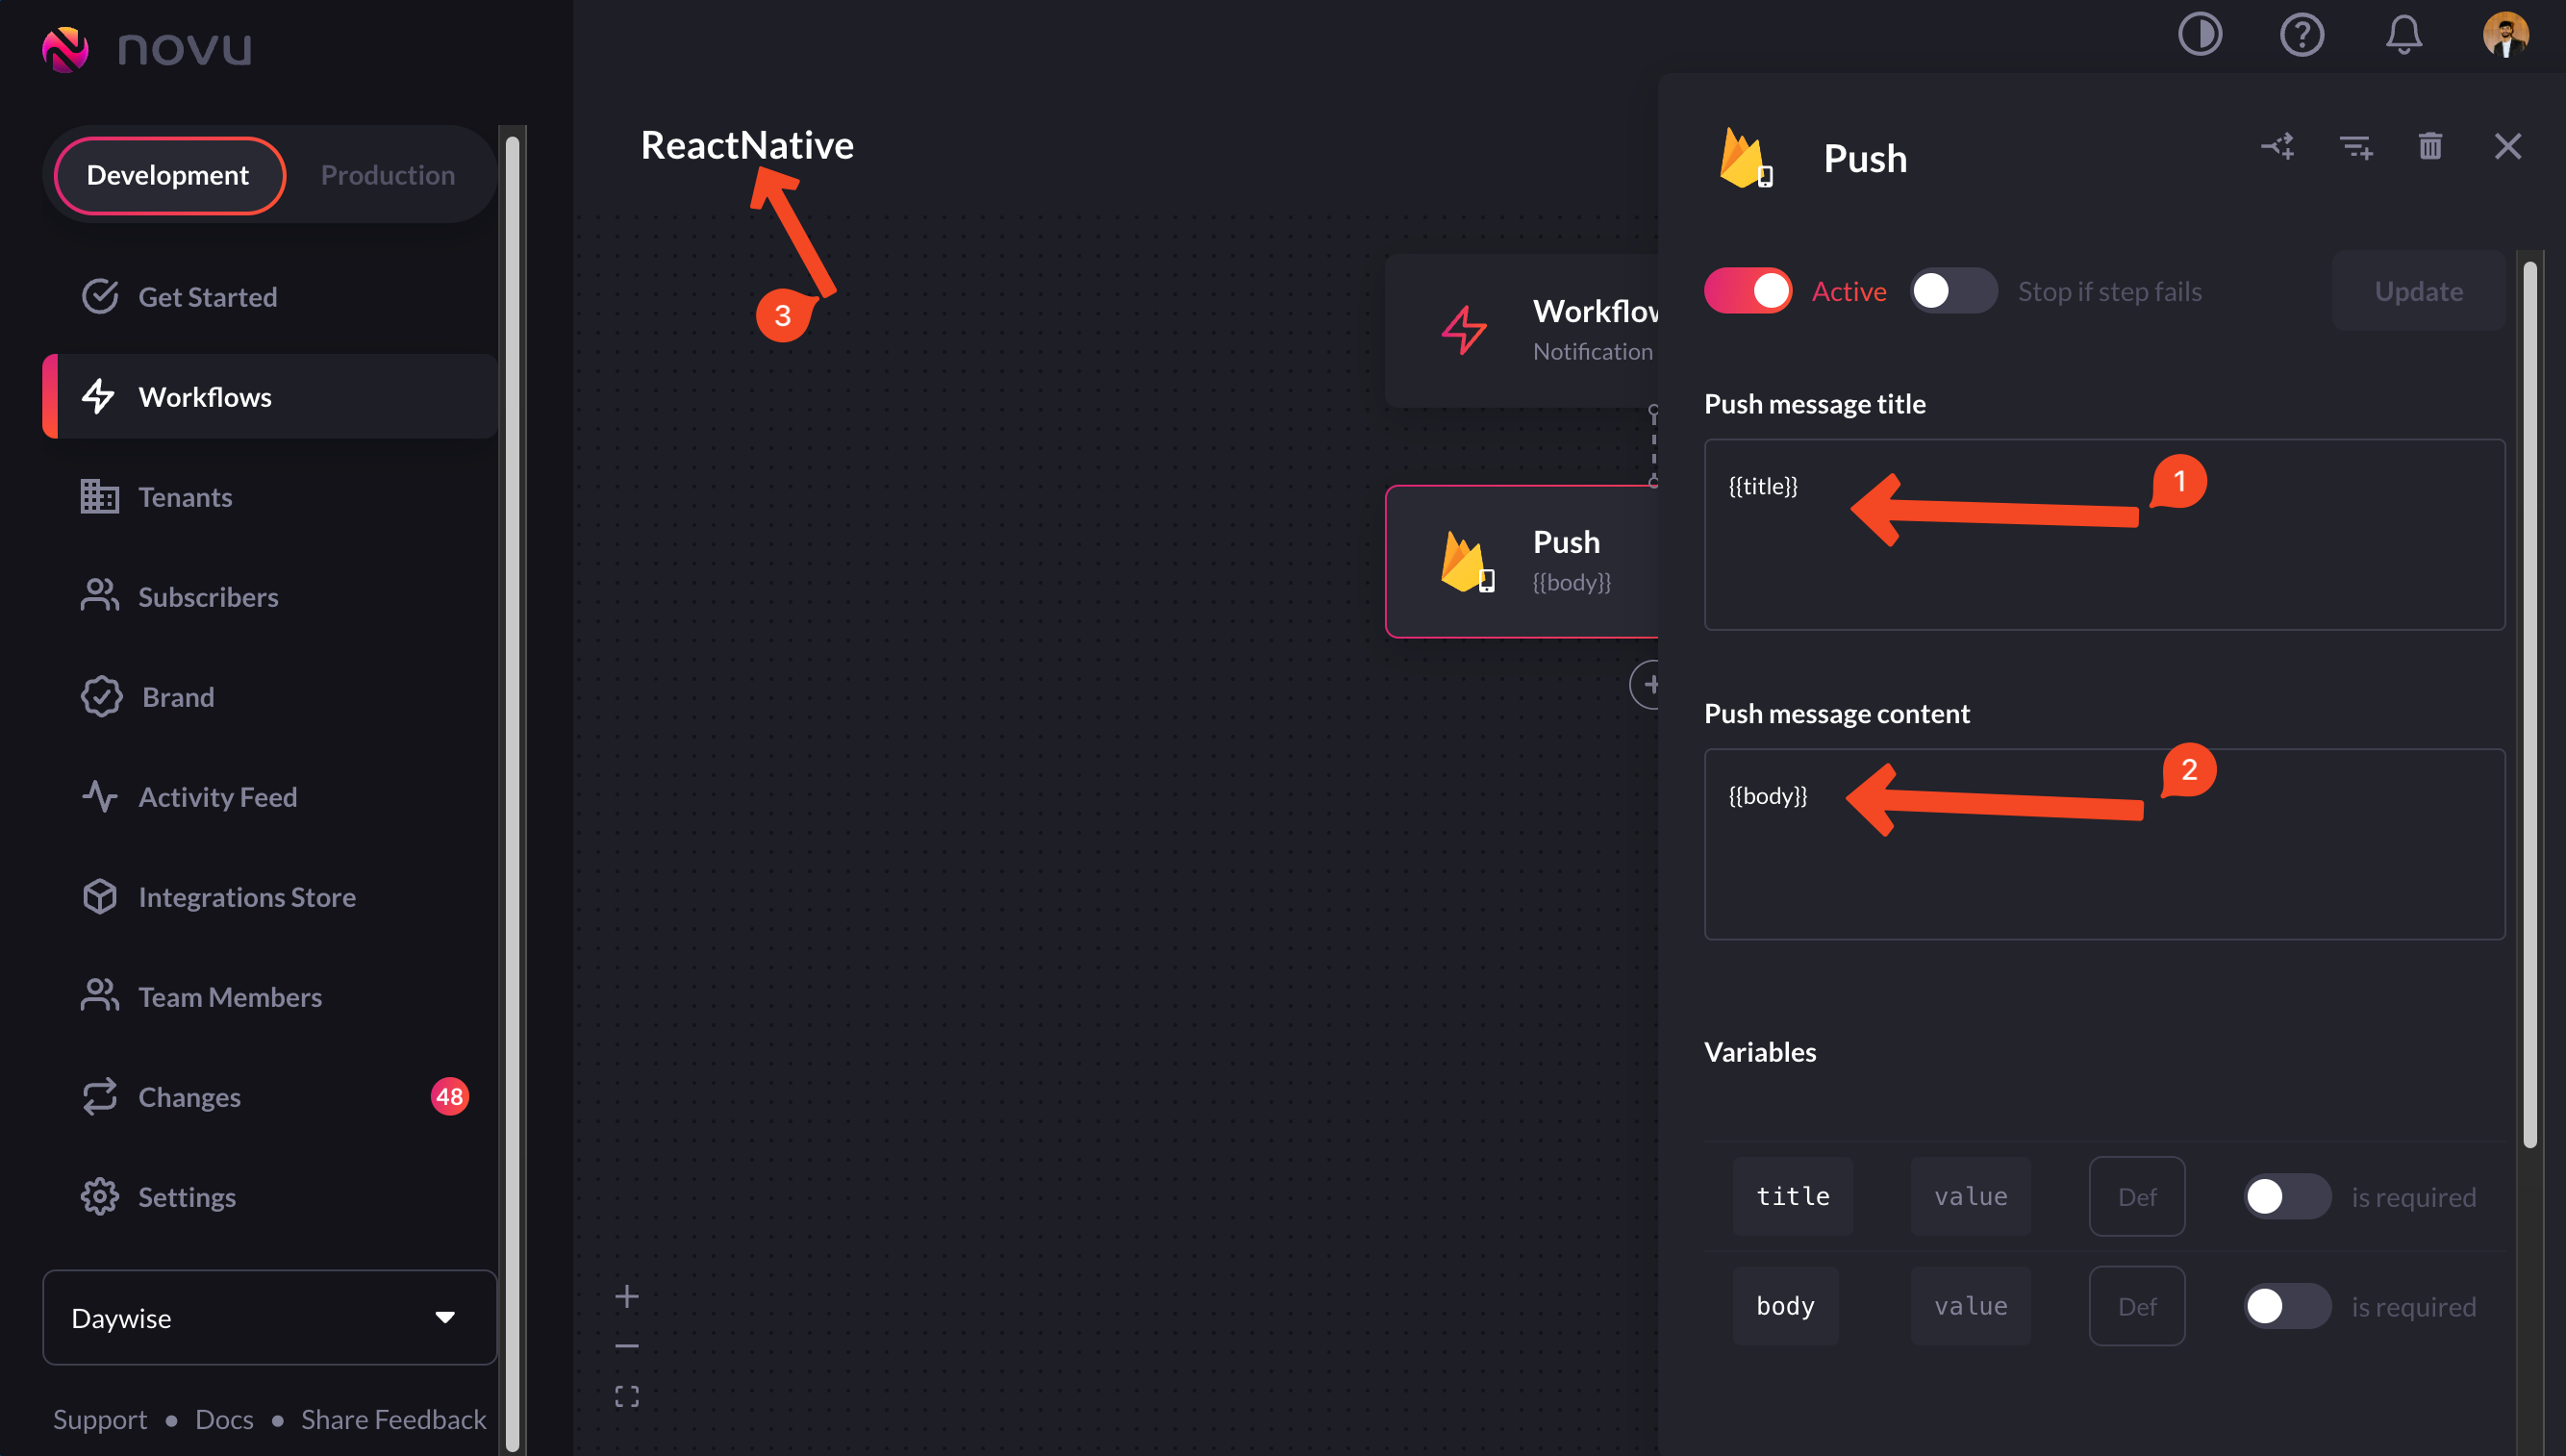
 5. We're going to use the identifiers `title` and `body` for the title and the content of notifications, so let's add them in the 'Push message title' and the 'Push message content' fields respectively. So, add them and give your workflow a suitable name.
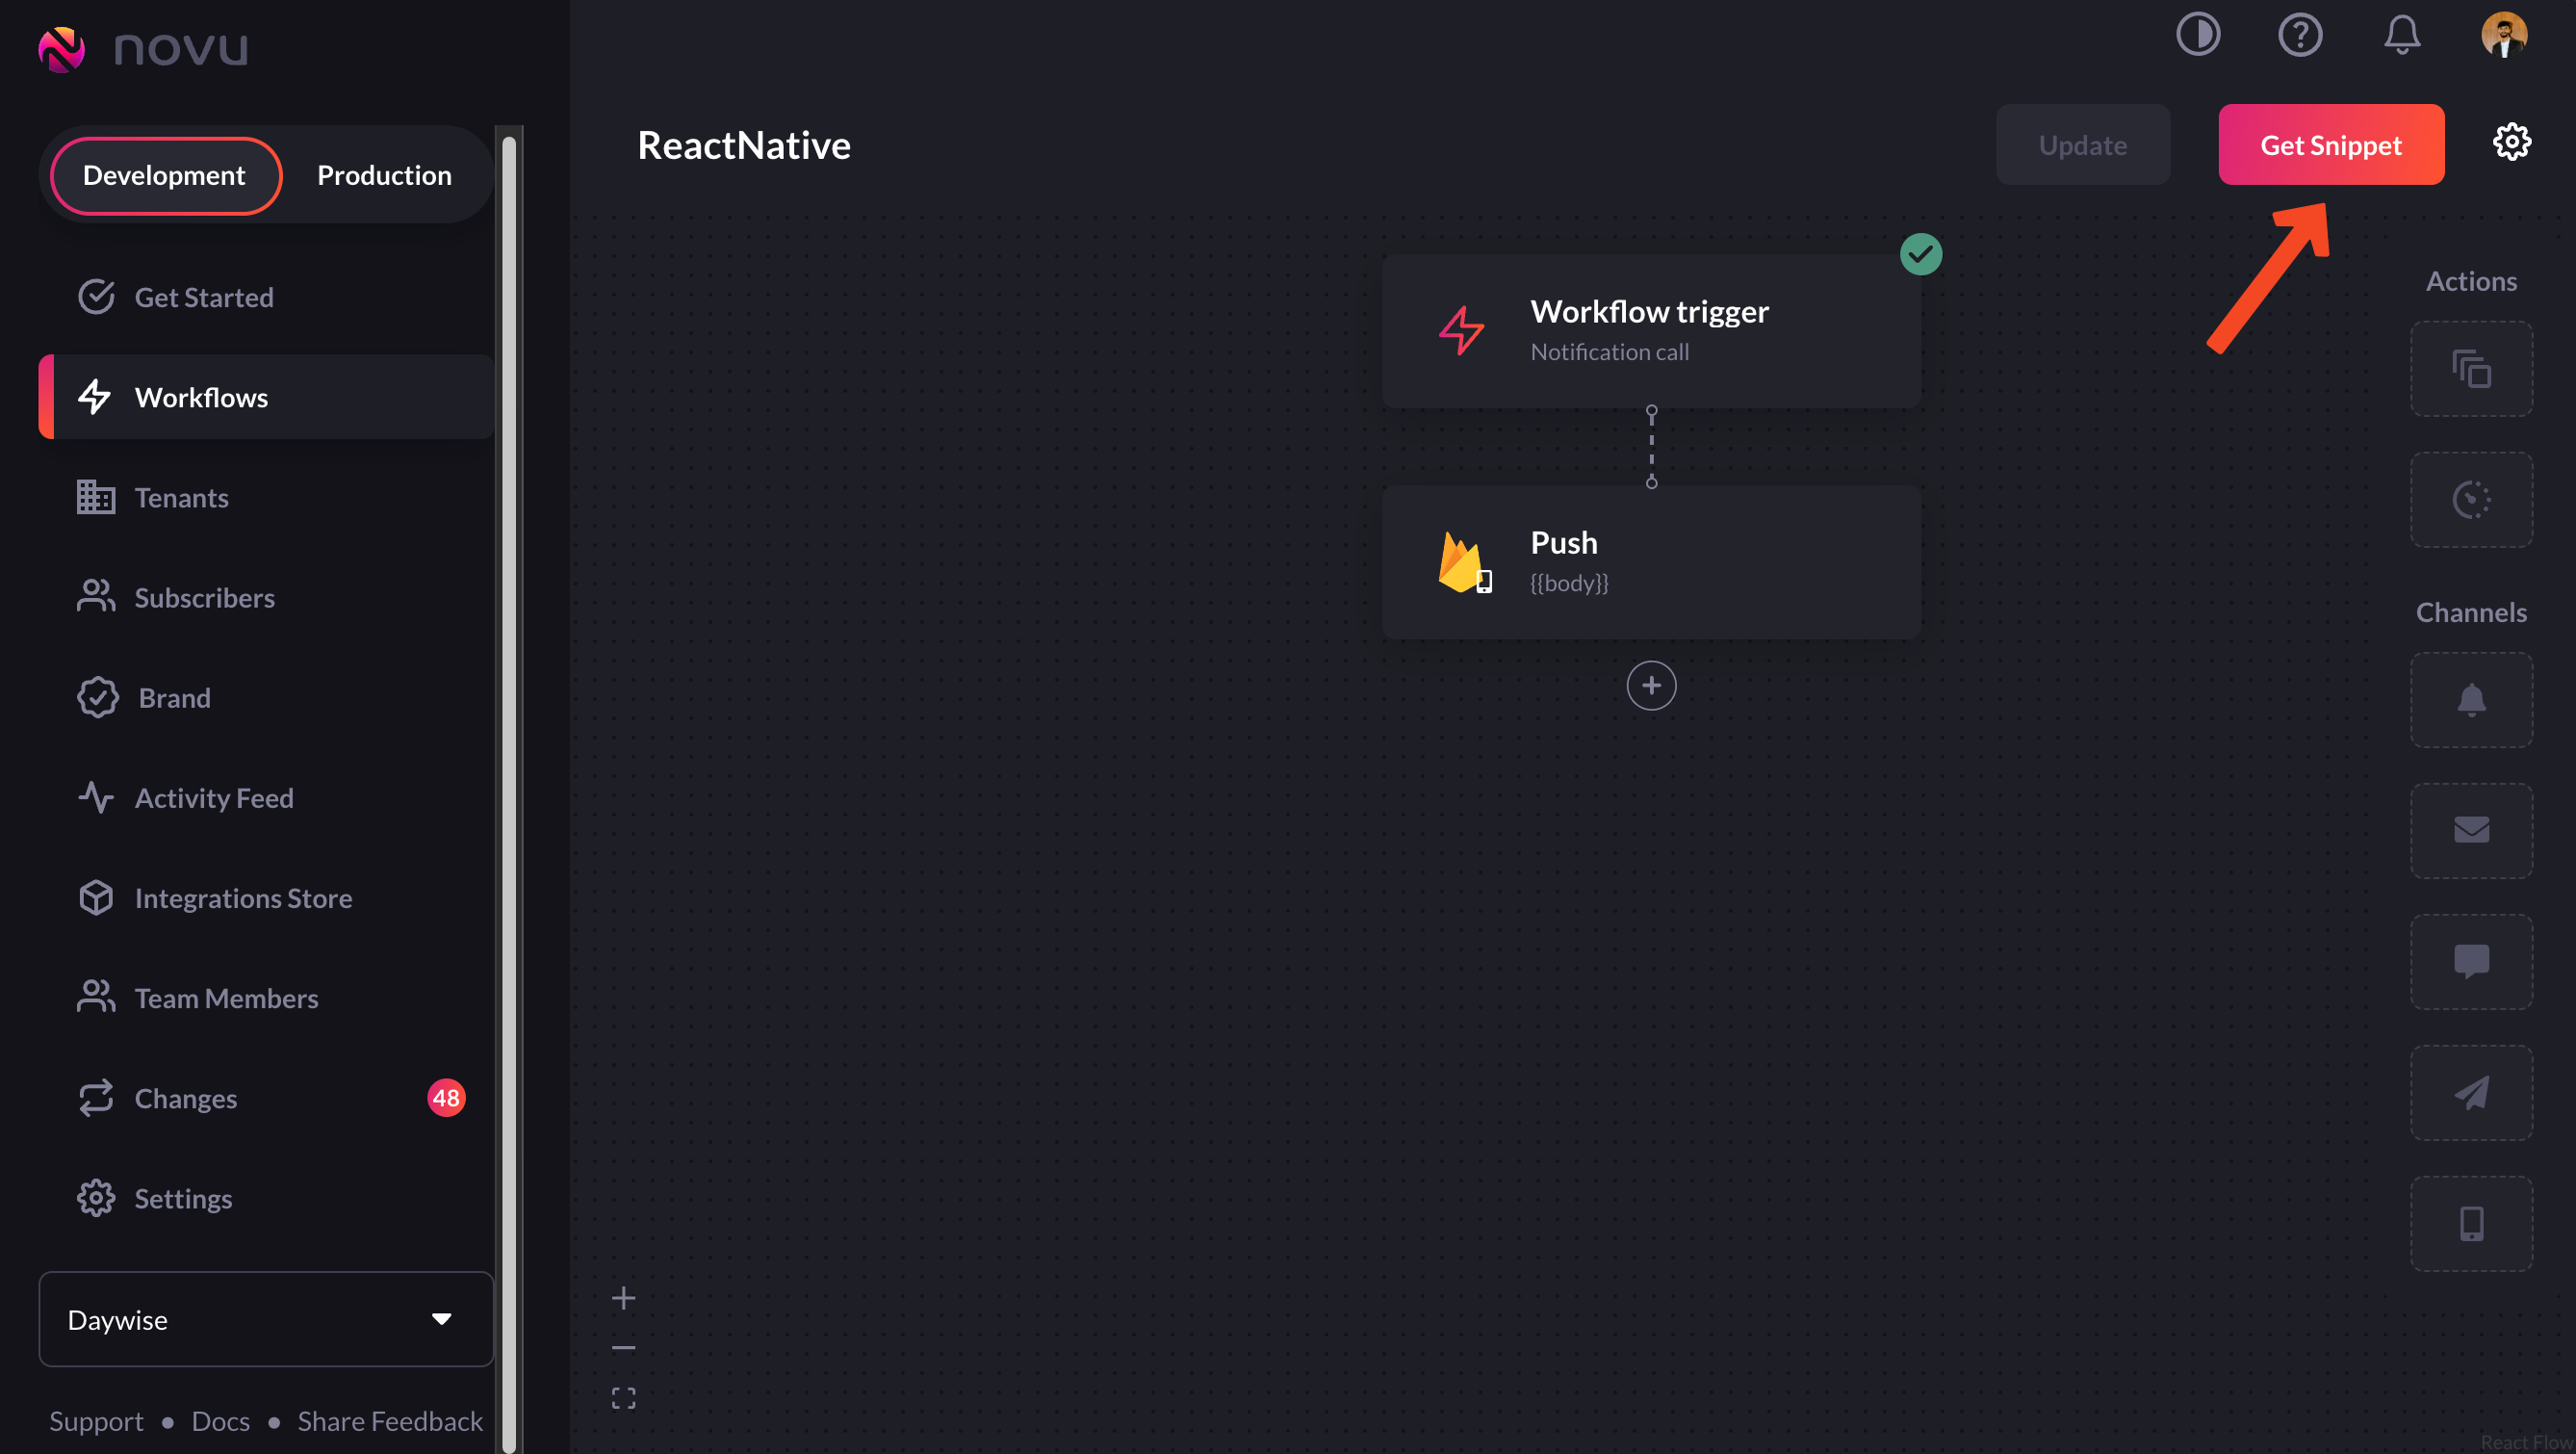
 6. Now, click on the 'get snippet' button to get the trigger code.
 ## Adding Firebase to the frontend
1. In your project, add Firebase using the following command:
```bash theme={null}
npm install firebase
```
2. Create a new file called `firebase.js` and add the following to it:
```jsx theme={null}
import { initializeApp } from "firebase/app";
import { getMessaging, onMessage } from "firebase/messaging";
//from firebase console
// Your web app's Firebase configuration
const firebaseConfig = {
apiKey: import.meta.env.VITE_FIREBASE_API_KEY,
authDomain: import.meta.env.VITE_FIREBASE_AUTH_DOMAIN,
projectId: import.meta.env.VITE_FIREBASE_PROJECT_ID,
storageBucket: import.meta.env.VITE_FIREBASE_STORAGE_BUCKET,
messagingSenderId: import.meta.env.VITE_FIREBASE_MESSAGING_SENDER_ID,
appId: import.meta.env.VITE_FIREBASE_APP_ID,
};
// Initialize Firebase
export const app = initializeApp(firebaseConfig);
// Initialize Firebase Cloud Messaging and get a reference to the service
export const messaging = getMessaging(app);
export const onMessageListener = () =>
new Promise((resolve) => {
onMessage(messaging, (payload) => {
console.log("payload", payload)
resolve(payload);
});
});
```
3. Now, we need to generate tokens using the `getToken` method provided by Firebase. But we want to use this only when the user has allowed notifications on their end. So let's request notification permission from the user and if granted, we'll generate the token. Add this to your root module:
```jsx theme={null}
async function requestPermission() {
const permission = await Notification.requestPermission()
if (permission === 'granted') {
// get token
const token = await getToken(messaging, { vapidkey: import.meta.env.VITE_VAPID_KEY })
} else if (permission === 'denied') {
alert('Persmission denied!')
}
}
useEffect(() => {
requestPermission();
}, [])
```
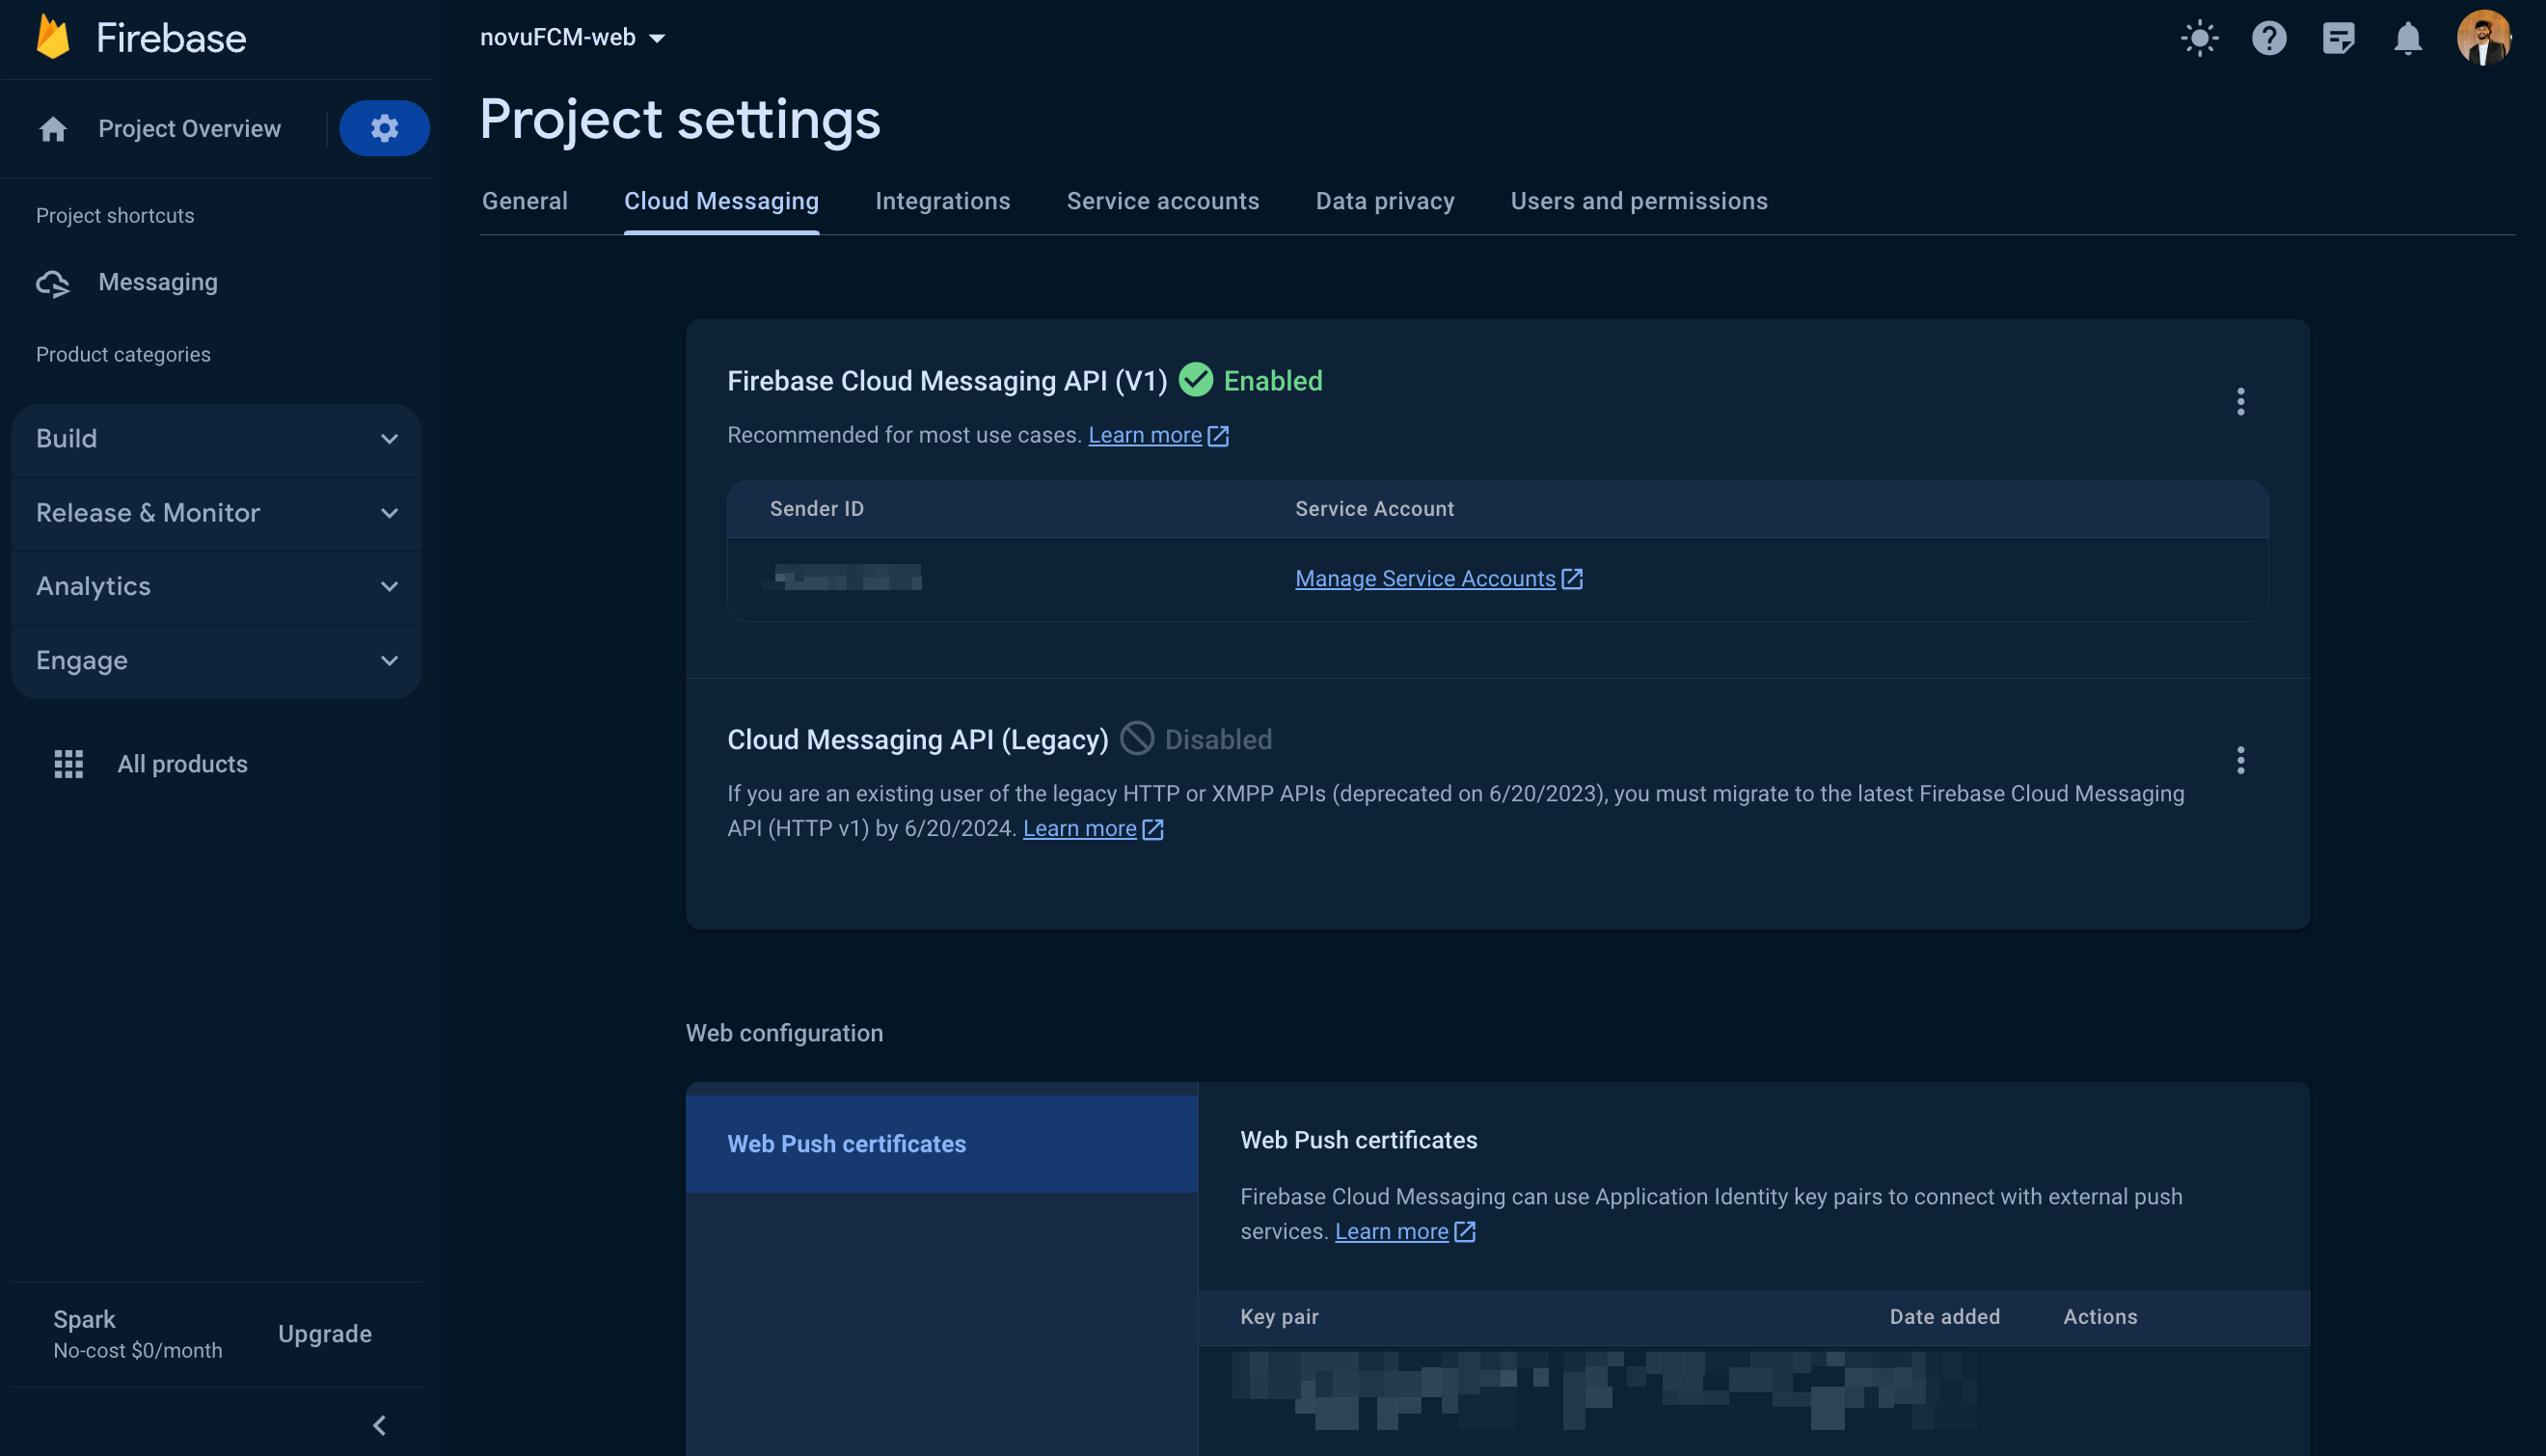
4. To use the `getToken` method, you need a Voluntary Application Server Identification or `VAPID key`. Go to your Project Settings -> Cloud Messaging -> Generate key pair (under Web Push Certificates):
## Adding Firebase to the frontend
1. In your project, add Firebase using the following command:
```bash theme={null}
npm install firebase
```
2. Create a new file called `firebase.js` and add the following to it:
```jsx theme={null}
import { initializeApp } from "firebase/app";
import { getMessaging, onMessage } from "firebase/messaging";
//from firebase console
// Your web app's Firebase configuration
const firebaseConfig = {
apiKey: import.meta.env.VITE_FIREBASE_API_KEY,
authDomain: import.meta.env.VITE_FIREBASE_AUTH_DOMAIN,
projectId: import.meta.env.VITE_FIREBASE_PROJECT_ID,
storageBucket: import.meta.env.VITE_FIREBASE_STORAGE_BUCKET,
messagingSenderId: import.meta.env.VITE_FIREBASE_MESSAGING_SENDER_ID,
appId: import.meta.env.VITE_FIREBASE_APP_ID,
};
// Initialize Firebase
export const app = initializeApp(firebaseConfig);
// Initialize Firebase Cloud Messaging and get a reference to the service
export const messaging = getMessaging(app);
export const onMessageListener = () =>
new Promise((resolve) => {
onMessage(messaging, (payload) => {
console.log("payload", payload)
resolve(payload);
});
});
```
3. Now, we need to generate tokens using the `getToken` method provided by Firebase. But we want to use this only when the user has allowed notifications on their end. So let's request notification permission from the user and if granted, we'll generate the token. Add this to your root module:
```jsx theme={null}
async function requestPermission() {
const permission = await Notification.requestPermission()
if (permission === 'granted') {
// get token
const token = await getToken(messaging, { vapidkey: import.meta.env.VITE_VAPID_KEY })
} else if (permission === 'denied') {
alert('Persmission denied!')
}
}
useEffect(() => {
requestPermission();
}, [])
```
4. To use the `getToken` method, you need a Voluntary Application Server Identification or `VAPID key`. Go to your Project Settings -> Cloud Messaging -> Generate key pair (under Web Push Certificates):
 5. In order for Firebase's background listener service to work, you need a service worker. Make sure you've created a service worker file `firebase-messaging-sw.js` and add the following to it:
```jsx theme={null}
importScripts("https://www.gstatic.com/firebasejs/8.10.0/firebase-app.js");
importScripts(
"https://www.gstatic.com/firebasejs/8.10.0/firebase-messaging.js"
);
const firebaseConfig = {
apiKey: import.meta.env.VITE_FIREBASE_API_KEY,
authDomain: import.meta.env.VITE_FIREBASE_AUTH_DOMAIN,
projectId: import.meta.env.VITE_FIREBASE_PROJECT_ID,
storageBucket: import.meta.env.VITE_FIREBASE_STORAGE_BUCKET,
messagingSenderId: import.meta.env.VITE_FIREBASE_MESSAGING_SENDER_ID,
appId: import.meta.env.VITE_FIREBASE_APP_ID,
};
firebase.initializeApp(firebaseConfig);
const messaging = firebase.messaging();
messaging.onBackgroundMessage((payload) => {
console.log(
"notif incoming",
payload
);
const notificationTitle = JSON.parse(JSON.parse(payload.notification)).title
// payload.notification.title;
const notificationOptions = {
body: payload.notification.body,
icon: payload.notification.image,
};
self.registration.showNotification(notificationTitle, notificationOptions);
});
```
## Adding Novu to the backend
In your app's backend, add Novu using the following command:
```bash theme={null}
npm install @novu/node
```
Now, create a route that you want to hit when called from the front end. In our app, this is the route:
```jsx theme={null}
import express from "express";
import { createNotif } from '../controller/notif.js'
const router = express.Router();
router.post('/create', createNotif)
export default router;
```
Now, we need a controller function to handle the logic for what is to be sent in the trigger function’s payload. In our case, this is the controller function:
```jsx theme={null}
import { inAppNotification } from "../novu/novu.js";
export const createNotif = async (req, res) => {
const { title, body } = req.body
try {
await inAppNotification(title, body);
res.status(201).json({ message: 'success', title: title, body: body });
} catch (error) {
res.status(409).json({ message: error.message });
}
}
```
To make it modular, we’ll keep the trigger code in a separate function in a separate file (`novu.js`, in our case) and the trigger function is getting called in the controller function above by the name `createNotif`.
If you’re following the guide, you should already have the trigger function. But before we can add it to our app, we need one key thing - **Subscribers.**
[Subscribers](https://docs.novu.co/subscribers/subscribers) are entities to which the notifications are sent. You can see a list of subscribers in the [Novu dashboard](https://web.novu.co/subscribers?utm_campaign=docs-guides-fcm-web) as well.
We'll create a subscriber in our app. Our backend will be written in Node.js, but we also have backend [SDKs in PHP, .NET, Go, Ruby, Python, and Kotlin](/sdks/introduction). The recommended way to create a subscriber in NodeJS is as follows:
```jsx theme={null}
await novu.subscribers.identify(process.env.NOVU_SUB_ID, {
firstName: "pushSubscriber"
});
```
Here, we're creating a subscriber with the `subscriberID` of whatever value the `env` file contains for the identifier `NOVU_SUB_ID`. You can read more about subscribers [in our docs.](/subscribers/subscribers).
Back in our app, before we can now add the trigger function, we need to set device identifiers using the [setCredential method](https://docs.novu.co/channels-and-providers/push/fcm#set-device-token):
```jsx theme={null}
await novu.subscribers.setCredentials(process.env.NOVU_SUB_ID, PushProviderIdEnum.FCM, {
deviceTokens: [process.env.DEVICE_TOKEN],
});
```
You'll need to pass the `subscriberID` and the `deviceTokens` in the `setCredentials` method.
Finally, we can add the trigger code:
```jsx theme={null}
import { Novu, PushProviderIdEnum } from '@novu/node';
export const inAppNotification = async (title, body) => {
const novu = new Novu(process.env.NOVU_API_KEY);
await novu.subscribers.identify(process.env.NOVU_SUB_ID, {
firstName: "pushSubscriber"
});
await novu.subscribers.setCredentials(process.env.NOVU_SUB_ID, PushProviderIdEnum.FCM, {
deviceTokens: [process.env.DEVICE_TOKEN],
});
novu.trigger(process.env.NOVU_WORKFLOW_ID, {
to: {
subscriberId: process.env.NOVU_SUB_ID
},
payload: {
title: title,
body: body
},
});
};
```
We're done with the app. You can find the [frontend code](https://github.com/novuhq/fcmWebPushFE) as well as [backend code](https://github.com/novuhq/FCMWebPushBE) for the app on Github.
Congratulations on following the guide up until this point. If you’ve done everything as recommended, you’ll end up with an app that uses Firebase Cloud Messaging to send notifications to your users using Novu.
5. In order for Firebase's background listener service to work, you need a service worker. Make sure you've created a service worker file `firebase-messaging-sw.js` and add the following to it:
```jsx theme={null}
importScripts("https://www.gstatic.com/firebasejs/8.10.0/firebase-app.js");
importScripts(
"https://www.gstatic.com/firebasejs/8.10.0/firebase-messaging.js"
);
const firebaseConfig = {
apiKey: import.meta.env.VITE_FIREBASE_API_KEY,
authDomain: import.meta.env.VITE_FIREBASE_AUTH_DOMAIN,
projectId: import.meta.env.VITE_FIREBASE_PROJECT_ID,
storageBucket: import.meta.env.VITE_FIREBASE_STORAGE_BUCKET,
messagingSenderId: import.meta.env.VITE_FIREBASE_MESSAGING_SENDER_ID,
appId: import.meta.env.VITE_FIREBASE_APP_ID,
};
firebase.initializeApp(firebaseConfig);
const messaging = firebase.messaging();
messaging.onBackgroundMessage((payload) => {
console.log(
"notif incoming",
payload
);
const notificationTitle = JSON.parse(JSON.parse(payload.notification)).title
// payload.notification.title;
const notificationOptions = {
body: payload.notification.body,
icon: payload.notification.image,
};
self.registration.showNotification(notificationTitle, notificationOptions);
});
```
## Adding Novu to the backend
In your app's backend, add Novu using the following command:
```bash theme={null}
npm install @novu/node
```
Now, create a route that you want to hit when called from the front end. In our app, this is the route:
```jsx theme={null}
import express from "express";
import { createNotif } from '../controller/notif.js'
const router = express.Router();
router.post('/create', createNotif)
export default router;
```
Now, we need a controller function to handle the logic for what is to be sent in the trigger function’s payload. In our case, this is the controller function:
```jsx theme={null}
import { inAppNotification } from "../novu/novu.js";
export const createNotif = async (req, res) => {
const { title, body } = req.body
try {
await inAppNotification(title, body);
res.status(201).json({ message: 'success', title: title, body: body });
} catch (error) {
res.status(409).json({ message: error.message });
}
}
```
To make it modular, we’ll keep the trigger code in a separate function in a separate file (`novu.js`, in our case) and the trigger function is getting called in the controller function above by the name `createNotif`.
If you’re following the guide, you should already have the trigger function. But before we can add it to our app, we need one key thing - **Subscribers.**
[Subscribers](https://docs.novu.co/subscribers/subscribers) are entities to which the notifications are sent. You can see a list of subscribers in the [Novu dashboard](https://web.novu.co/subscribers?utm_campaign=docs-guides-fcm-web) as well.
We'll create a subscriber in our app. Our backend will be written in Node.js, but we also have backend [SDKs in PHP, .NET, Go, Ruby, Python, and Kotlin](/sdks/introduction). The recommended way to create a subscriber in NodeJS is as follows:
```jsx theme={null}
await novu.subscribers.identify(process.env.NOVU_SUB_ID, {
firstName: "pushSubscriber"
});
```
Here, we're creating a subscriber with the `subscriberID` of whatever value the `env` file contains for the identifier `NOVU_SUB_ID`. You can read more about subscribers [in our docs.](/subscribers/subscribers).
Back in our app, before we can now add the trigger function, we need to set device identifiers using the [setCredential method](https://docs.novu.co/channels-and-providers/push/fcm#set-device-token):
```jsx theme={null}
await novu.subscribers.setCredentials(process.env.NOVU_SUB_ID, PushProviderIdEnum.FCM, {
deviceTokens: [process.env.DEVICE_TOKEN],
});
```
You'll need to pass the `subscriberID` and the `deviceTokens` in the `setCredentials` method.
Finally, we can add the trigger code:
```jsx theme={null}
import { Novu, PushProviderIdEnum } from '@novu/node';
export const inAppNotification = async (title, body) => {
const novu = new Novu(process.env.NOVU_API_KEY);
await novu.subscribers.identify(process.env.NOVU_SUB_ID, {
firstName: "pushSubscriber"
});
await novu.subscribers.setCredentials(process.env.NOVU_SUB_ID, PushProviderIdEnum.FCM, {
deviceTokens: [process.env.DEVICE_TOKEN],
});
novu.trigger(process.env.NOVU_WORKFLOW_ID, {
to: {
subscriberId: process.env.NOVU_SUB_ID
},
payload: {
title: title,
body: body
},
});
};
```
We're done with the app. You can find the [frontend code](https://github.com/novuhq/fcmWebPushFE) as well as [backend code](https://github.com/novuhq/FCMWebPushBE) for the app on Github.
Congratulations on following the guide up until this point. If you’ve done everything as recommended, you’ll end up with an app that uses Firebase Cloud Messaging to send notifications to your users using Novu.