> ## Documentation Index
> Fetch the complete documentation index at: https://v0.x-docs.novu.co/llms.txt
> Use this file to discover all available pages before exploring further.
# React
> Learn how to use Novu to quickly send multi-channel (SMS, Email, Chat, Push) notifications with React.
Send notifications across different channels (SMS, Email, Chat, Push) and enable real-time In-App notifications with the help of a rich and customizable Notification Center.
## Requirements
To follow the steps in this quickstart, you'll need:
* A Novu account. [Sign up for free](http://web.novu.co/?utm_campaign=docs-gs-quick-react) if you don’t have one yet.
* A working React development environment.
You can find the code for this project [here](https://github.com/novuhq/react-quickstart)
## Install the Novu React Notification Center Package in your React app
The Novu React package provides a React component library that you can use to add a fully functioning notification center to your React application.
To use it, first, install the React Notification Center package by running the following command in your terminal:
```bash theme={null}
npm install @novu/notification-center
```
Before you can use Novu in your React app, you'll need two things:
1. Create a workflow to use for sending notifications, and
2. Create a subscriber - recipient of notifications.
## Create a workflow
Before triggering a notification, we need to create a workflow. A workflow is like a blueprint that all the notifications are supposed to follow.
> The recipients of a triggered notification are called subscribers.
The workflow includes the following:
* Workflow name and Identifier
* Channel-tailored content:
| Channel
| Content Style
| Custom Variables
`{{handlebars}}` format |
| ------------------- | ------------------------- | :-------------------------------------------: |
| **Email** | HTML | ✅ |
| | Visual Editor | ✅ |
| **SMS** | Text | ✅ |
| **Chat** | Text | ✅ |
| **In-App** | Text | ✅ |
| **Push** | Text | ✅ |
These are the steps to create a workflow:
1. Click **Workflow** on the left sidebar of your Novu dashboard.
2. Click the **Create Workflow** button on the top right.
3. The name of the new workflow is currently **"Untitled"**. Rename it to a more suitable title.
4. Select **In-App** as the channel you want to add.
 {" "}
5. Click on the recently added "In-App" channel and configure it according to your preferences. Once you're done, click "Update" to save your configuration.
{" "}
5. Click on the recently added "In-App" channel and configure it according to your preferences. Once you're done, click "Update" to save your configuration.
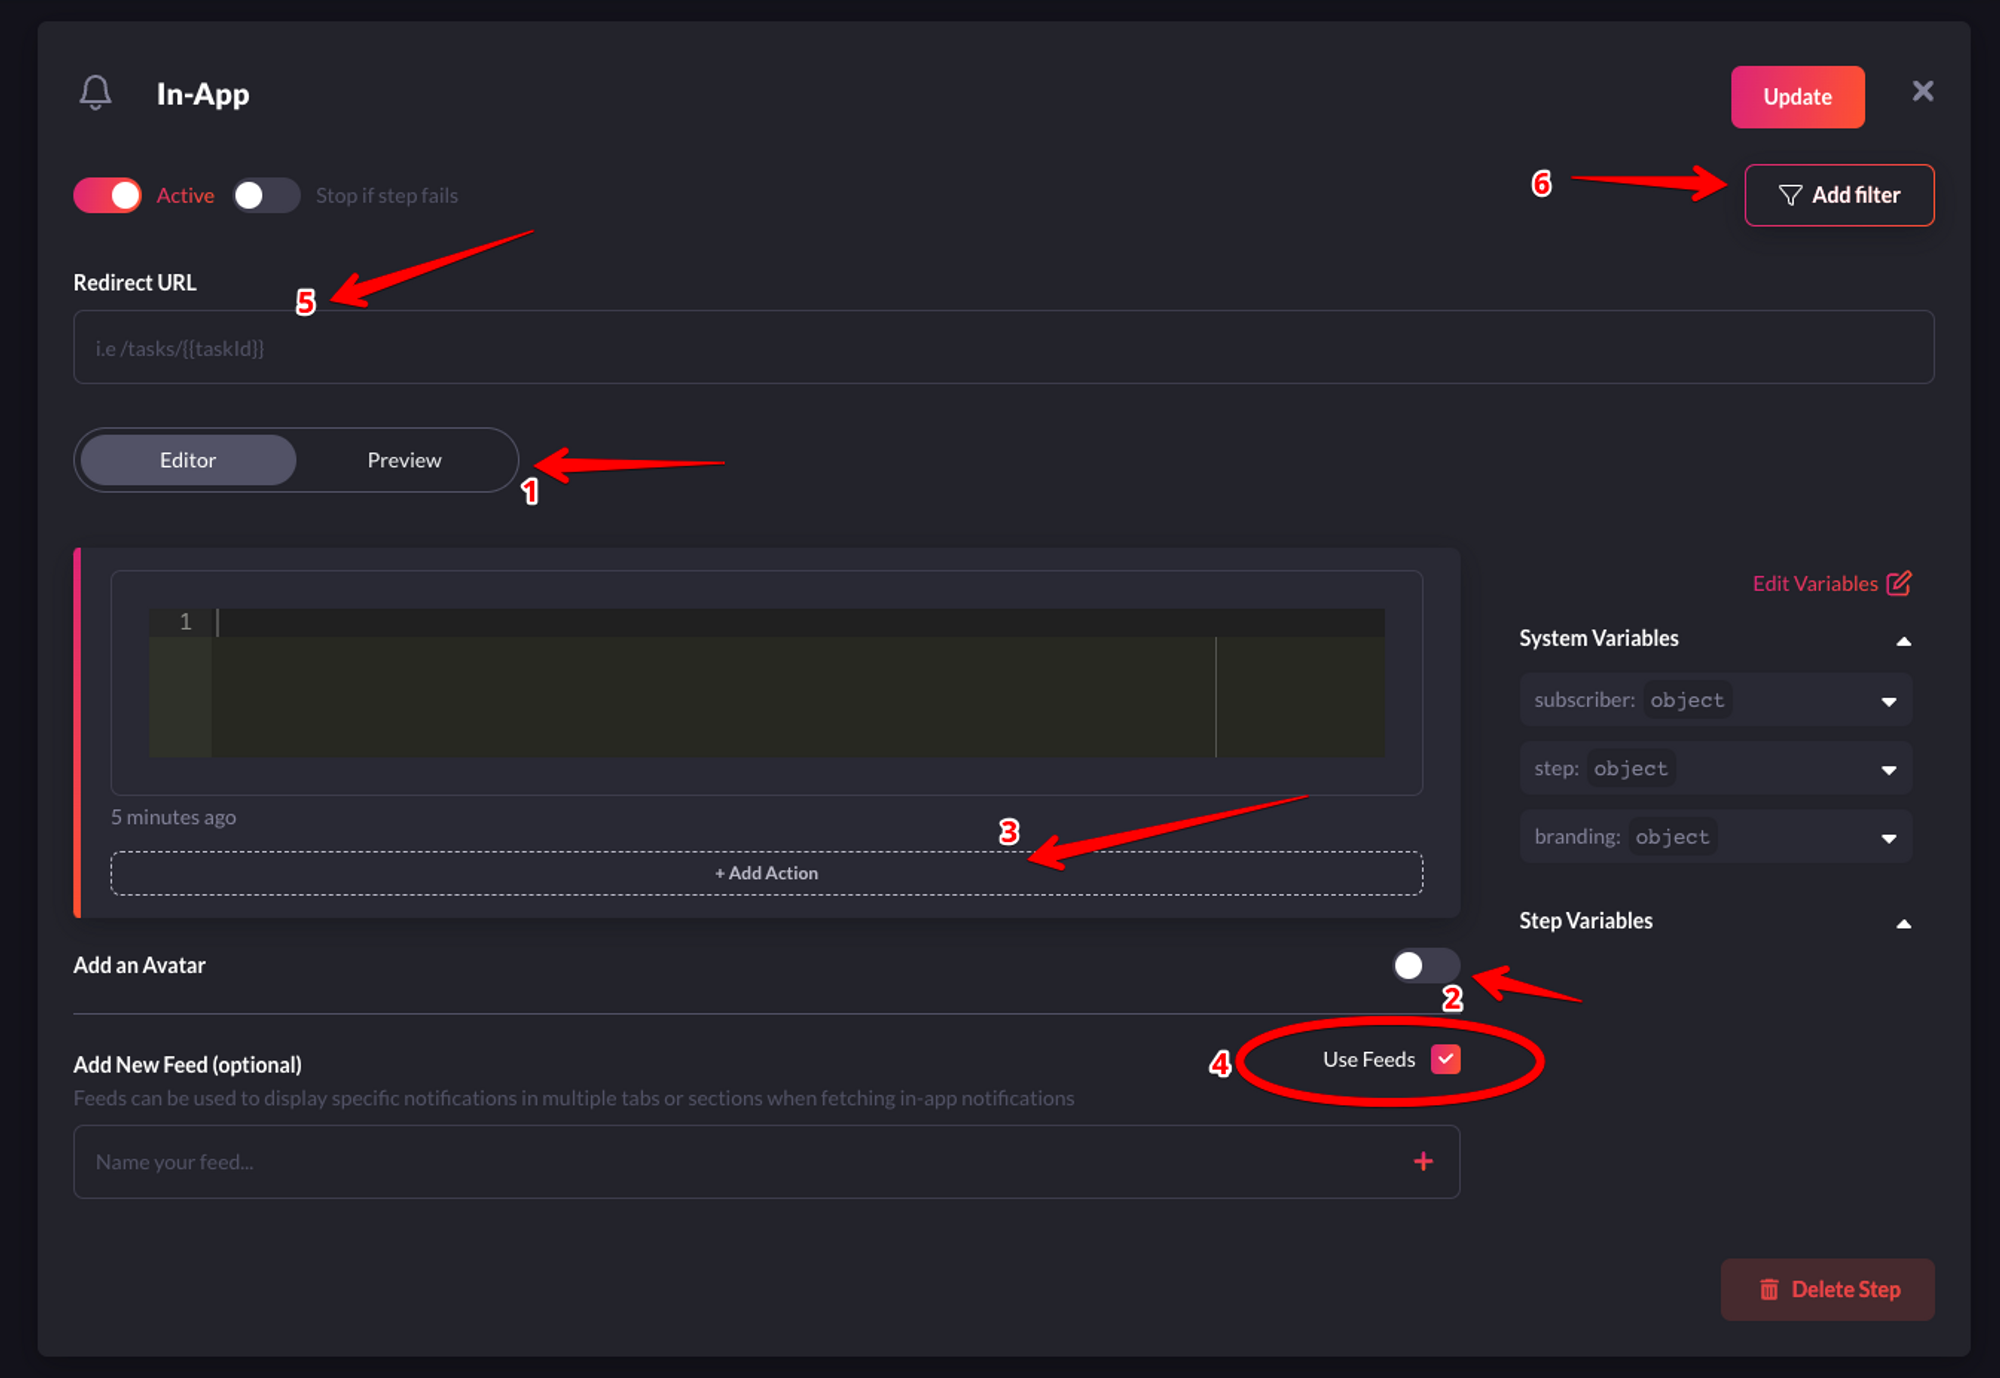 {" "}
I'll briefly explain the function of each label in the image above:
* **1-Preview**: This shows you a glimpse of how each notification item will look in the Notification Center UI.
* **2-Avatar**: If turned on, each notification item will show the avatar of the subscriber.
* **3-Action**: With this, you can add a primary and secondary call to action button to each notification item.
* **4-Notification Feeds**: This displays a stream of specific notifications. You can have multiple feeds to show specific notifications in multiple tabs.
* **5-Redirect URL**: This is the URL to which a subscriber can be directed when they click on a notification item.
* **6-Filter**: This feature allows you to configure the criteria for delivering notifications. For instance, you can apply a filter based on a subscriber's online status to send them an email if they were online within the last hour. Read [more about filters](https://docs.novu.co/platform/step-filter/#subscriber-seen--read-filters).
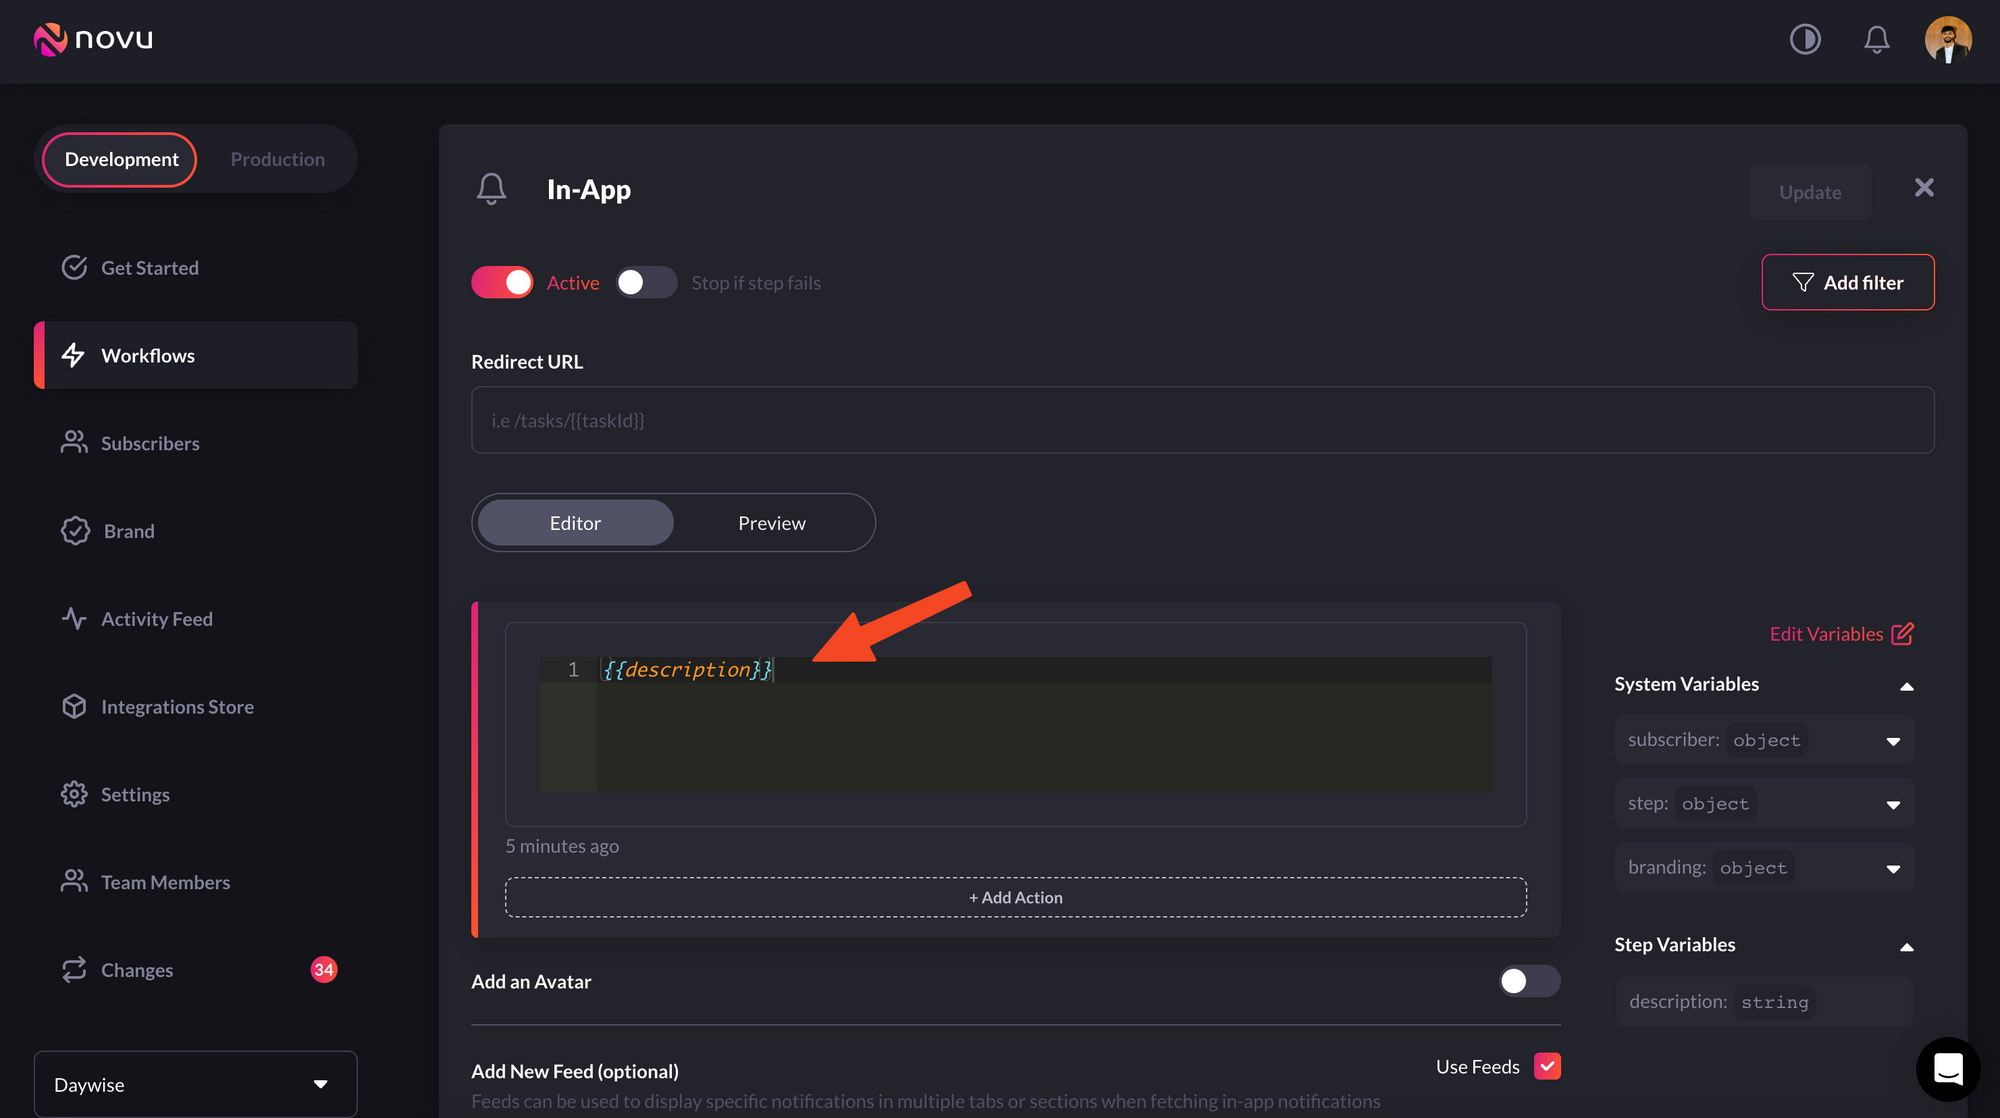
* **7-Editor**: You can add text that you want to be displayed in each notification item. Additionally, you can specify custom variables using `{{ }}`. This means you can inject variables from your code into a notification item's text via a payload.
In our case, we'll use the custom variables functionality, as shown below:
{" "}
I'll briefly explain the function of each label in the image above:
* **1-Preview**: This shows you a glimpse of how each notification item will look in the Notification Center UI.
* **2-Avatar**: If turned on, each notification item will show the avatar of the subscriber.
* **3-Action**: With this, you can add a primary and secondary call to action button to each notification item.
* **4-Notification Feeds**: This displays a stream of specific notifications. You can have multiple feeds to show specific notifications in multiple tabs.
* **5-Redirect URL**: This is the URL to which a subscriber can be directed when they click on a notification item.
* **6-Filter**: This feature allows you to configure the criteria for delivering notifications. For instance, you can apply a filter based on a subscriber's online status to send them an email if they were online within the last hour. Read [more about filters](https://docs.novu.co/platform/step-filter/#subscriber-seen--read-filters).
* **7-Editor**: You can add text that you want to be displayed in each notification item. Additionally, you can specify custom variables using `{{ }}`. This means you can inject variables from your code into a notification item's text via a payload.
In our case, we'll use the custom variables functionality, as shown below:
 {" "}
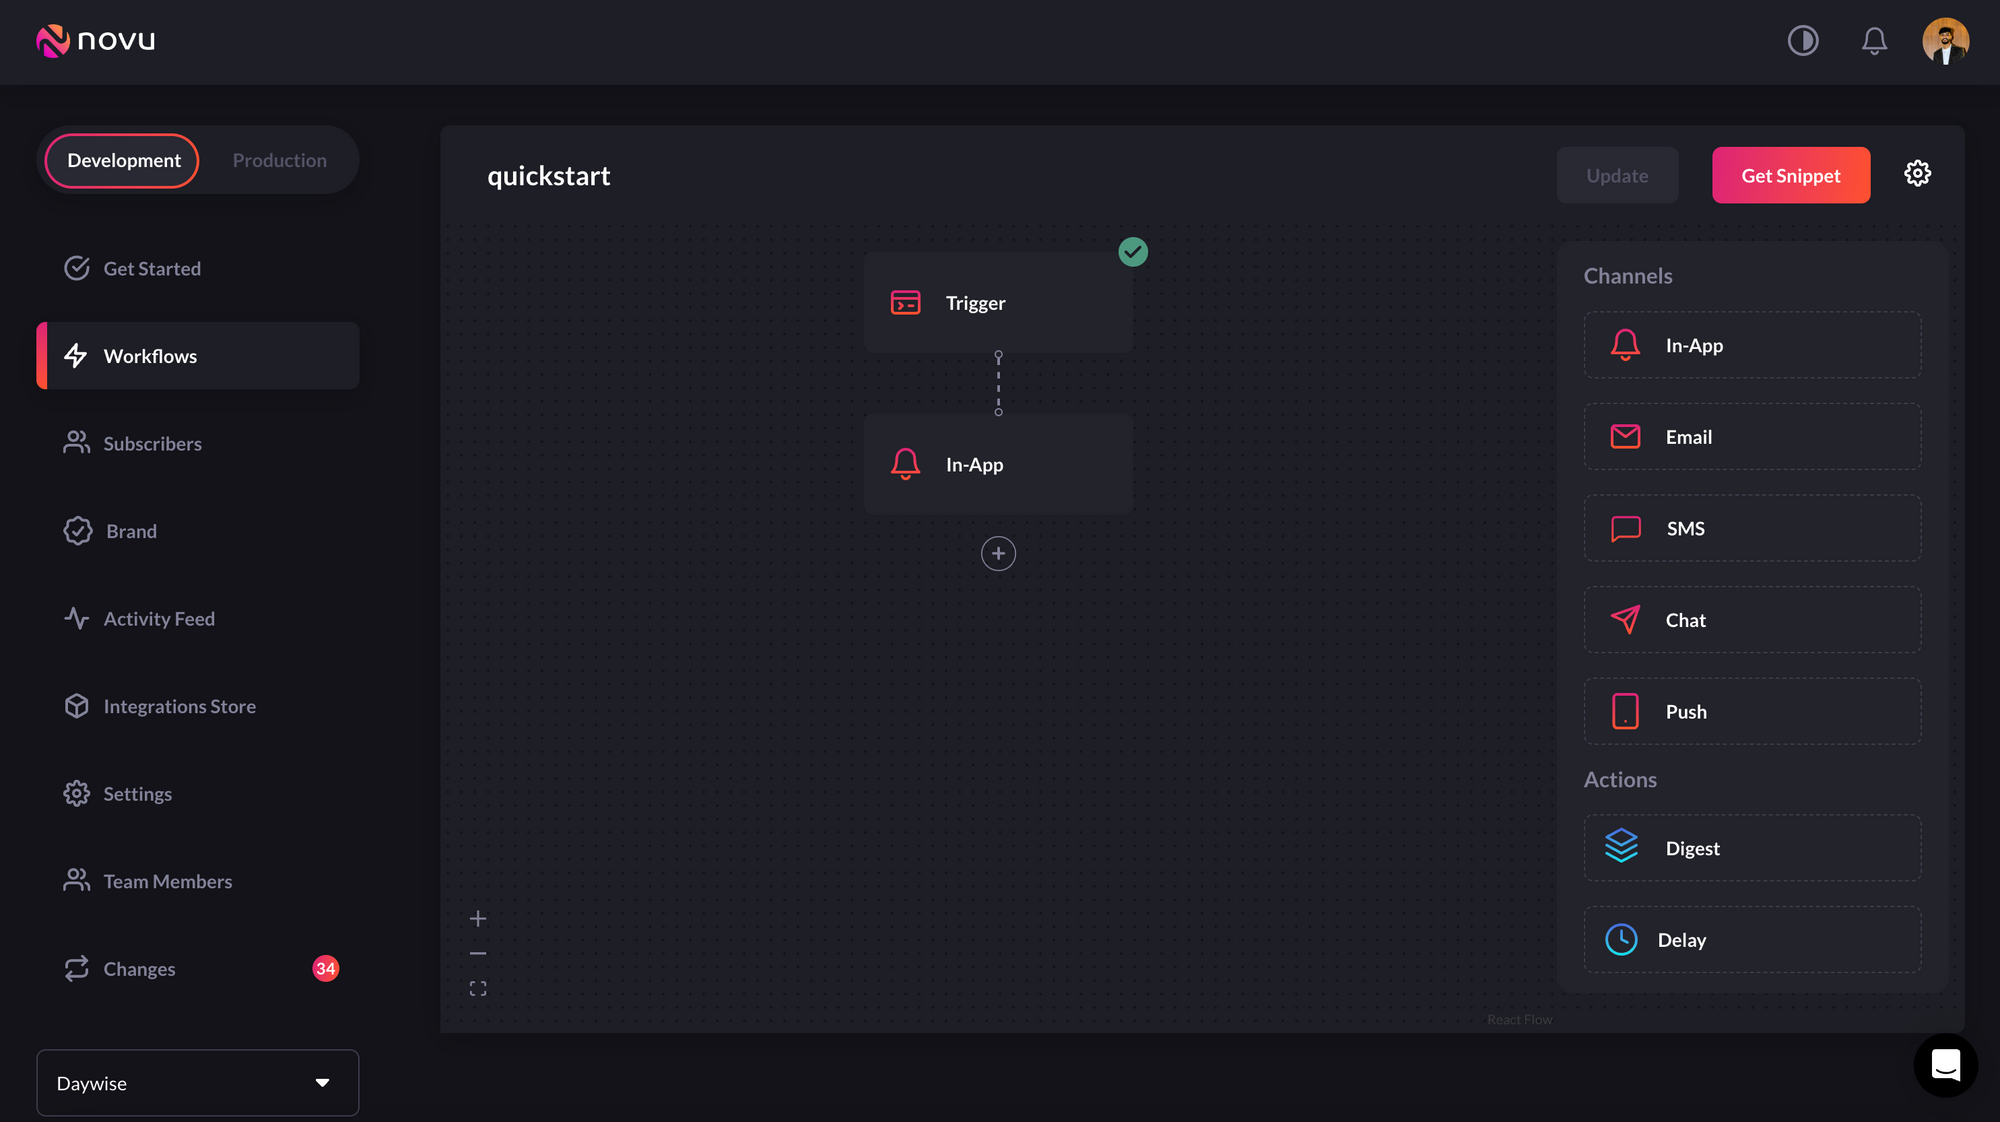
Feel free to add only text for now and rename the workflow to quick start. It automatically creates a slug-like Identifier that will be needed in later steps to trigger a notification.
{" "}
Feel free to add only text for now and rename the workflow to quick start. It automatically creates a slug-like Identifier that will be needed in later steps to trigger a notification.
 {" "}
Now, we’ll learn how to create subscribers on Novu - Recipients of Notifications!
## Create a subscriber
If you click “Subscriber” on the left sidebar of the [Novu dashboard](https://web.novu.co/subscribers?utm_campaign=docs-quick-react), you’ll see the subscriber list. By default, there will only be one subscriber as you’re automatically added as a subscriber when you sign up for Novu:
{" "}
Now, we’ll learn how to create subscribers on Novu - Recipients of Notifications!
## Create a subscriber
If you click “Subscriber” on the left sidebar of the [Novu dashboard](https://web.novu.co/subscribers?utm_campaign=docs-quick-react), you’ll see the subscriber list. By default, there will only be one subscriber as you’re automatically added as a subscriber when you sign up for Novu:
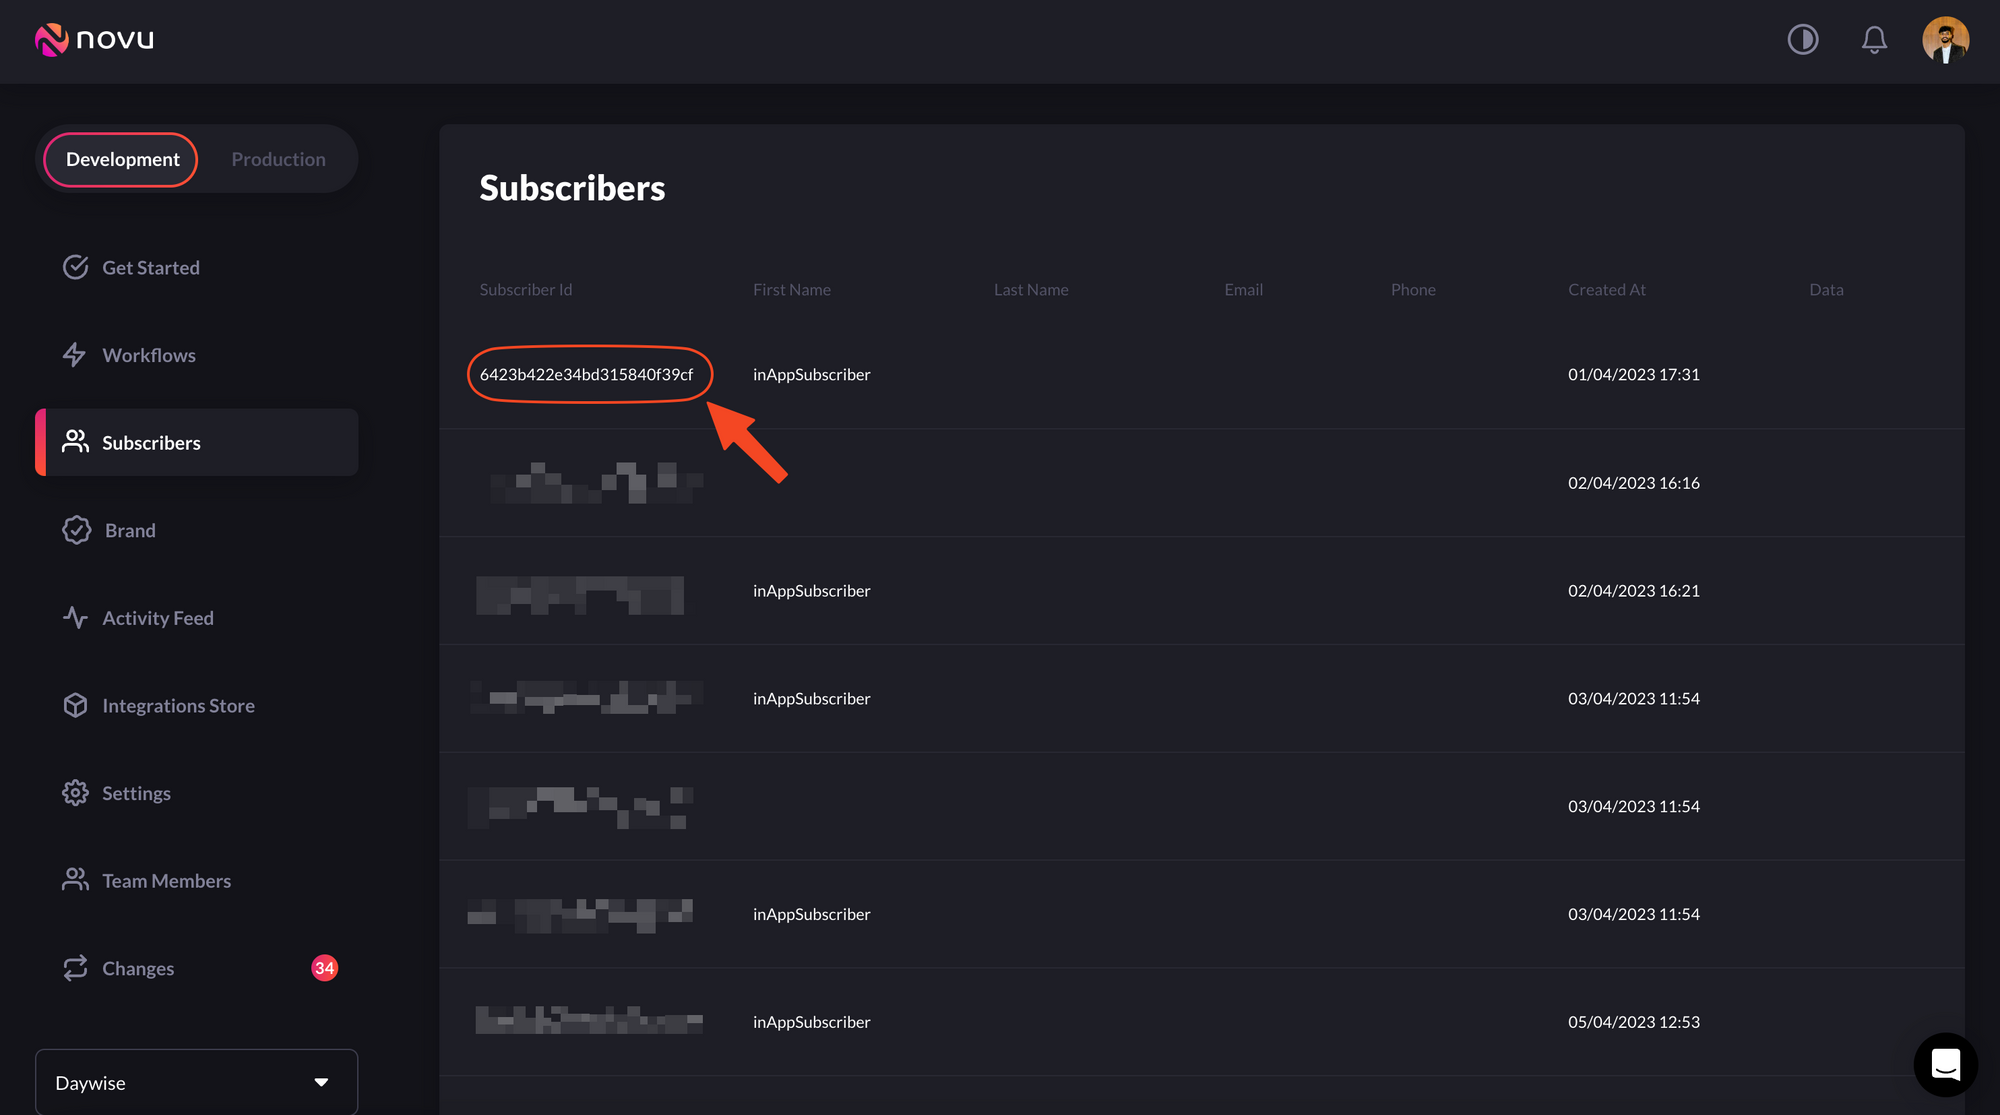 {" "}
If you don't see the default subscriber, follow [how to create subscriber](/subscribers/subscribers#create-a-subscriber) documentation to learn on how to create one
Now, let’s create a subscriber on Novu. After creating a subscriber, we’ll trigger a notification to this subscriber. Subscribers are identified by a unique `subscriberId`.
With Novu, you can create a subscriber using any of its SDKs (Node.js, PHP, .NET, Go, Ruby, Python and Kotlin). The NodeJS code to create a subscriber in Novu is:
```jsx theme={null}
import { Novu } from "@novu/node";
const novu = new Novu("");
await novu.subscribers.identify("789", {
firstName: "Sumit",
lastName: "Saurabh",
});
```
The `identify` method used above either updates an existing subscriber using the payload data if a subscriber with the same `subscriberId` already exists, or creates a new one if it doesn't. Here, since no subscriber with `firstName` of `Sumit` and `lastName` of `Saurabh` exists, a new one was created and we can now send a notification to this subscriber by triggering a workflow.
You can read more about the `identify` method in our
[docs](https://docs.novu.co/subscribers/subscribers#create-a-subscriber)
You can get your API key from the Novu dashboard. Replace `` with it. Now, head over to the Novu dashboard and see the newly created subscriber above with a `subscriberId` of `789`.
You can also update information about an already existing subscriber using the `subscriber.update` method as shown below:
```jsx theme={null}
import { Novu } from "@novu/node";
const novu = new Novu("");
await novu.subscribers.update("789", {
firstName: "Saurabh", // new first name
lastName: "Sumit", // new last name
});
```
## Using Novu in a React app
We have already installed the Novu notification center package above. To use it in an app, simply import it and add the component to your React app as follows:
```jsx theme={null}
import {
NovuProvider,
PopoverNotificationCenter,
NotificationBell,
} from "@novu/notification-center";
function App() {
return (
<>
{({ unseenCount }) => }
);
}
export default App;
```
You'll notice two things used above - `applicationIdentifier` and `subscriberID`.
An application identifier is a public key used to identify your application. You can get your own application identifier from the [Novu dashboard settings](https://web.novu.co/settings?utm_campaign=docs-quick-react).
And subscribers are users to whom notifications will be sent. They are identified by a `subscriberID` which you can also find in the [Novu subscribers dashboard](https://web.novu.co/subscribers?utm_campaign=docs-quick-react).
## Trigger a notification
We can trigger a notification by simply running the code below with the correct credentials;
```jsx theme={null}
import { Novu } from "@novu/node";
const novu = new Novu("");
novu.trigger("quickstart", {
to: {
subscriberId: "789",
},
payload: {
description: "Test notification",
},
});
```
This will take the workflow we created above with the identifier `quickstart` and send a notification to the subscriber with `subscriberId` of `789`.
> Make sure you're executing this code with the correct credentials.
## Conclusion
Great job! If you've reached this point, you should now have successfully set up the notification centre, created a subscriber, a workflow, and triggered a notification in your React application.
{" "}
If you don't see the default subscriber, follow [how to create subscriber](/subscribers/subscribers#create-a-subscriber) documentation to learn on how to create one
Now, let’s create a subscriber on Novu. After creating a subscriber, we’ll trigger a notification to this subscriber. Subscribers are identified by a unique `subscriberId`.
With Novu, you can create a subscriber using any of its SDKs (Node.js, PHP, .NET, Go, Ruby, Python and Kotlin). The NodeJS code to create a subscriber in Novu is:
```jsx theme={null}
import { Novu } from "@novu/node";
const novu = new Novu("");
await novu.subscribers.identify("789", {
firstName: "Sumit",
lastName: "Saurabh",
});
```
The `identify` method used above either updates an existing subscriber using the payload data if a subscriber with the same `subscriberId` already exists, or creates a new one if it doesn't. Here, since no subscriber with `firstName` of `Sumit` and `lastName` of `Saurabh` exists, a new one was created and we can now send a notification to this subscriber by triggering a workflow.
You can read more about the `identify` method in our
[docs](https://docs.novu.co/subscribers/subscribers#create-a-subscriber)
You can get your API key from the Novu dashboard. Replace `` with it. Now, head over to the Novu dashboard and see the newly created subscriber above with a `subscriberId` of `789`.
You can also update information about an already existing subscriber using the `subscriber.update` method as shown below:
```jsx theme={null}
import { Novu } from "@novu/node";
const novu = new Novu("");
await novu.subscribers.update("789", {
firstName: "Saurabh", // new first name
lastName: "Sumit", // new last name
});
```
## Using Novu in a React app
We have already installed the Novu notification center package above. To use it in an app, simply import it and add the component to your React app as follows:
```jsx theme={null}
import {
NovuProvider,
PopoverNotificationCenter,
NotificationBell,
} from "@novu/notification-center";
function App() {
return (
<>
{({ unseenCount }) => }
);
}
export default App;
```
You'll notice two things used above - `applicationIdentifier` and `subscriberID`.
An application identifier is a public key used to identify your application. You can get your own application identifier from the [Novu dashboard settings](https://web.novu.co/settings?utm_campaign=docs-quick-react).
And subscribers are users to whom notifications will be sent. They are identified by a `subscriberID` which you can also find in the [Novu subscribers dashboard](https://web.novu.co/subscribers?utm_campaign=docs-quick-react).
## Trigger a notification
We can trigger a notification by simply running the code below with the correct credentials;
```jsx theme={null}
import { Novu } from "@novu/node";
const novu = new Novu("");
novu.trigger("quickstart", {
to: {
subscriberId: "789",
},
payload: {
description: "Test notification",
},
});
```
This will take the workflow we created above with the identifier `quickstart` and send a notification to the subscriber with `subscriberId` of `789`.
> Make sure you're executing this code with the correct credentials.
## Conclusion
Great job! If you've reached this point, you should now have successfully set up the notification centre, created a subscriber, a workflow, and triggered a notification in your React application.