> ## Documentation Index
> Fetch the complete documentation index at: https://v0.x-docs.novu.co/llms.txt
> Use this file to discover all available pages before exploring further.
# RedwoodJS
> Learn how to use Novu to quickly send multi-channel (SMS, Email, Chat, Push) notifications with RedwoodJS.
Send notifications across different channels (SMS, Email, Chat, Push) and enable real-time In-App notifications with the help of a rich and customizable Notification Center in a RedwoodJS app.
Explore the code for [this quickstart on GitHub](https://github.com/novuhq/redwoodjs-quickstart/).
Explore the [live demo](https://novu-redwoodjs-blog.netlify.app/contact).
# Prerequisites
To follow the steps in this quickstart, you'll need:
* A Novu account. If you don't have one, [sign up for free](https://web.novu.co?utm_campaign=docs-gs-quick-redwoodjs).
* Node.js installed on your development machine.
# Create a RedwoodJS app
Clone the popular RedwoodJS blog tutorial app by running the following command in your terminal:
```bash theme={null}
git clone https://github.com/redwoodjs/redwood-tutorial
cd redwood-tutorial
yarn install
yarn rw prisma migrate dev
yarn rw prisma db seed
yarn rw dev
```
# Install Novu
To install Novu's In-App notification center, simply issue the following command:
```bash theme={null}
yarn workspace web add @novu/notification-center
```
Next, install Novu's Node SDK to fire notifications from the api/backend:
```bash theme={null}
yarn workspace api add @novu/node
```
## Register The Notification Center Component
Head over to `web/src/layouts/BlogLayout/BlogLayout.js` file of the recently cloned project and add the Novu In-App Notification center.
The file should look like this:
```javascript theme={null}
import {
NovuProvider,
PopoverNotificationCenter,
NotificationBell,
} from "@novu/notification-center";
import { Link, routes } from "@redwoodjs/router";
import { useAuth } from "src/auth";
const BlogLayout = ({ children }) => {
const { logOut, isAuthenticated, currentUser } = useAuth();
const SUBSCRIBER_ID = process.env.REDWOOD_ENV_SUBSCRIBER_ID;
const APPLICATION_IDENTIFIER = process.env.REDWOOD_ENV_APPLICATION_IDENTIFIER;
return (
<>
Redwood Blog with Novu
{children}
);
};
export default BlogLayout;
```
Add `REDWOOD_ENV_APPLICATION_IDENTIFIER` and `REDWOOD_ENV_SUBSCRIBER_ID` to
the `.env` file.{" "}
The `Subscriber ID` ideally should be the `id` of the **logged in user**. When a user logs into your app, they’ll be able to see all their notifications in the notification center. For this to work successfully, the user should have been created as a subscriber on Novu.
The `Application Identifier` is a public key used to identify your application.
Head over to your [Novu dashboard settings](https://web.novu.co/settings?utm_campaign=docs-quick-redwoodjs), copy the application identifier and add it as the value of `REDWOOD_ENV_APPLICATION_IDENTIFIER`.
Head over to [the Subscribers page](https://web.novu.co/subscribers?utm_campaign=docs-quick-redwoodjs), grab a subscriber identifier and add it as the value of `REDWOOD_ENV_SUBSCRIBER_ID` in the `.env` file.
Now, check your app, you will see a notification bell button. Click on the button to reveal the notification center UI. Voila!
There are no notifications because none has been triggered yet. When
notifications are sent to a subscriber, it will show up in the UI. Next, we'll
learn how to trigger notifications.
# Create A Workflow
The first step to trigger notifications is to create a workflow. A workflow is like a map that holds the entire flow of messages sent to the subscriber.
The recipients of a triggered notification are called subscribers.
The workflow includes the following:
* Workflow name and Identifier
* Channel tailored content:
| Channel
| Content Style
| Custom Variables `{{handlebars}}` format |
| ------------------- | ------------------------- | :-------------------------------------------: |
| **Email** | HTML | ✅ |
| | Visual Editor | ✅ |
| **SMS** | Text | ✅ |
| **Chat** | Text | ✅ |
| **In-App** | Text | ✅ |
| **Push** | Text | ✅ |
Please proceed to create a workflow.
1. Click **Workflows** on the left sidebar of your Novu dashboard.
2. Click the **Add a workflow** button on the top left.
3. The name of the new workflow is currently "Untitled." Rename it to a more suitable title.
4. Select **In-App** as the channel you want to add.
5. Click on the recently added In-App channel and configure it.
{" "}
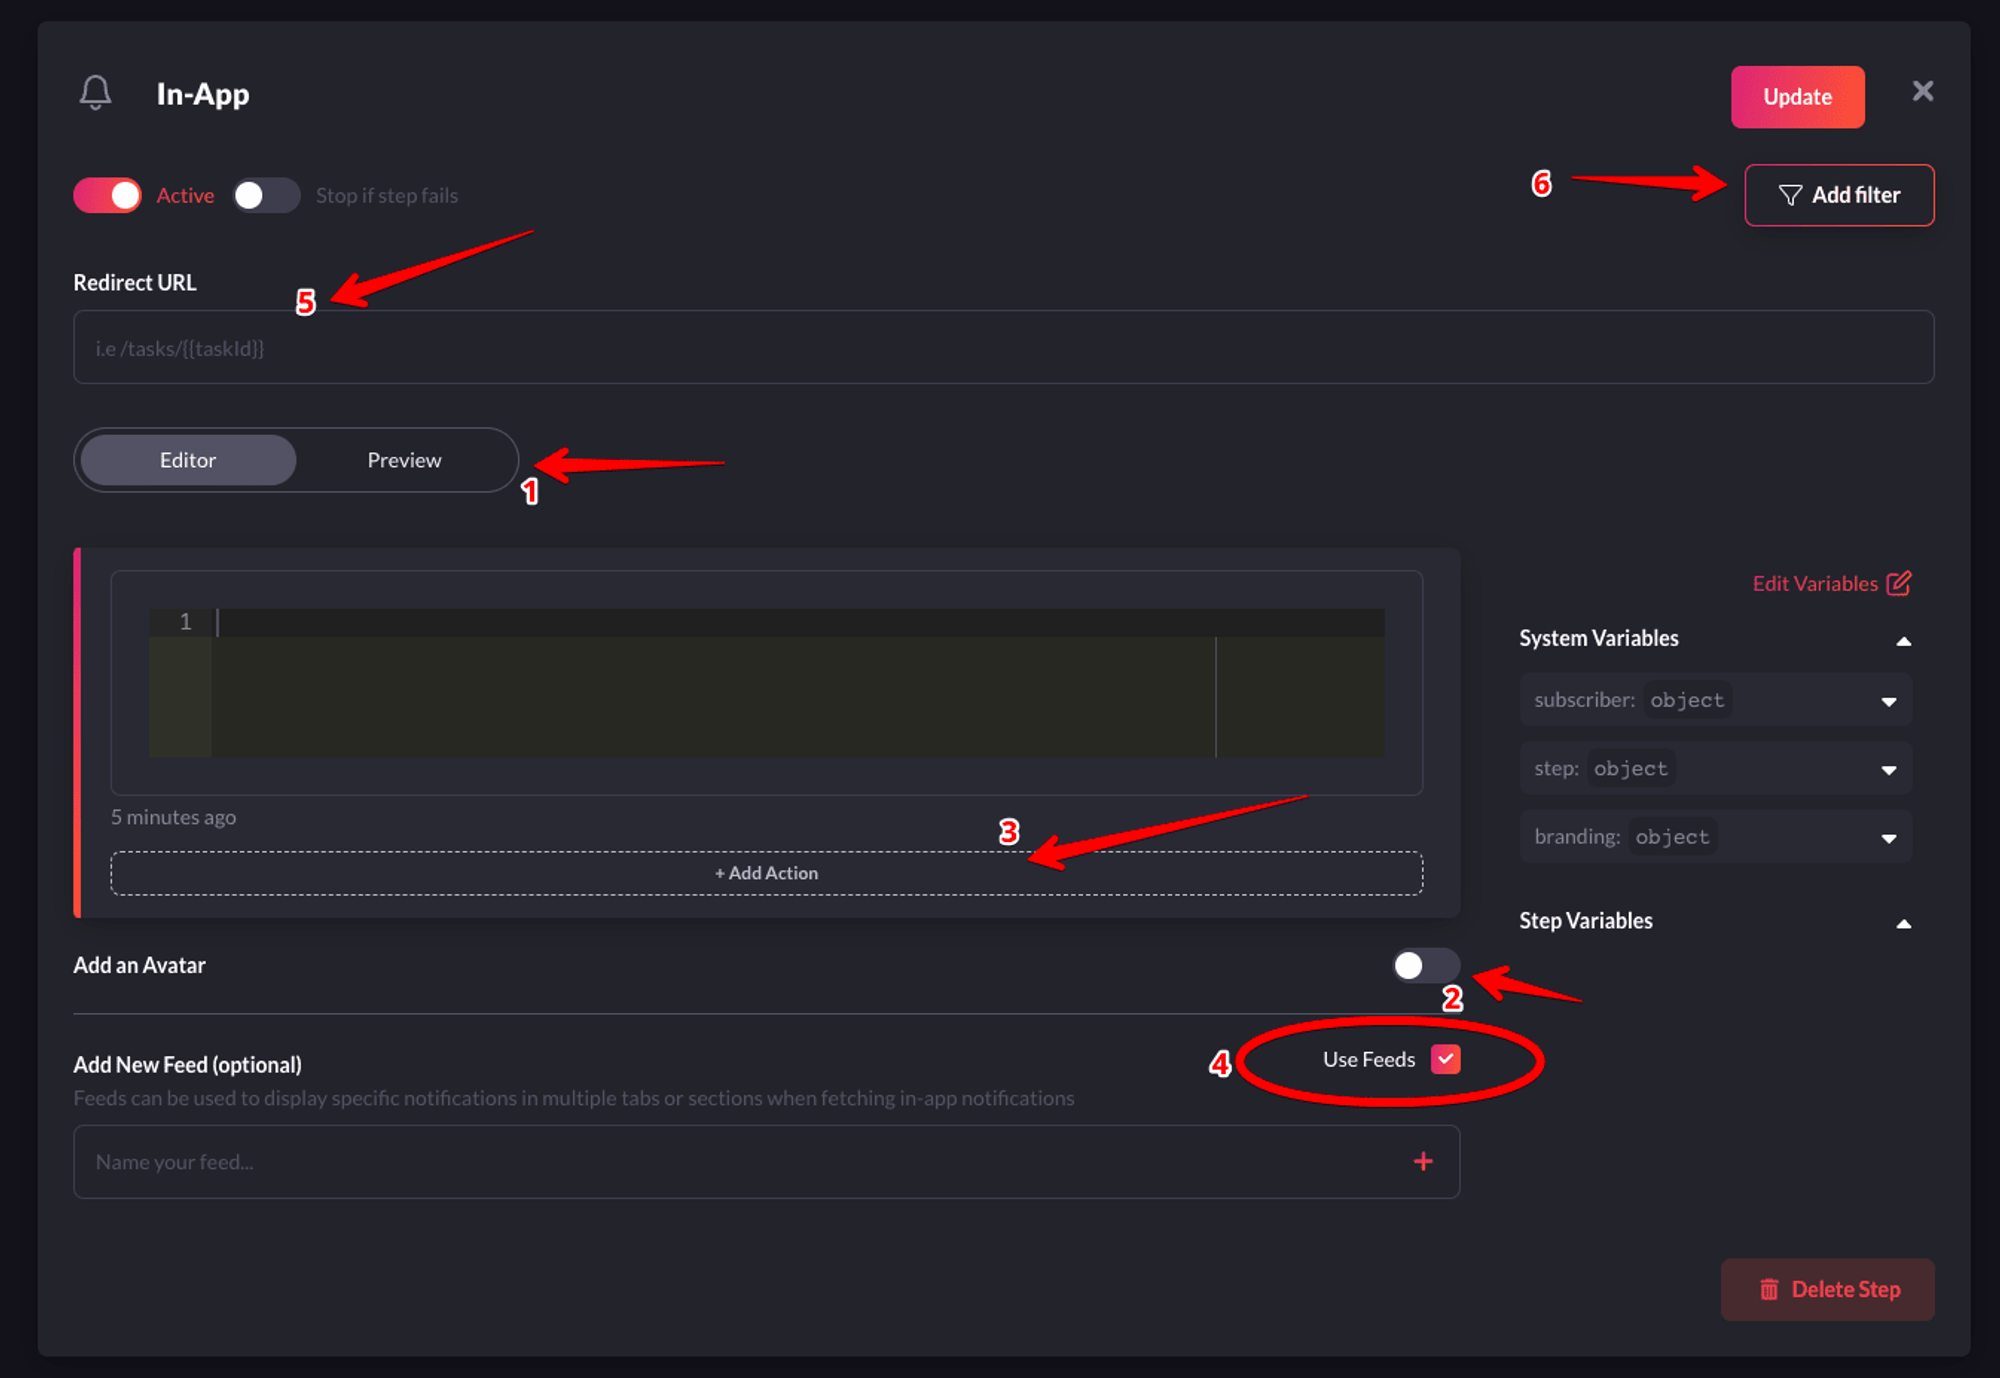
I’ll briefly explain the function of each label in the image above.
* **1-Preview**: Shows you a glimpse of how each notification item will look like in the Notification Center UI.
* **2-Avatar:** If turned on, each notification item will show the avatar of the subscriber.
* **3-Action:** With this, you can add a primary and secondary call to action button to each notification item.
* **4-Notification Feeds:** This displays a stream of specific notifications. You can have multiple feeds to show specific notifications in multiple tabs.
* **5-Redirect URL** - This is the URL to which a subscriber can be directed when they click on a notification item.
* **6-Filter** - This feature allows you to configure the criteria for delivering notifications. For instance, you can apply a filter based on a subscriber's online status to send them an email if they were online within the last hour. Read [more about filters](https://docs.novu.co/platform/step-filter/#subscriber-seen--read-filters).
In the In-App channel `Editor`, add the following content and rename the step to `Onboarding In App` :
```javascript theme={null}
Hi {{ name }},
Thanks for indicating interest in attending RedwoodJS conference. Here is your message:
{{ message }}
```
{" "}
`{{ name }}` and `{{ message }}` are payload values that will be passed on from
our code to the workflow template so it can appear in the notification sent to
subscribers.
Click on the `Update` button to save the configuration successfully!
6. In the workflow page, drag and drop the **Email** channel to the workflow canvas to be just below the `In-App` channel.
7. Click on the recently added Email channel and configure it:
Add `Sender name` and `Subject`. Ensure the `Default Layout` is selected for the Email Layout.
Switch to the `Custom Code` section and add the following:
```javascript theme={null}
Hi {{ name }},
Thank you for attending RedwoodJS Conference. This means a lot to us!
Here is your message:
{{ message }}
```
Finally, give the workflow a name. We'll need the workflow trigger identifier ***(which is the slug of the name)*** later.
Next, we’ll learn how to trigger notifications to subscribers.
# Trigger A Notification
Open up `api/src/services/contacts/contacts.js`, and add the following code into your app to trigger a notification:
```javascript theme={null}
import { Novu } from '@novu/node'
const novu = new Novu(process.env.NOVU_API_KEY)
export async function sendNotification(email, name, message) {
await novu.trigger('', {
to: {
subscriberId: process.env.REDWOOD_ENV_SUBSCRIBER_ID,
email: email,
},
payload: {
name: name,
message: message,
},
})
}
...
...
/** In the createContact code, call the sendNotification and pass in the email, name and message */
export const createContact = ({ input }) => {
validate(input.email, 'email', { email: true })
sendNotification(input.email, input.name, input.message)
return db.contact.create({
data: input,
})
}
...
...
```
Before running the code, make sure you understand the following:
* The value of `` should be the workflow’s trigger ID/slug.
* The value of `payload` is an array of the data that you want to be dynamically injected into the workflow content.
* The value of `subscriberId` is the id of the subscriber on Novu.
* Ensure `NOVU_API_KEY` is in the `.env` file and with the appropriate value gotten from the dashboard.
# One more thing
Head over to the [integrations store on your Novu dashboard](https://web.novu.co/integrations?utm_campaign=docs-quick-redwoodjs).
Select the **Novu Email Test Provider**, and mark as the primary provider for Emails. This ensures that all emails are sent via the Novu Email provider.
# Test the app
Ensure your app is still running and head over the `/contact` page in the app. Fill the form and click `Save`.
The app will trigger two notifications:
* An In-App notification
* An Email notification
# Conclusion
Great job! If you've reached this point, you should now have successfully created workflow, configured a channel provider, triggered a workflow, and sent an email and In-App notification.
 {" "}
I’ll briefly explain the function of each label in the image above.
* **1-Preview**: Shows you a glimpse of how each notification item will look like in the Notification Center UI.
* **2-Avatar:** If turned on, each notification item will show the avatar of the subscriber.
* **3-Action:** With this, you can add a primary and secondary call to action button to each notification item.
* **4-Notification Feeds:** This displays a stream of specific notifications. You can have multiple feeds to show specific notifications in multiple tabs.
* **5-Redirect URL** - This is the URL to which a subscriber can be directed when they click on a notification item.
* **6-Filter** - This feature allows you to configure the criteria for delivering notifications. For instance, you can apply a filter based on a subscriber's online status to send them an email if they were online within the last hour. Read [more about filters](https://docs.novu.co/platform/step-filter/#subscriber-seen--read-filters).
In the In-App channel `Editor`, add the following content and rename the step to `Onboarding In App` :
```javascript theme={null}
Hi {{ name }},
{" "}
I’ll briefly explain the function of each label in the image above.
* **1-Preview**: Shows you a glimpse of how each notification item will look like in the Notification Center UI.
* **2-Avatar:** If turned on, each notification item will show the avatar of the subscriber.
* **3-Action:** With this, you can add a primary and secondary call to action button to each notification item.
* **4-Notification Feeds:** This displays a stream of specific notifications. You can have multiple feeds to show specific notifications in multiple tabs.
* **5-Redirect URL** - This is the URL to which a subscriber can be directed when they click on a notification item.
* **6-Filter** - This feature allows you to configure the criteria for delivering notifications. For instance, you can apply a filter based on a subscriber's online status to send them an email if they were online within the last hour. Read [more about filters](https://docs.novu.co/platform/step-filter/#subscriber-seen--read-filters).
In the In-App channel `Editor`, add the following content and rename the step to `Onboarding In App` :
```javascript theme={null}
Hi {{ name }},