> ## Documentation Index
> Fetch the complete documentation index at: https://v0.x-docs.novu.co/llms.txt
> Use this file to discover all available pages before exploring further.
# Vue
> Learn how to use Novu to quickly send multi-channel (SMS, Email, Chat, Push) notifications with Vue.
Learn how to use Novu to quickly send multi-channel (SMS, Email, Chat, Push) notifications and integrate a rich, customizable and ready-to-use realtime UI In-App notification center in Vue apps.
# Requirements
To follow the steps in this quickstart, you'll need:
* A Novu account. [Sign up for free](http://web.novu.co/?utm_campaign=docs-gs-quick-vue) if you don’t have one yet.
* A working Vue development environment with a Vue 3 version.
You can also [view the completed code](https://github.com/novuhq/vue-quickstart) of this quick start in a GitHub repo.
# Create a new Vue app
If you already have a working Vue app, please feel free to skip this section.
Create a new Vue 3 app by running the following command in your terminal:
```bash theme={null}
npx create-vue notifications-app
```
Interactively run through the questions and answer them according to your preference. Then `cd` into the `notifications-app` folder and run the following:
```bash theme={null}
npm install && npm run format && npm run dev
```
# Install Novu Vue Notification Center Package
The Novu Vue package provides a Vue component wrapper over the web component that you can use to integrate the notification center into your Vue application.
Now install the Vue Notification Center package by running the following command in your terminal:
```bash theme={null}
npm install @novu/notification-center-vue
```
## Register The Notification Center Plugin
First, register the notification center plugin in your app as a global component.
In your `main.js` or `main.ts` file, add it like so:
```tsx theme={null}
import { createApp } from 'vue';
import NotificationCenterPlugin from '@novu/notification-center-vue';
import '@novu/notification-center-vue/dist/style.css';
// your app component
import App from './App.vue';
const app = createApp(App);
app.use(NotificationCenterPlugin);
app.mount('#app');
```
# Use The Notification Center Component
Create a new file, `NotificationCenter.vue` in the `src/components` directory. This file will house the Notification Center component.
Add the `NotificationCenterComponent` like so:
***Using the Composition API***
```tsx theme={null}
```
src/components/NotificationCenter.vue
***Using the Options API***
```tsx theme={null}
```
src/components/NotificationCenter.vue
The `subscriberId` ideally should be the `id` of the **logged in user**. When a user logs into your app, they’ll be able to see all their notifications in the notification center. For this to work successfully, the user should have been created as a subscriber on Novu.
The `applicationIdentifier` is a public key used to identify your application. Obtain it from your [Novu dashboard settings](https://web.novu.co/settings?utm_campaign=docs-quick-vue), and add it to your `.env` file.
If there’s none, create a `.env` file and add it like so:
```
VITE_NOVU_APP_IDENTIFIER = YOUR_NOVU_APP_IDENTIFIER;
```
Replace `YOUR_NOVU_APP_IDENTIFIER` with the real value from your dashboard.
# Display The In-App Notification Center UI
If you started by creating a new Vue app, then do the following:
Head over to `src/views/HomeView.vue` and import the `NotificationCenter.vue` component.
Replace the entire file with the code below:
```tsx theme={null}
```
src/views/HomeView\.vue
Run your app again. You will see a button with the text **Notifications: 0**. Click on the button to reveal the notification center UI. Voila!
There are no notifications because none has been triggered yet. When notifications are sent to a subscriber, it will show up in the UI. Next, we'll learn how to trigger notifications.
There’s a probability you might want the general notification bell icon. By default, the component displays the bell icon.
Simply delete the button element. Your component should look like this:
```jsx theme={null}
```
You should now see a **bell button** that opens the notification center when clicked. This bell can be customized to your preference, and we will style and modify it in a later step.
* [Vue Notification Center Example Repo](https://github.com/novuhq/examples/tree/main/vue-notification-center-example)
# Create A Workflow
The first step to trigger notifications is to create a workflow. A workflow is like a map that holds the entire flow of messages sent to the subscriber.
The recipients of a triggered notification are called subscribers.
The workflow includes the following:
* Workflow name and Identifier
* Channel tailored content:
| Channel
| Content Style
| Custom Variables `{{handlebars}}` format |
| ------------------- | ------------------------- | :-------------------------------------------: |
| **Email** | HTML | ✅ |
| | Visual Editor | ✅ |
| **SMS** | Text | ✅ |
| **Chat** | Text | ✅ |
| **In-App** | Text | ✅ |
| **Push** | Text | ✅ |
Please proceed to create a workflow.
1. Click **Workflows** on the left sidebar of your Novu dashboard.
2. Click the **Create Workflow** button on the top right.
3. The name of the new workflow is currently "Untitled." Rename it to a more suitable title.
4. Select **In-App** as the channel you want to add.
5. Click on the recently added In-App channel and configure it according to your preferences. Once you’re done, click Update to save your configuration.
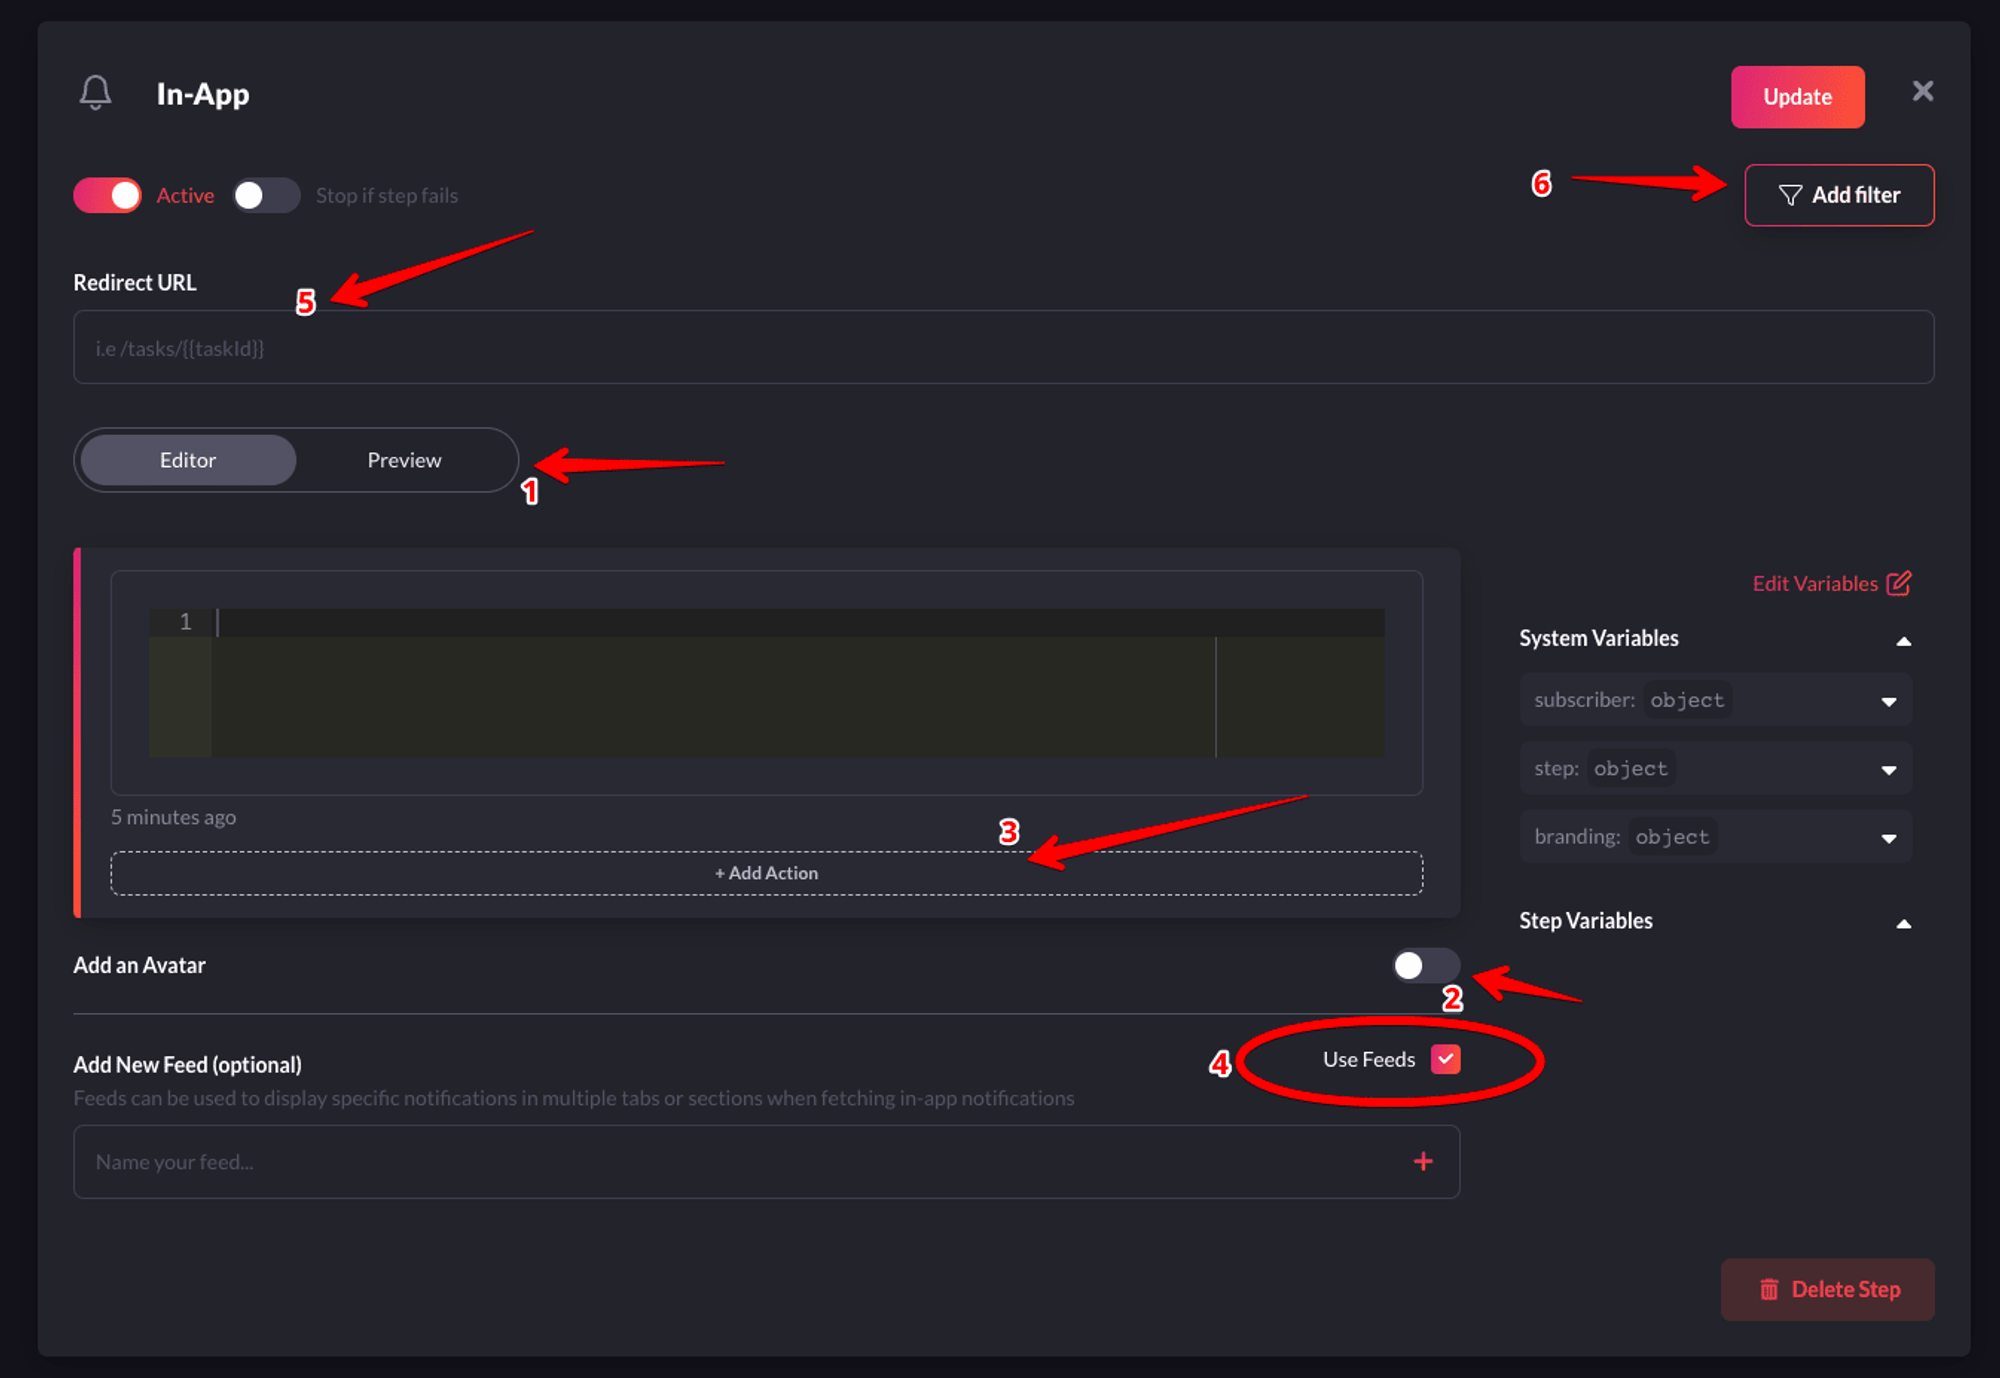
I’ll briefly explain the function of each label in the image above.
* **1-Preview**: Shows you a glimpse of how each notification item will look like in the Notification Center UI.
* **2-Avatar:** If turned on, each notification item will show the avatar of the subscriber.
* **3-Action:** With this, you can add a primary and secondary call to action button to each notification item.
* **4-Notification Feeds:** This displays a stream of specific notifications. You can have multiple feeds to show specific notifications in multiple tabs.
* **5-Redirect URL** - This is the URL to which a subscriber can be directed when they click on a notification item.
* **6-Filter** - This feature allows you to configure the criteria for delivering notifications. For instance, you can apply a filter based on a subscriber's online status to send them an email if they were online within the last hour. Read [more about filters](https://docs.novu.co/platform/step-filter/#subscriber-seen--read-filters).
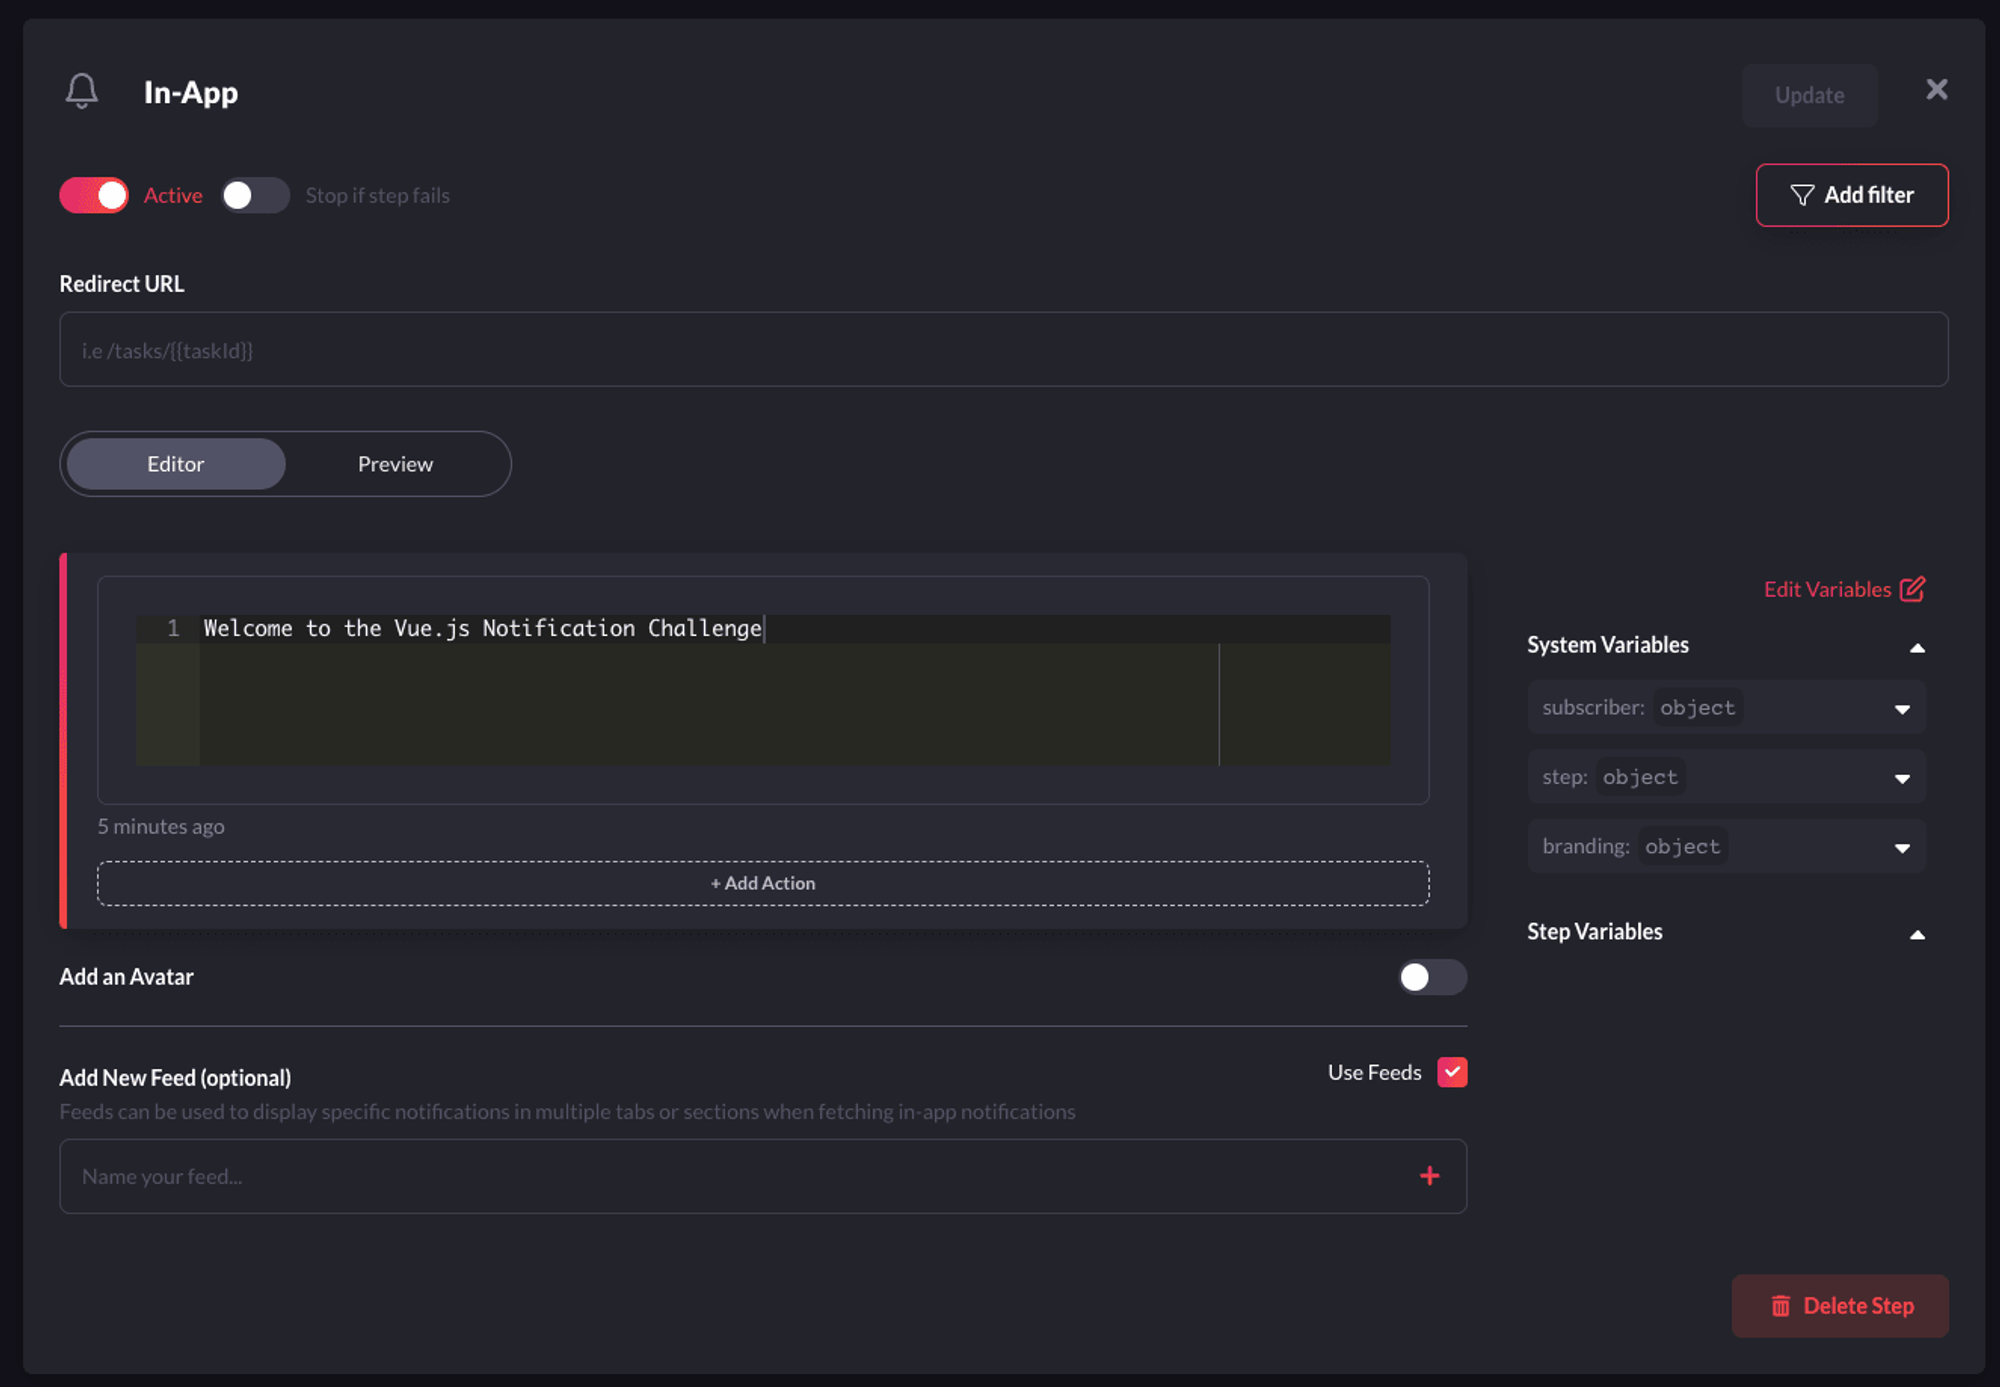
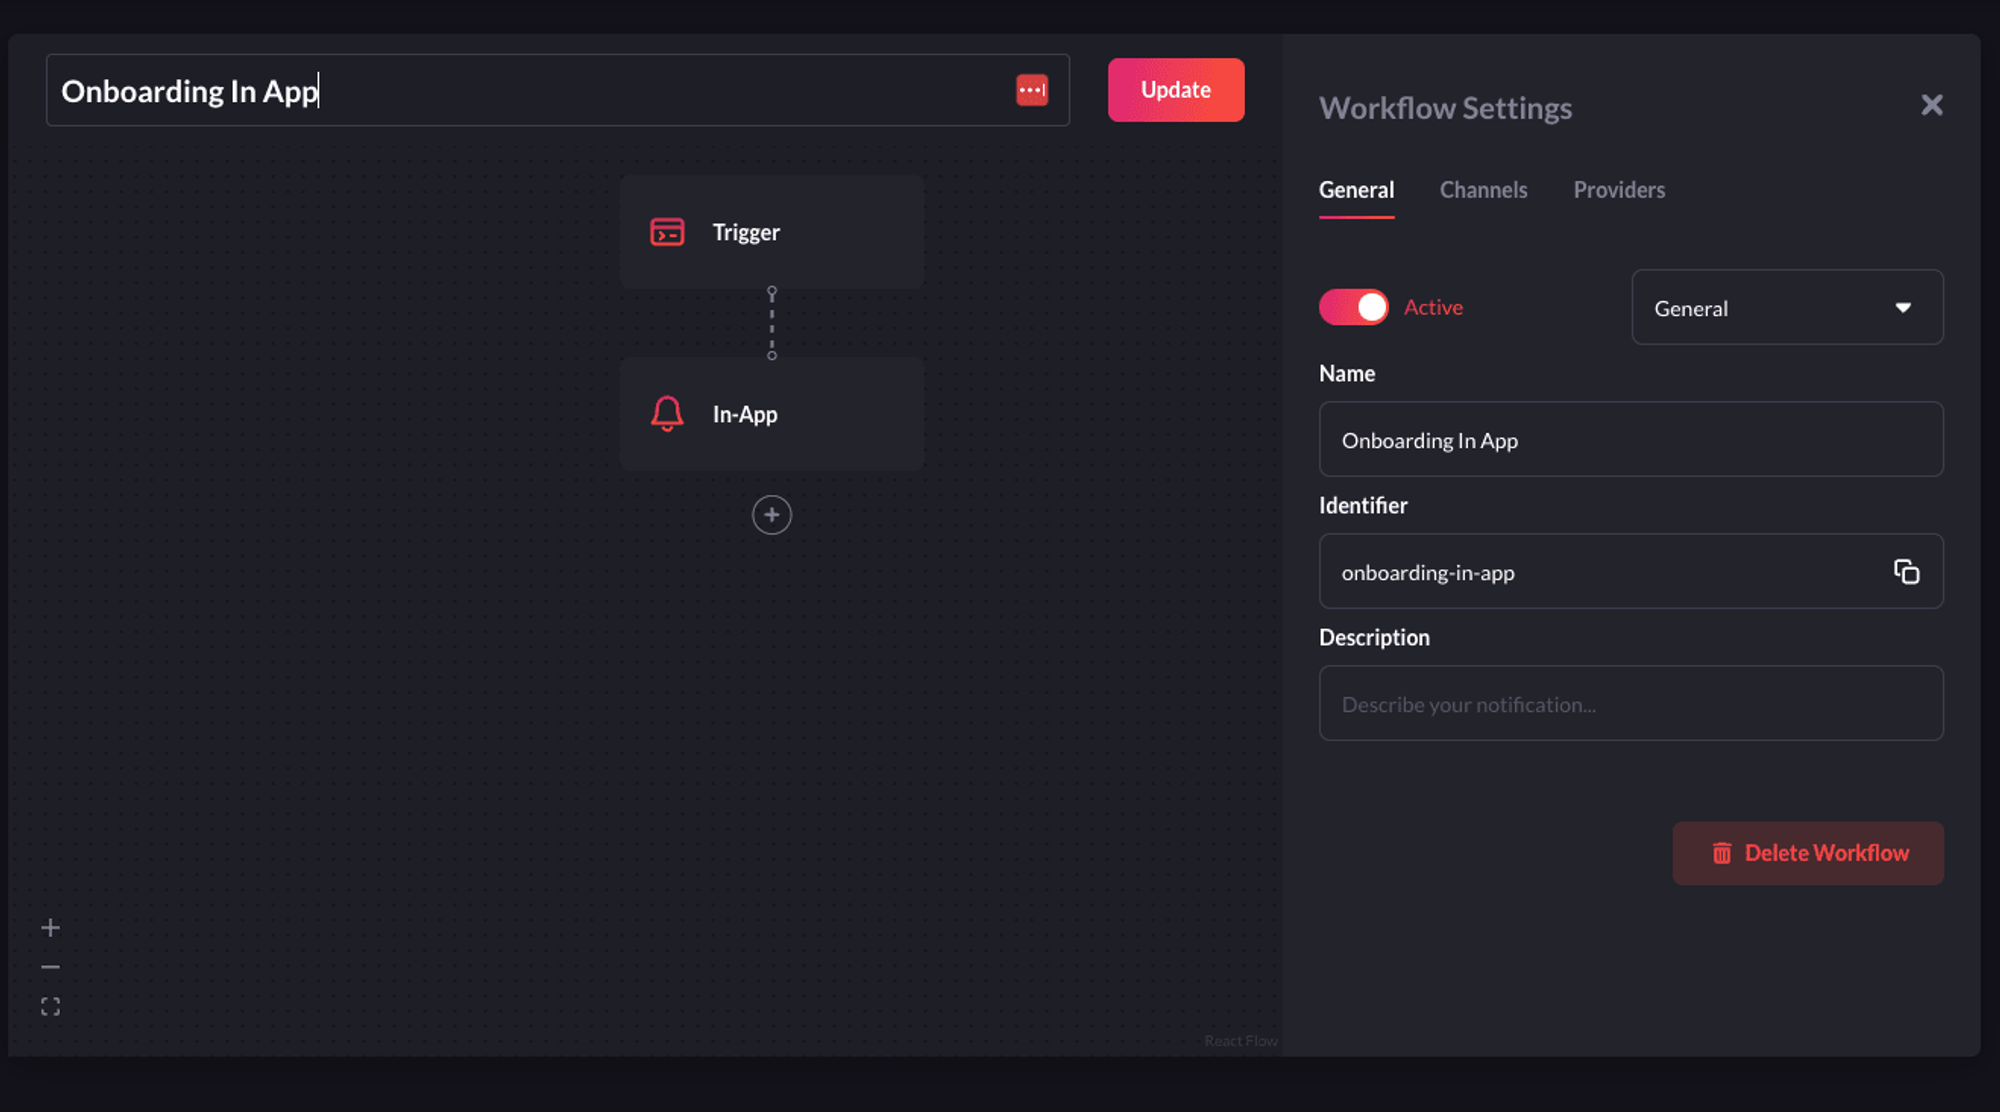
Feel free to add only text for now and rename the workflow to `Onboarding In App`. It automatically creates a slug-like Identifier that will be needed in later steps to trigger a notification.
Next, we’ll learn how to create subscribers on Novu - *Recipients of Notifications*
# Create A Subscriber
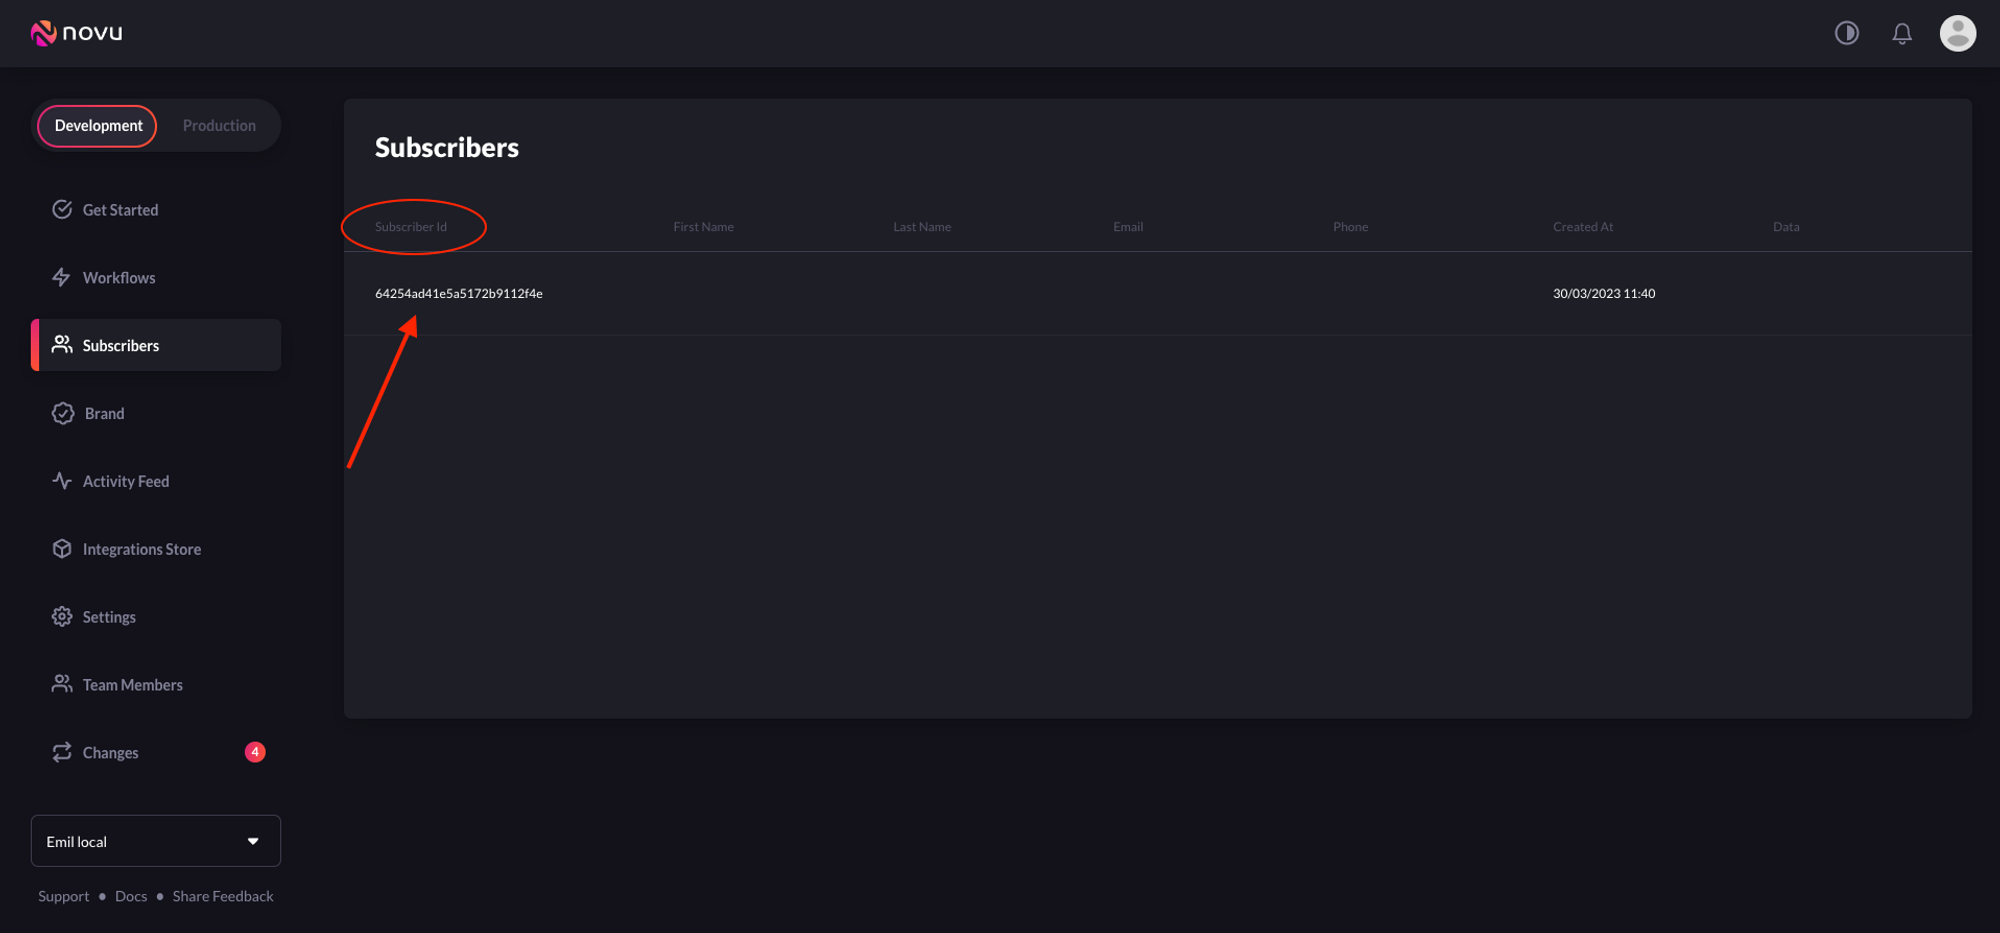
Click **Subscribers** on the left sidebar of the [Novu dashboard](https://web.novu.co/subscribers?utm_campaign=docs-quick-vue) to see all subscribers. By default, the dashboard will display a subscriber, as you were added automatically during sign-up.
Now, let's create a subscriber on Novu.
Novu has a plethora of backend SDKs (Node.js, PHP, .NET, Go, Ruby, Python and Kotlin) to choose from to create a subscriber programmatically. This is the recommended method.
Obtain your API key from your [Novu dashboard.](https://web.novu.co/settings?utm_campaign=docs-quick-vue) Replace `` with it.
Now check your Novu dashboard. You should see the recently created subscriber.
You can also update the subscriber info like so:
```jsx theme={null}
import { Novu } from '@novu/node';
const novu = new Novu('');
await novu.subscribers.update('132', {
email: 'janedoe@domain.com', // new email
phone: '+19874567832', // new phone
});
```
# Trigger A Notification
To trigger a notification, simply run the codesandbox below with the correct credentials.
```jsx theme={null}
// code to trigger a notification
```
`onboarding-in-app` is the workflow identifier we created earlier.
Ensure the `subscriberId` value in the backend code that triggers the notification matches the `subscriberId` in your **NotificationCenterComponent** code.
```tsx theme={null}
```
Check your app again. You should see the recently triggered notification!
# Conclusion
Great job! If you've reached this point, you should now have successfully set up the notification center, created a subscriber, a workflow, configured a channel provider and triggered a notification in your Vue application.
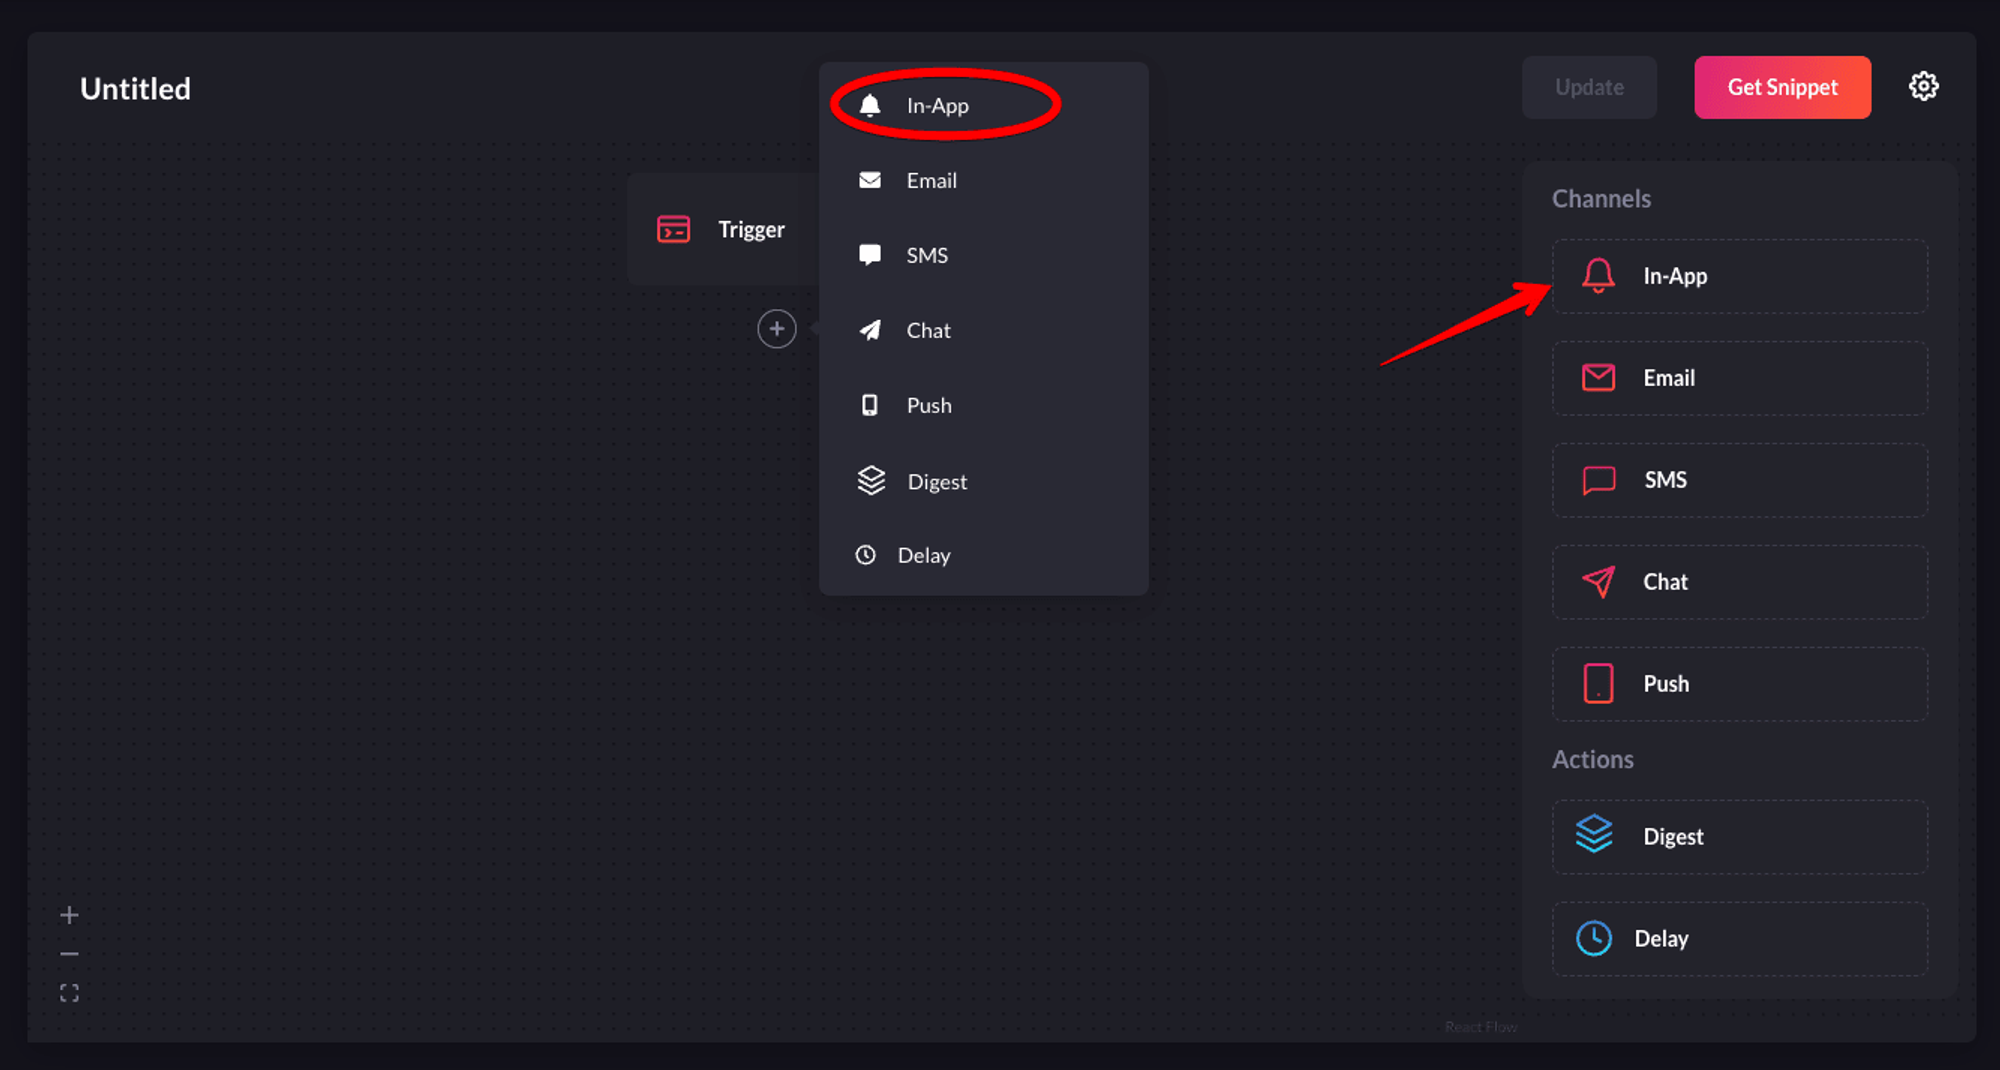 5. Click on the recently added In-App channel and configure it according to your preferences. Once you’re done, click Update to save your configuration.
 I’ll briefly explain the function of each label in the image above.
* **1-Preview**: Shows you a glimpse of how each notification item will look like in the Notification Center UI.
* **2-Avatar:** If turned on, each notification item will show the avatar of the subscriber.
* **3-Action:** With this, you can add a primary and secondary call to action button to each notification item.
* **4-Notification Feeds:** This displays a stream of specific notifications. You can have multiple feeds to show specific notifications in multiple tabs.
* **5-Redirect URL** - This is the URL to which a subscriber can be directed when they click on a notification item.
* **6-Filter** - This feature allows you to configure the criteria for delivering notifications. For instance, you can apply a filter based on a subscriber's online status to send them an email if they were online within the last hour. Read [more about filters](https://docs.novu.co/platform/step-filter/#subscriber-seen--read-filters).
Feel free to add only text for now and rename the workflow to `Onboarding In App`. It automatically creates a slug-like Identifier that will be needed in later steps to trigger a notification.
I’ll briefly explain the function of each label in the image above.
* **1-Preview**: Shows you a glimpse of how each notification item will look like in the Notification Center UI.
* **2-Avatar:** If turned on, each notification item will show the avatar of the subscriber.
* **3-Action:** With this, you can add a primary and secondary call to action button to each notification item.
* **4-Notification Feeds:** This displays a stream of specific notifications. You can have multiple feeds to show specific notifications in multiple tabs.
* **5-Redirect URL** - This is the URL to which a subscriber can be directed when they click on a notification item.
* **6-Filter** - This feature allows you to configure the criteria for delivering notifications. For instance, you can apply a filter based on a subscriber's online status to send them an email if they were online within the last hour. Read [more about filters](https://docs.novu.co/platform/step-filter/#subscriber-seen--read-filters).
Feel free to add only text for now and rename the workflow to `Onboarding In App`. It automatically creates a slug-like Identifier that will be needed in later steps to trigger a notification.
 Next, we’ll learn how to create subscribers on Novu - *Recipients of Notifications*
# Create A Subscriber
Click **Subscribers** on the left sidebar of the [Novu dashboard](https://web.novu.co/subscribers?utm_campaign=docs-quick-vue) to see all subscribers. By default, the dashboard will display a subscriber, as you were added automatically during sign-up.
Next, we’ll learn how to create subscribers on Novu - *Recipients of Notifications*
# Create A Subscriber
Click **Subscribers** on the left sidebar of the [Novu dashboard](https://web.novu.co/subscribers?utm_campaign=docs-quick-vue) to see all subscribers. By default, the dashboard will display a subscriber, as you were added automatically during sign-up.
 Now, let's create a subscriber on Novu.
Novu has a plethora of backend SDKs (Node.js, PHP, .NET, Go, Ruby, Python and Kotlin) to choose from to create a subscriber programmatically. This is the recommended method.
Obtain your API key from your [Novu dashboard.](https://web.novu.co/settings?utm_campaign=docs-quick-vue) Replace `
Now, let's create a subscriber on Novu.
Novu has a plethora of backend SDKs (Node.js, PHP, .NET, Go, Ruby, Python and Kotlin) to choose from to create a subscriber programmatically. This is the recommended method.
Obtain your API key from your [Novu dashboard.](https://web.novu.co/settings?utm_campaign=docs-quick-vue) Replace `