Send notifications across different channels (SMS, Email, Chat, Push) and enable real-time In-App notifications with the help of a rich and customizable Notification Center in a RedwoodJS app.

Explore the code for this quickstart on GitHub.

Explore the live demo.

Prerequisites

To follow the steps in this quickstart, you’ll need:

  • A Novu account. If you don’t have one, sign up for free.
  • Node.js installed on your development machine.

Create a RedwoodJS app

Clone the popular RedwoodJS blog tutorial app by running the following command in your terminal:

git clone https://github.com/redwoodjs/redwood-tutorial
cd redwood-tutorial
yarn install
yarn rw prisma migrate dev
yarn rw prisma db seed
yarn rw dev

Install Novu

To install Novu’s In-App notification center, simply issue the following command:

yarn workspace web add @novu/notification-center

Next, install Novu’s Node SDK to fire notifications from the api/backend:

yarn workspace api add @novu/node

Register The Notification Center Component

Head over to web/src/layouts/BlogLayout/BlogLayout.js file of the recently cloned project and add the Novu In-App Notification center.

The file should look like this:

import {
  NovuProvider,
  PopoverNotificationCenter,
  NotificationBell,
} from "@novu/notification-center";

import { Link, routes } from "@redwoodjs/router";

import { useAuth } from "src/auth";

const BlogLayout = ({ children }) => {
  const { logOut, isAuthenticated, currentUser } = useAuth();
  const SUBSCRIBER_ID = process.env.REDWOOD_ENV_SUBSCRIBER_ID;
  const APPLICATION_IDENTIFIER = process.env.REDWOOD_ENV_APPLICATION_IDENTIFIER;

  return (
    <>
      <header className="relative flex justify-between items-center py-4 px-8 bg-blue-700 text-white">
        <h1 className="text-5xl font-semibold tracking-tight">
          <Link
            className="text-blue-400 hover:text-blue-100 transition duration-100"
            to={routes.home()}
          >
            Redwood Blog with <em>Novu</em>
          </Link>
        </h1>
        <nav>
          <ul className="relative flex items-center font-light">
            <li>
              <NovuProvider
                subscriberId={SUBSCRIBER_ID}
                applicationIdentifier={APPLICATION_IDENTIFIER}
              >
                <PopoverNotificationCenter
                  showUserPreferences={true}
                  position="top-start"
                >
                  {({ unseenCount }) => (
                    <NotificationBell unseenCount={unseenCount} />
                  )}
                </PopoverNotificationCenter>
              </NovuProvider>
            </li>
            <li>
              <Link
                className="py-2 px-4 hover:bg-blue-600 transition duration-100 rounded"
                to={routes.about()}
              >
                About
              </Link>
            </li>
            <li>
              <Link
                className="py-2 px-4 hover:bg-blue-600 transition duration-100 rounded"
                to={routes.contact()}
              >
                Contact
              </Link>
            </li>
            <li>
              {isAuthenticated ? (
                <div>
                  <button type="button" onClick={logOut} className="py-2 px-4">
                    Logout
                  </button>
                </div>
              ) : (
                <Link to={routes.login()} className="py-2 px-4">
                  Login
                </Link>
              )}
            </li>
          </ul>
          {isAuthenticated && (
            <div className="absolute bottom-1 right-0 mr-12 text-xs text-blue-300">
              {currentUser.email}
            </div>
          )}
        </nav>
      </header>
      <main className="max-w-4xl mx-auto p-12 bg-white shadow rounded-b">
        {children}
      </main>
    </>
  );
};

export default BlogLayout;

Add REDWOOD_ENV_APPLICATION_IDENTIFIER and REDWOOD_ENV_SUBSCRIBER_ID to the .env file.

The Subscriber ID ideally should be the id of the logged in user. When a user logs into your app, they’ll be able to see all their notifications in the notification center. For this to work successfully, the user should have been created as a subscriber on Novu.

The Application Identifier is a public key used to identify your application.

Head over to your Novu dashboard settings, copy the application identifier and add it as the value of REDWOOD_ENV_APPLICATION_IDENTIFIER.

Head over to the Subscribers page, grab a subscriber identifier and add it as the value of REDWOOD_ENV_SUBSCRIBER_ID in the .env file.

Now, check your app, you will see a notification bell button. Click on the button to reveal the notification center UI. Voila!

There are no notifications because none has been triggered yet. When notifications are sent to a subscriber, it will show up in the UI. Next, we’ll learn how to trigger notifications.

Create A Workflow

The first step to trigger notifications is to create a workflow. A workflow is like a map that holds the entire flow of messages sent to the subscriber.

The recipients of a triggered notification are called subscribers.

The workflow includes the following:

  • Workflow name and Identifier
  • Channel tailored content:
Channel

Content Style

Custom Variables
{{handlebars}} format
EmailHTML
Visual Editor
SMSText
ChatText
In-AppText
PushText

Please proceed to create a workflow.

  1. Click Workflows on the left sidebar of your Novu dashboard.
  2. Click the Add a workflow button on the top left.
  3. The name of the new workflow is currently “Untitled.” Rename it to a more suitable title.
  4. Select In-App as the channel you want to add.
  5. Click on the recently added In-App channel and configure it.
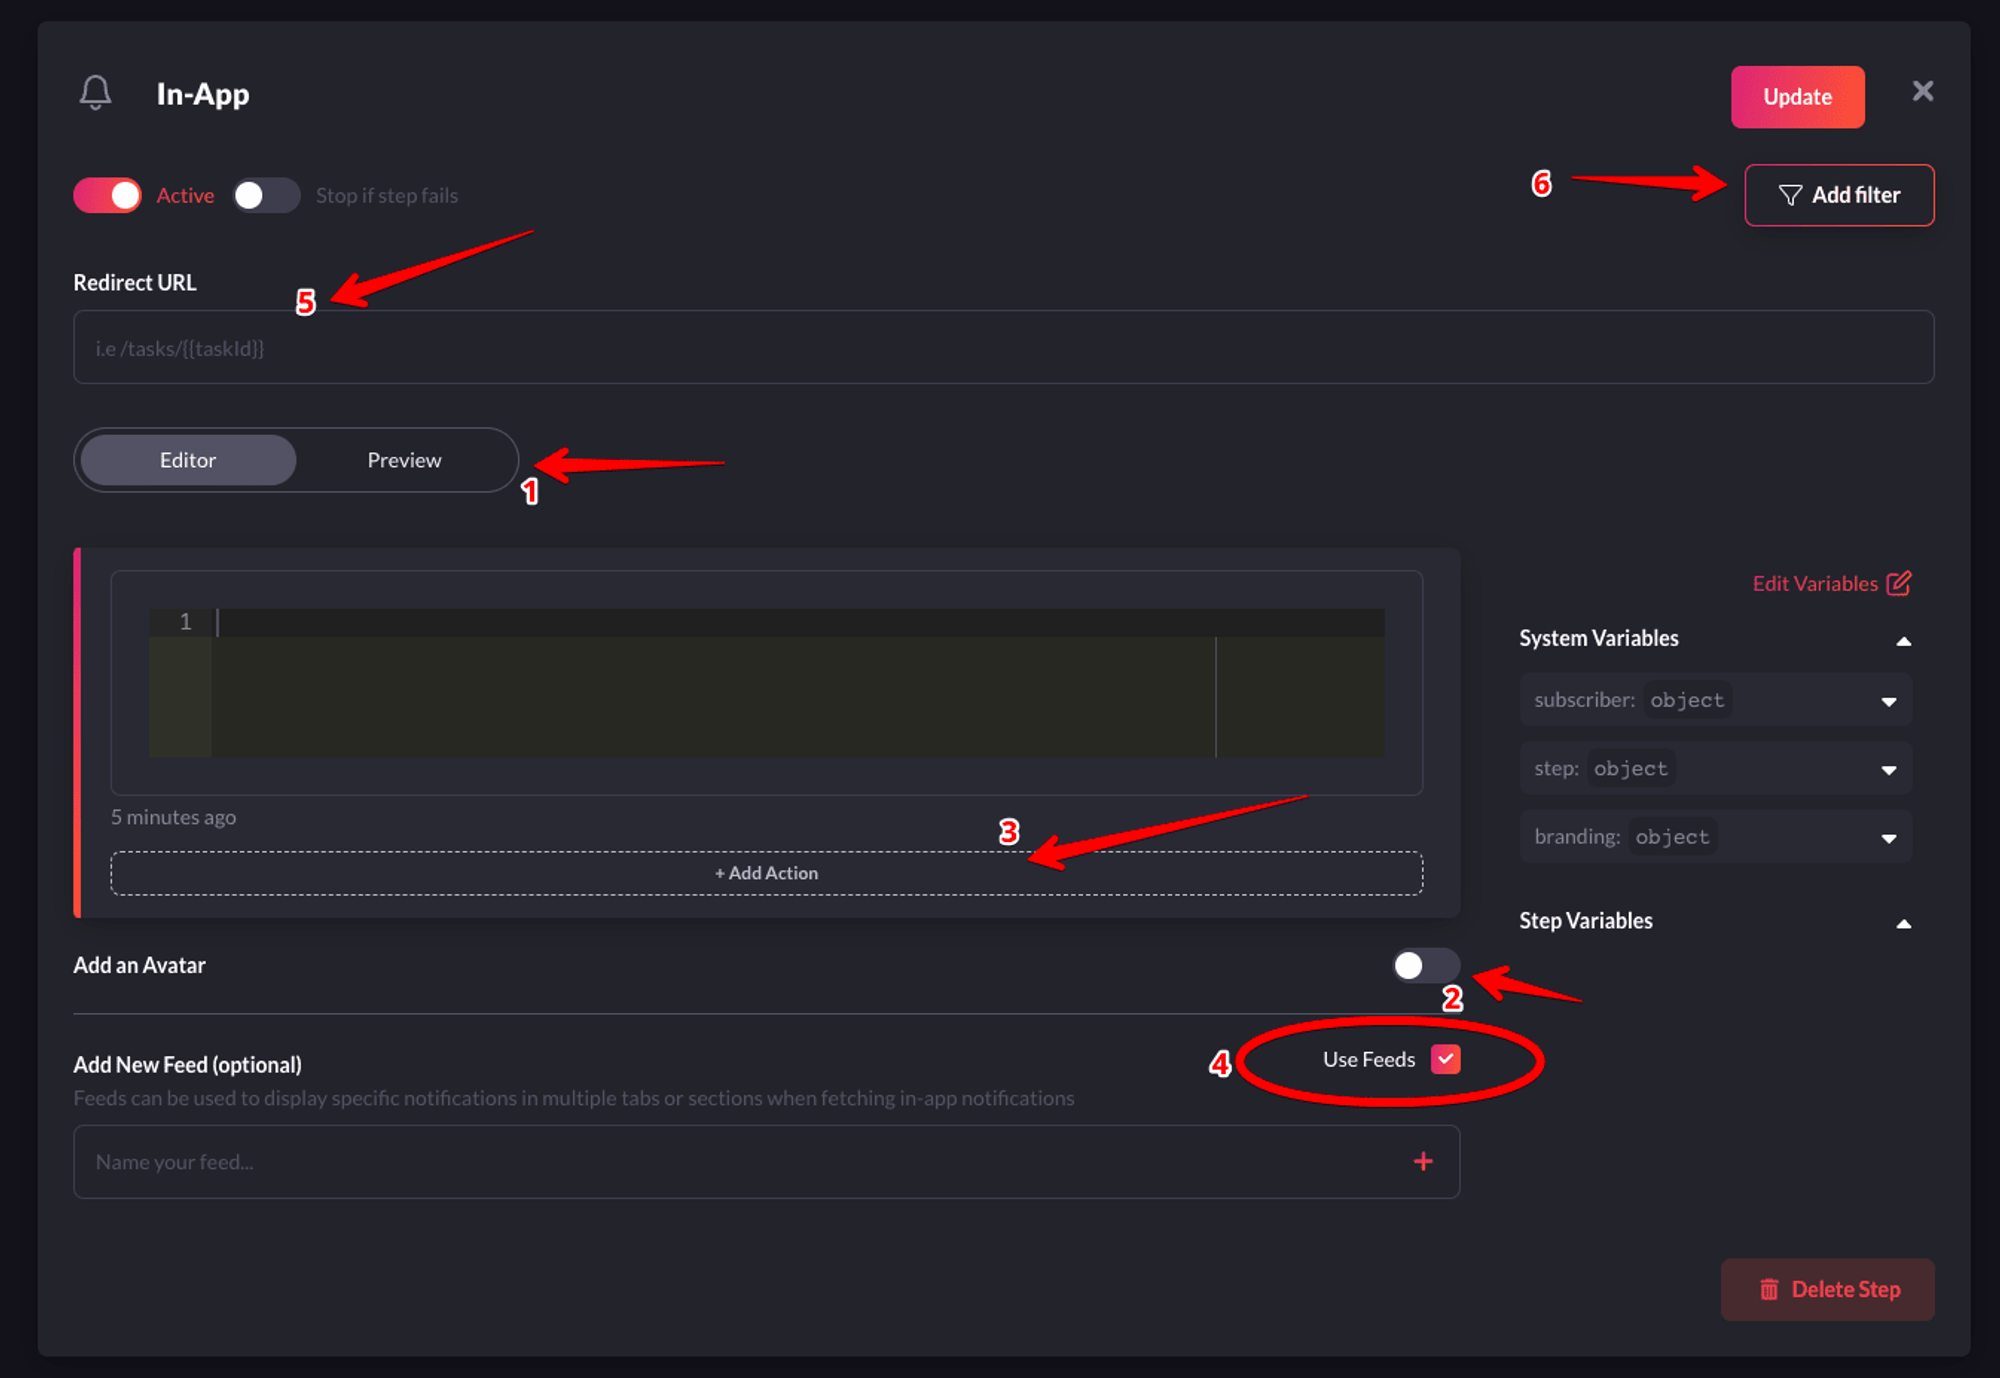
Configure it as per your requirements and then save it

I’ll briefly explain the function of each label in the image above.

  • 1-Preview: Shows you a glimpse of how each notification item will look like in the Notification Center UI.
  • 2-Avatar: If turned on, each notification item will show the avatar of the subscriber.
  • 3-Action: With this, you can add a primary and secondary call to action button to each notification item.
  • 4-Notification Feeds: This displays a stream of specific notifications. You can have multiple feeds to show specific notifications in multiple tabs.
  • 5-Redirect URL - This is the URL to which a subscriber can be directed when they click on a notification item.
  • 6-Filter - This feature allows you to configure the criteria for delivering notifications. For instance, you can apply a filter based on a subscriber’s online status to send them an email if they were online within the last hour. Read more about filters.

In the In-App channel Editor, add the following content and rename the step to Onboarding In App :

Hi {{ name }},
<br/>
<p>Thanks for indicating interest in attending RedwoodJS conference. Here is your message: </p>

<p>{{ message }}</p>

{{ name }} and {{ message }} are payload values that will be passed on from our code to the workflow template so it can appear in the notification sent to subscribers.

Click on the Update button to save the configuration successfully!

  1. In the workflow page, drag and drop the Email channel to the workflow canvas to be just below the In-App channel.
  2. Click on the recently added Email channel and configure it:

Add Sender name and Subject. Ensure the Default Layout is selected for the Email Layout.

Switch to the Custom Code section and add the following:

Hi {{ name }},

<br />
<p>Thank you for attending RedwoodJS Conference. This means a lot to us!</p>
<br />
<p>Here is your message:</p>

{{ message }}

Finally, give the workflow a name. We’ll need the workflow trigger identifier (which is the slug of the name) later.

Next, we’ll learn how to trigger notifications to subscribers.

Trigger A Notification

Open up api/src/services/contacts/contacts.js, and add the following code into your app to trigger a notification:

import { Novu } from '@novu/node'

const novu = new Novu(process.env.NOVU_API_KEY)

export async function sendNotification(email, name, message) {
  await novu.trigger('<workflow-trigger-id>', {
    to: {
      subscriberId: process.env.REDWOOD_ENV_SUBSCRIBER_ID,
      email: email,
    },
    payload: {
      name: name,
      message: message,
    },
  })
}

...

...

/** In the createContact code, call the sendNotification and pass in the email, name and message */
export const createContact = ({ input }) => {
  validate(input.email, 'email', { email: true })

  sendNotification(input.email, input.name, input.message)

  return db.contact.create({
    data: input,
  })
}

...
...

Before running the code, make sure you understand the following:

  • The value of <workflow-trigger-id> should be the workflow’s trigger ID/slug.
  • The value of payload is an array of the data that you want to be dynamically injected into the workflow content.
  • The value of subscriberId is the id of the subscriber on Novu.
  • Ensure NOVU_API_KEY is in the .env file and with the appropriate value gotten from the dashboard.

One more thing

Head over to the integrations store on your Novu dashboard.

Select the Novu Email Test Provider, and mark as the primary provider for Emails. This ensures that all emails are sent via the Novu Email provider.

Test the app

Ensure your app is still running and head over the /contact page in the app. Fill the form and click Save.

The app will trigger two notifications:

  • An In-App notification
  • An Email notification

Conclusion

Great job! If you’ve reached this point, you should now have successfully created workflow, configured a channel provider, triggered a workflow, and sent an email and In-App notification.