Prerequisites
- Node.js installed on your development machine (to create a NextJS app).
- A Novu account. If you don’t have one, sign up for free here.
Create a NextJS app to get started
The first step here would be to create a NextJS app. We will play with Novu in this app later. To get started, open your terminal and create a NextJS app using the following command:pages directory.
By creating a new file in the pages directory, such as about.js, we automatically create a route /about in our application. Next.js handles the routing logic behind the scenes, ensuring that when a user accesses /about, the corresponding page component is rendered.
In our app, we’ll create a route that will send an email notification to a specified email id. To do this, we need two things:
- Install Novu and connect it to our app
- Create the route and define a function in that route
Installing Novu and connecting it to the app
To install Novu, simply open your terminal and issue the following command: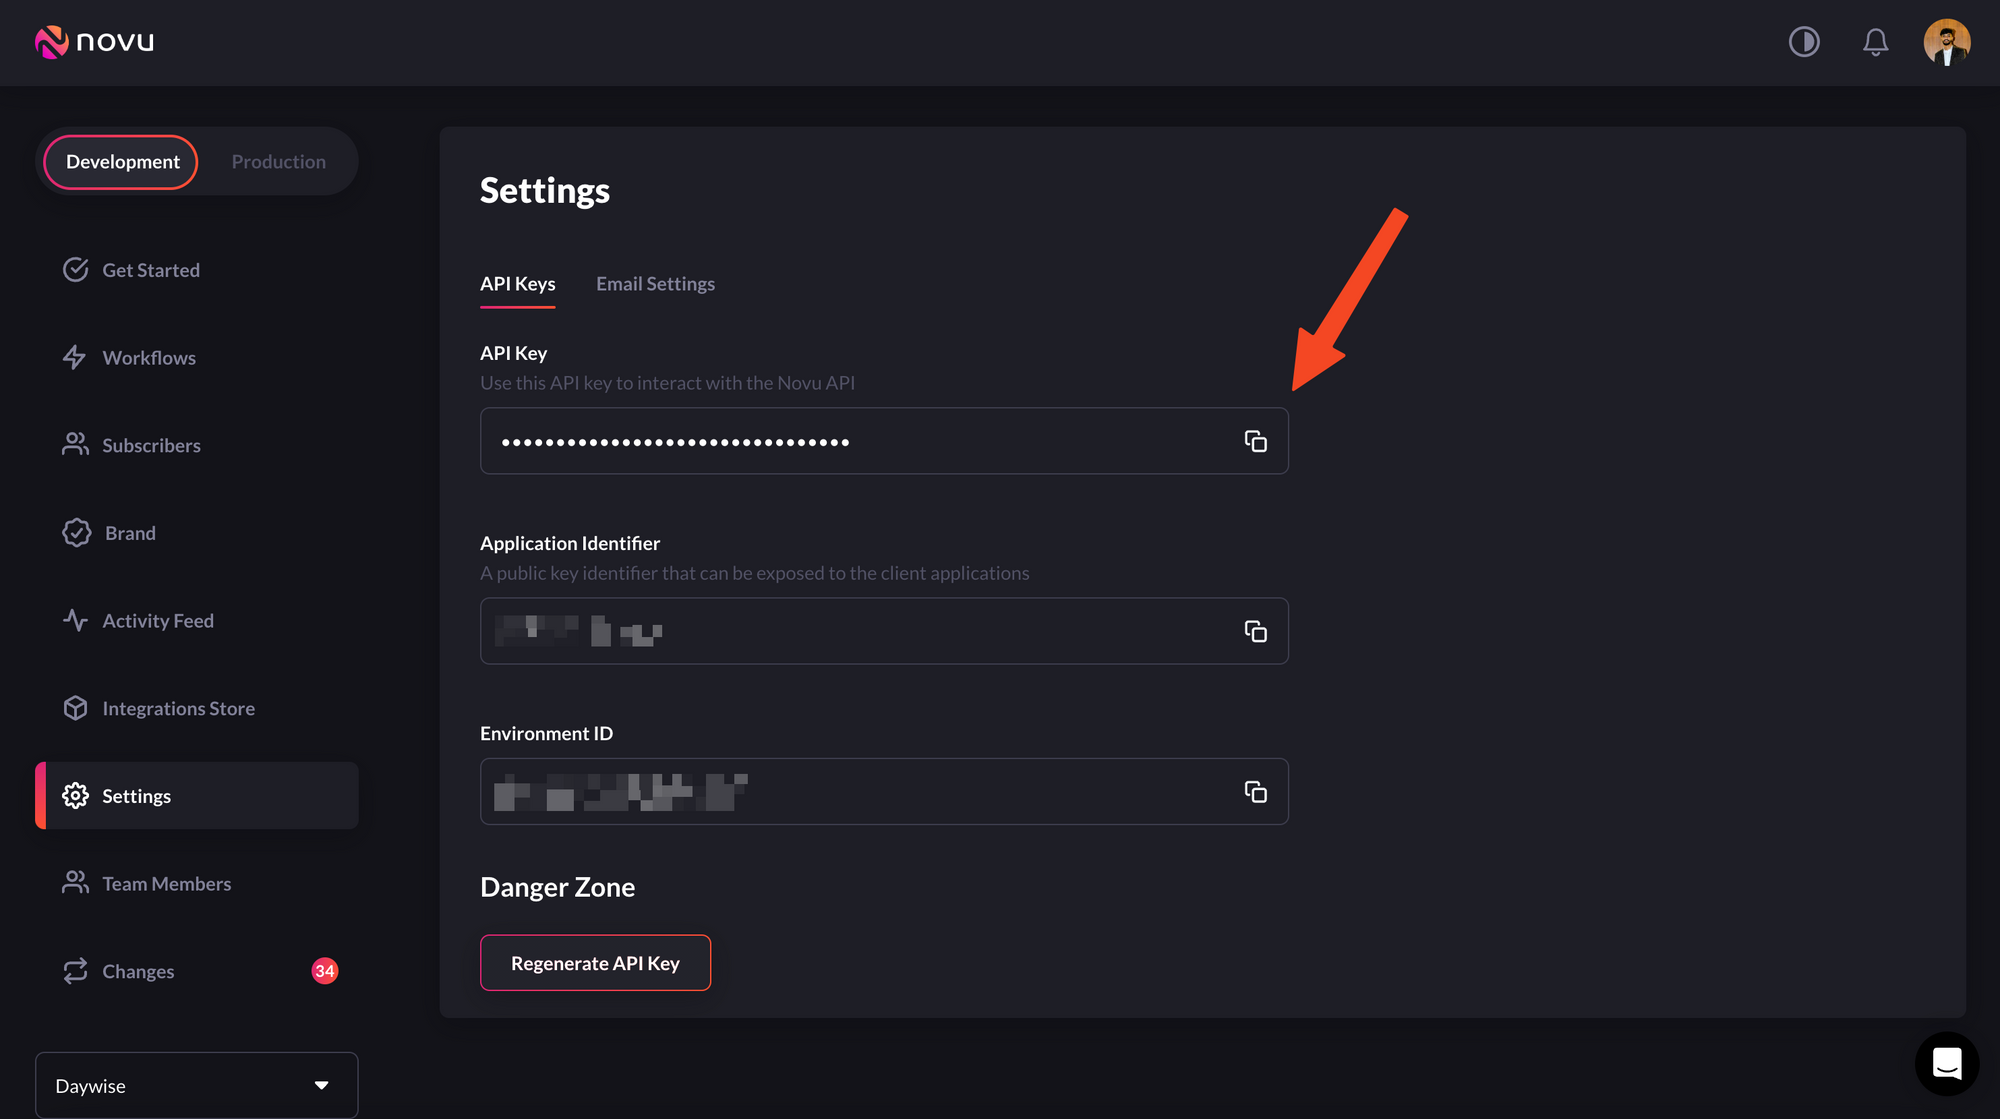
Obtain your API key from the settings menu
You can see all this in our integrations store and set it up there.
For each channel, there can be only one provider active at a time. Although the exact setup process varies from provider to provider, the general flow is signing up for a provider, getting an API key from its portal, and plugging it into the Novu web portal.
Once having integrated a provider, we need a workflow to send notifications. One can have dynamic data in this workflow if they so choose.
In our case, we’ll have dynamic data and whatever we send as a description will be sent as an email notification. Following are the steps to create a workflow.
Creating a workflow
- Click “Workflows” on the left sidebar of your Novu dashboard.
- Click the “Create Workflow” button on the top right.
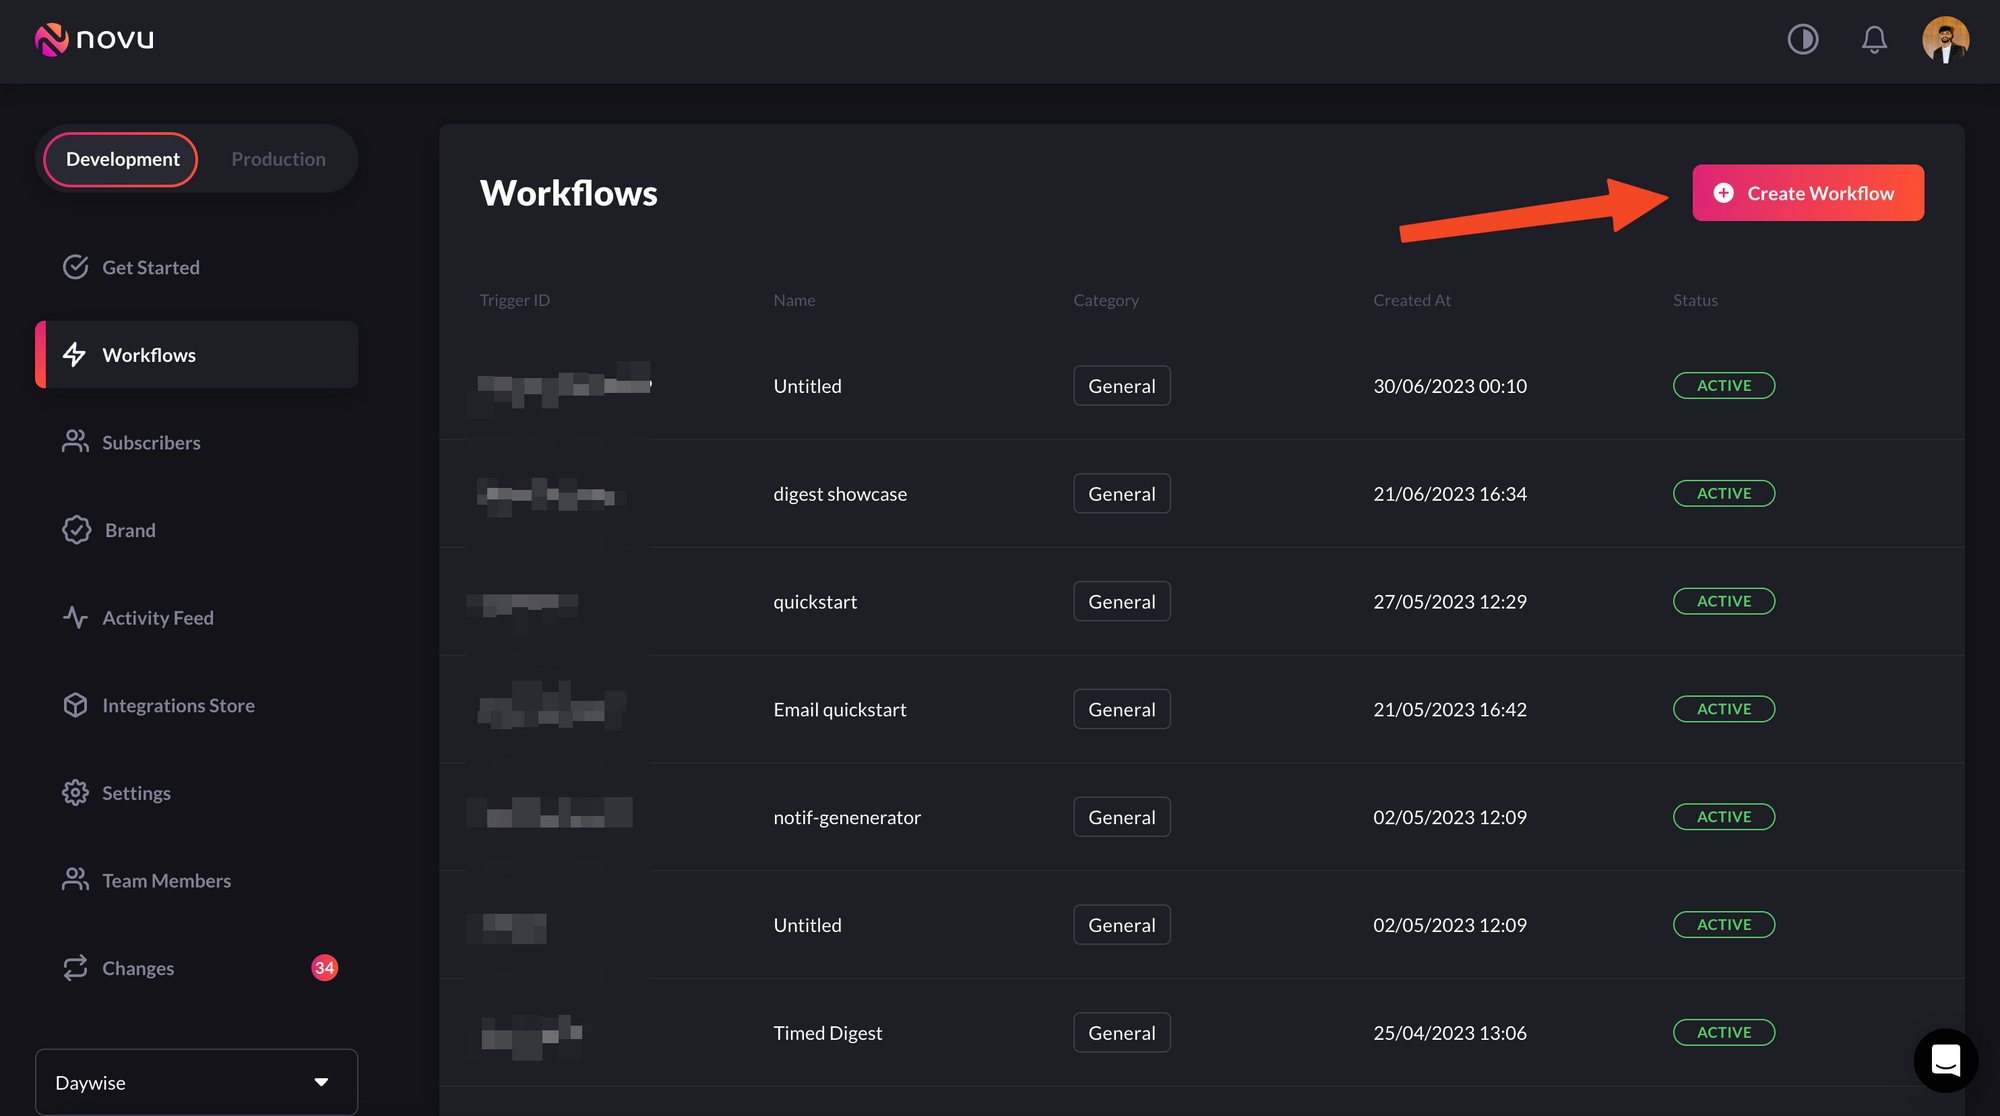
Click the “Create Workflow” button on the top right to create a workflow
- The name of the new workflow is currently “Untitled.” Rename it to a more suitable title.
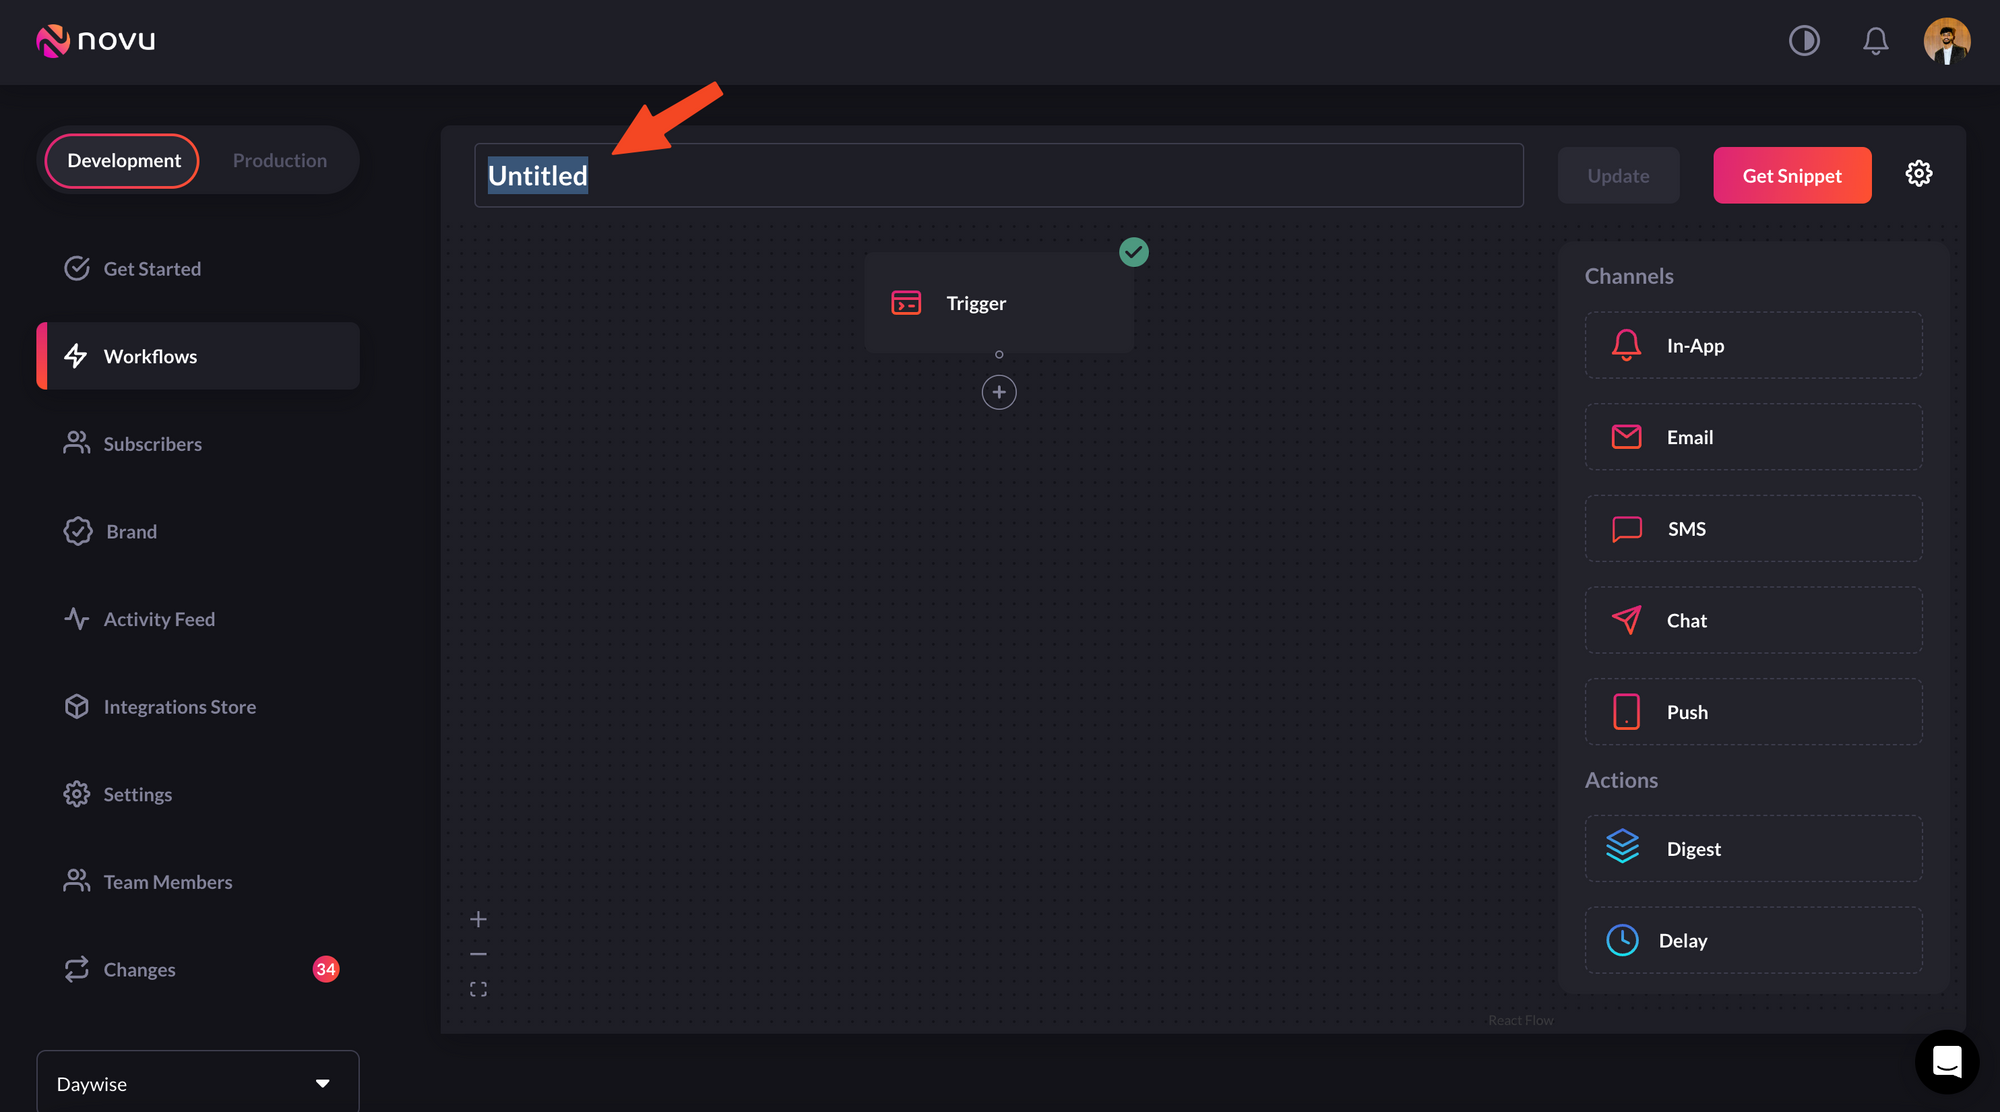
Rename the workflow to a more appropriate name
- Select “Email” as the channel you want to add, by dragging it from the right sidebar:
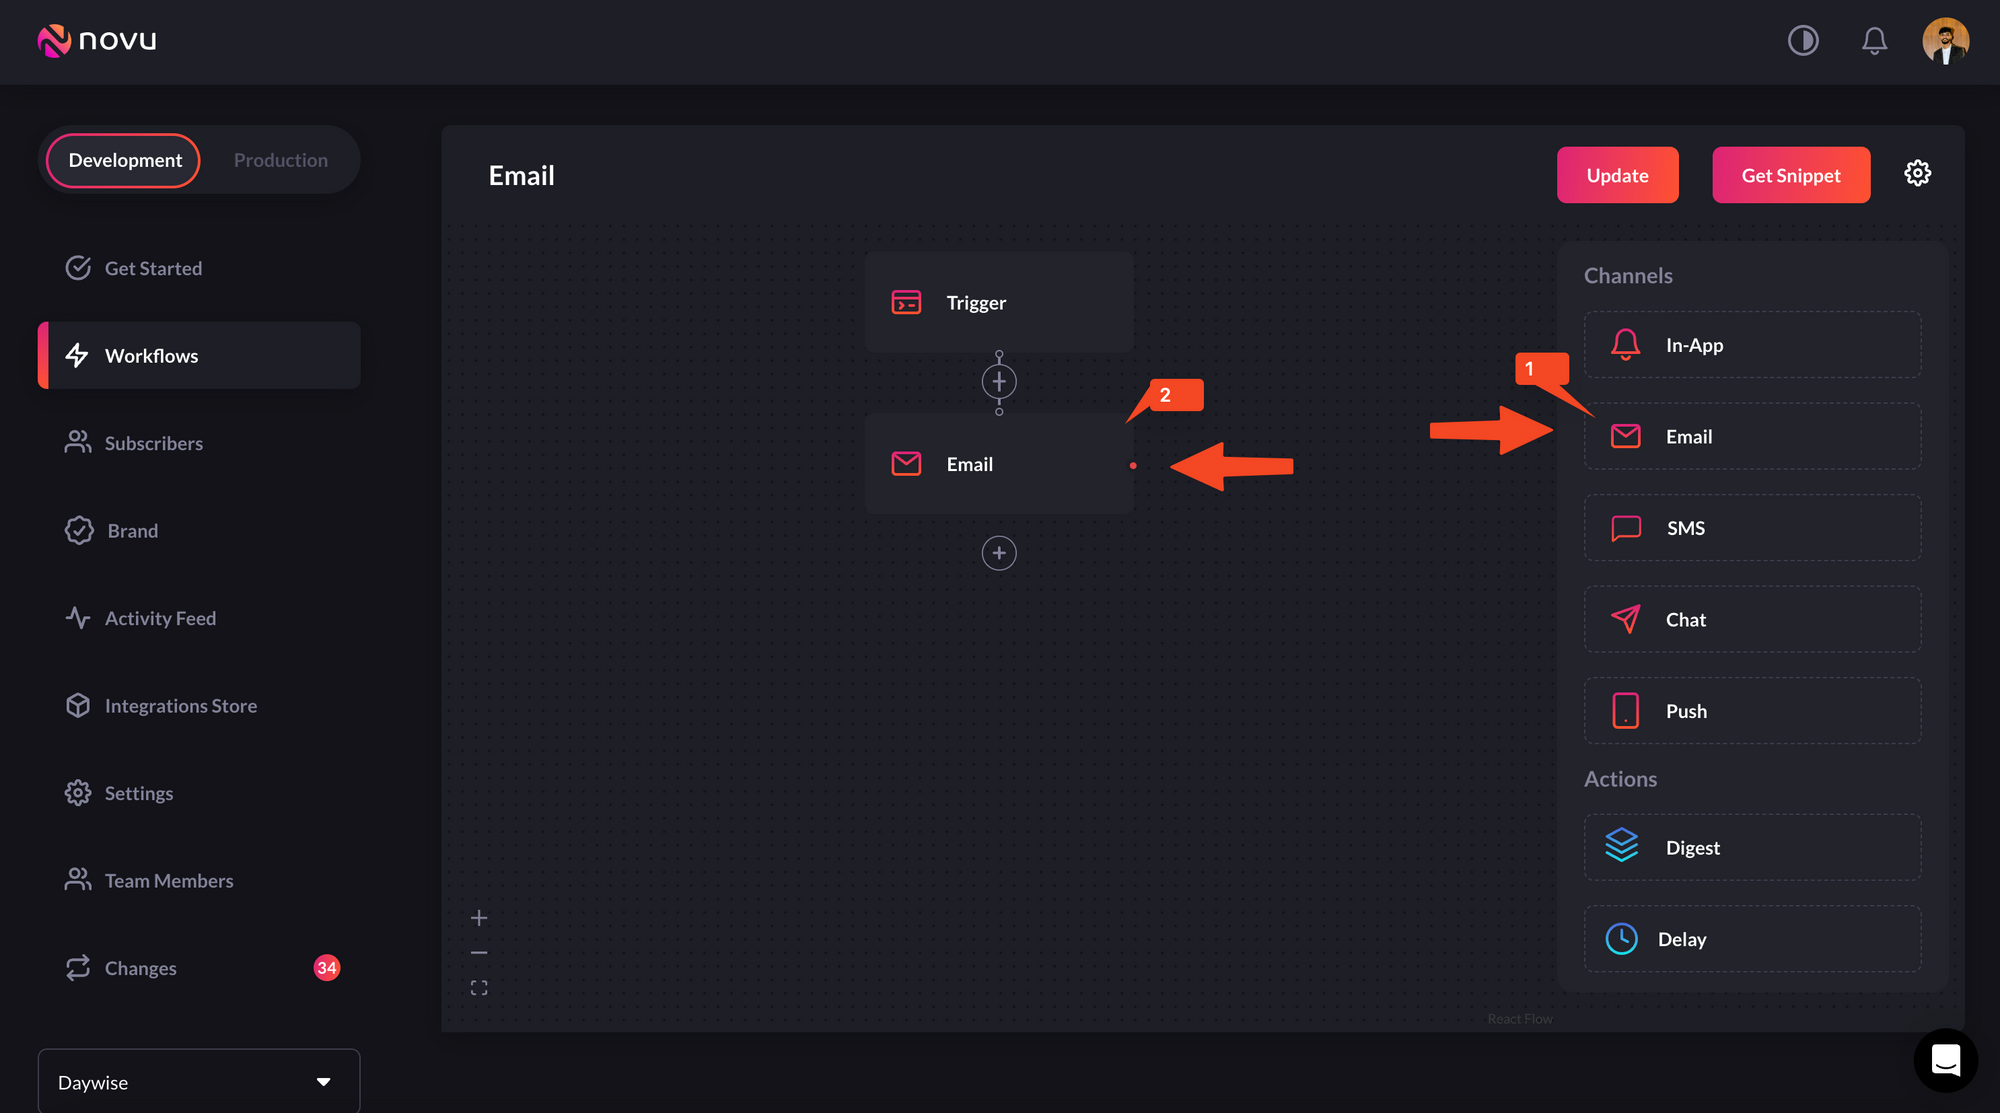
Select Email as the channel you want to add, by dragging it from the right sidebar.
- Click on the ‘Email’ in the workflow and edit it as per this image. Don’t forget to add the fields in the editor which is supposed to be updated with dynamic values that we’ll send when calling the API.
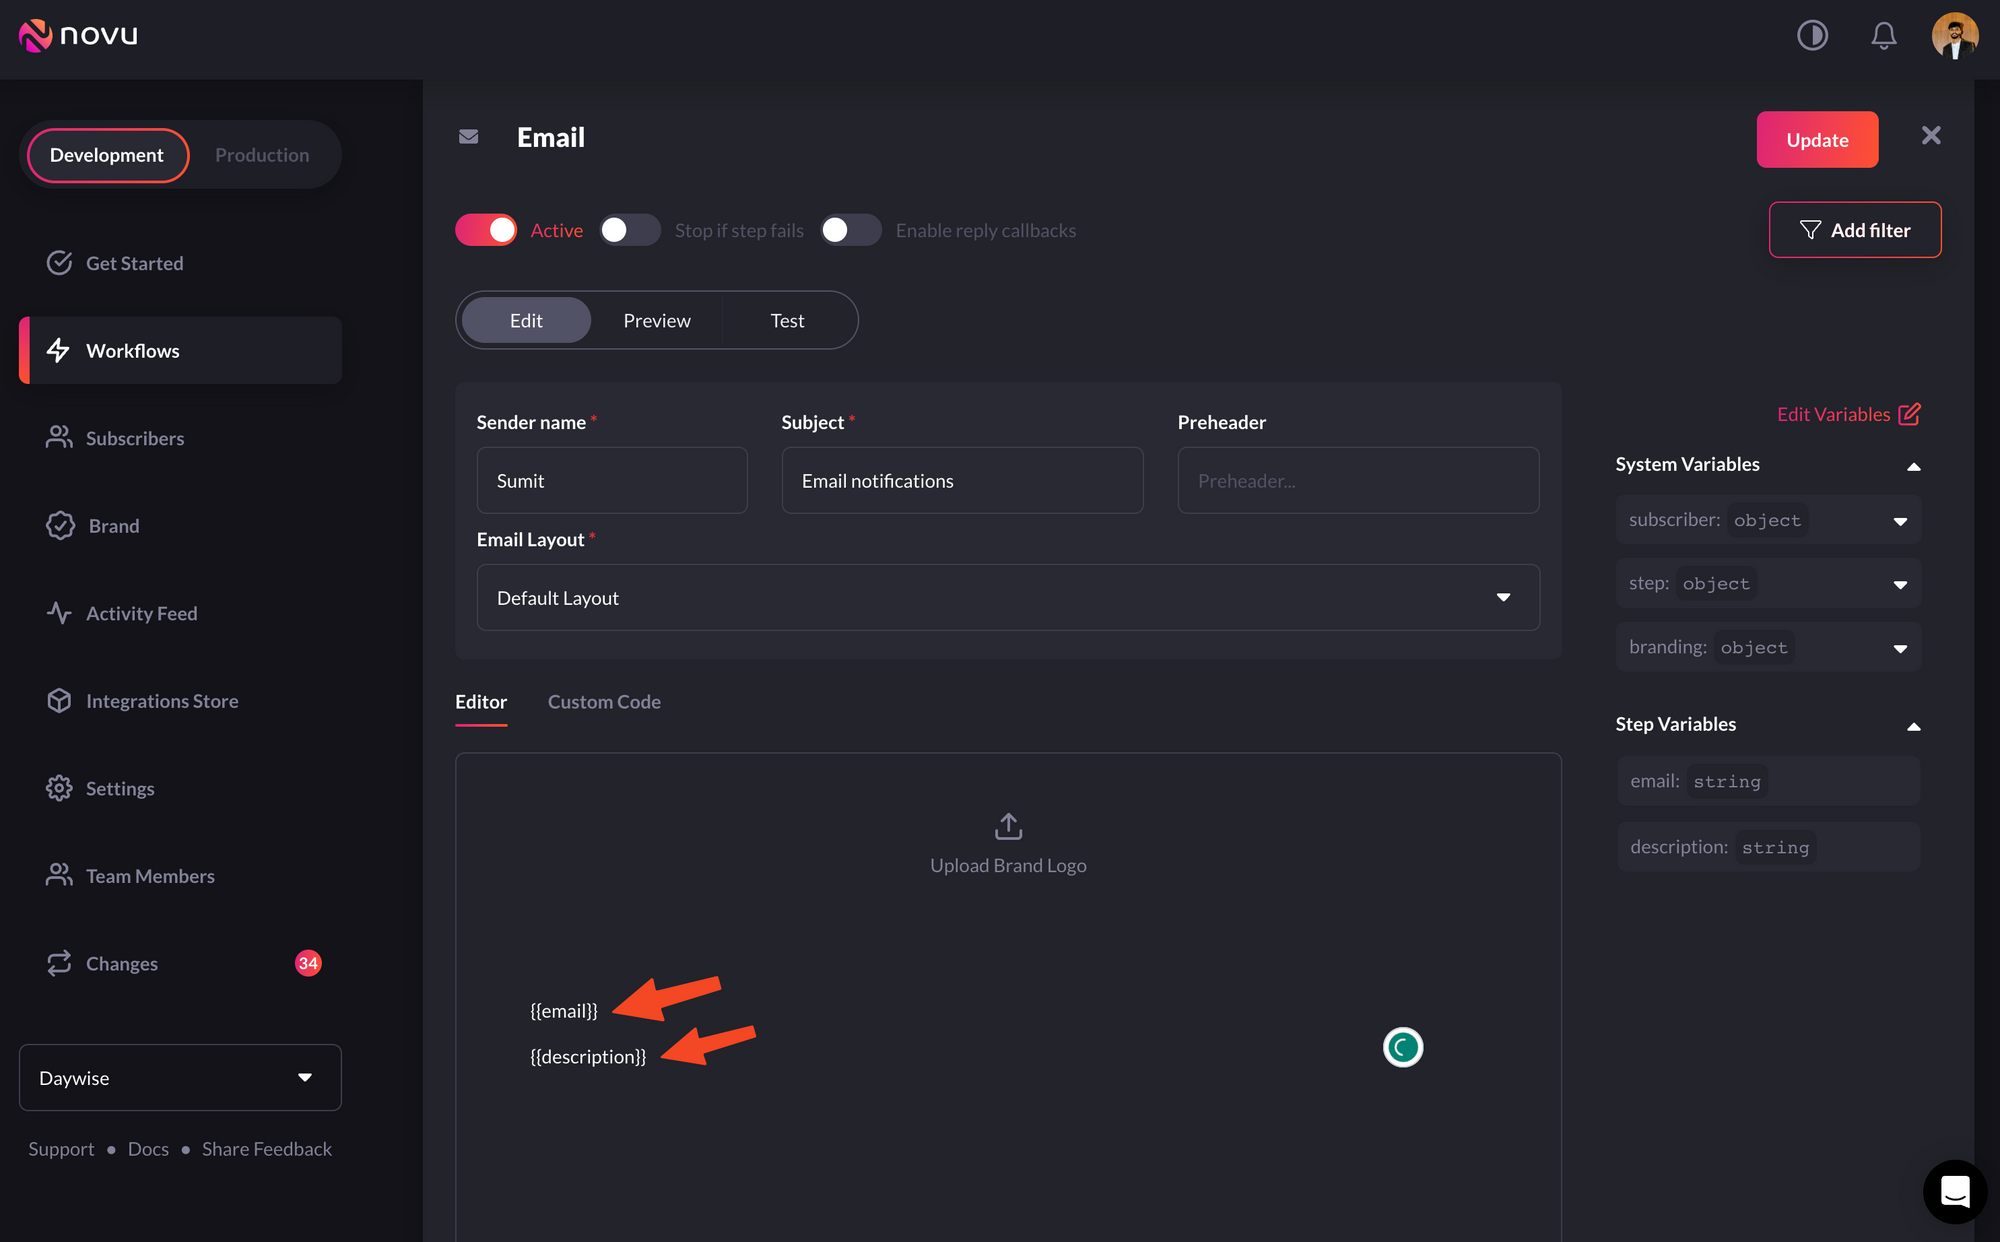
Edit the email node
- Also, add the variables in the ‘variables’ section in the test tab and try testing it by sending the email to your email id using the ‘send test email’ button on the bottom right.
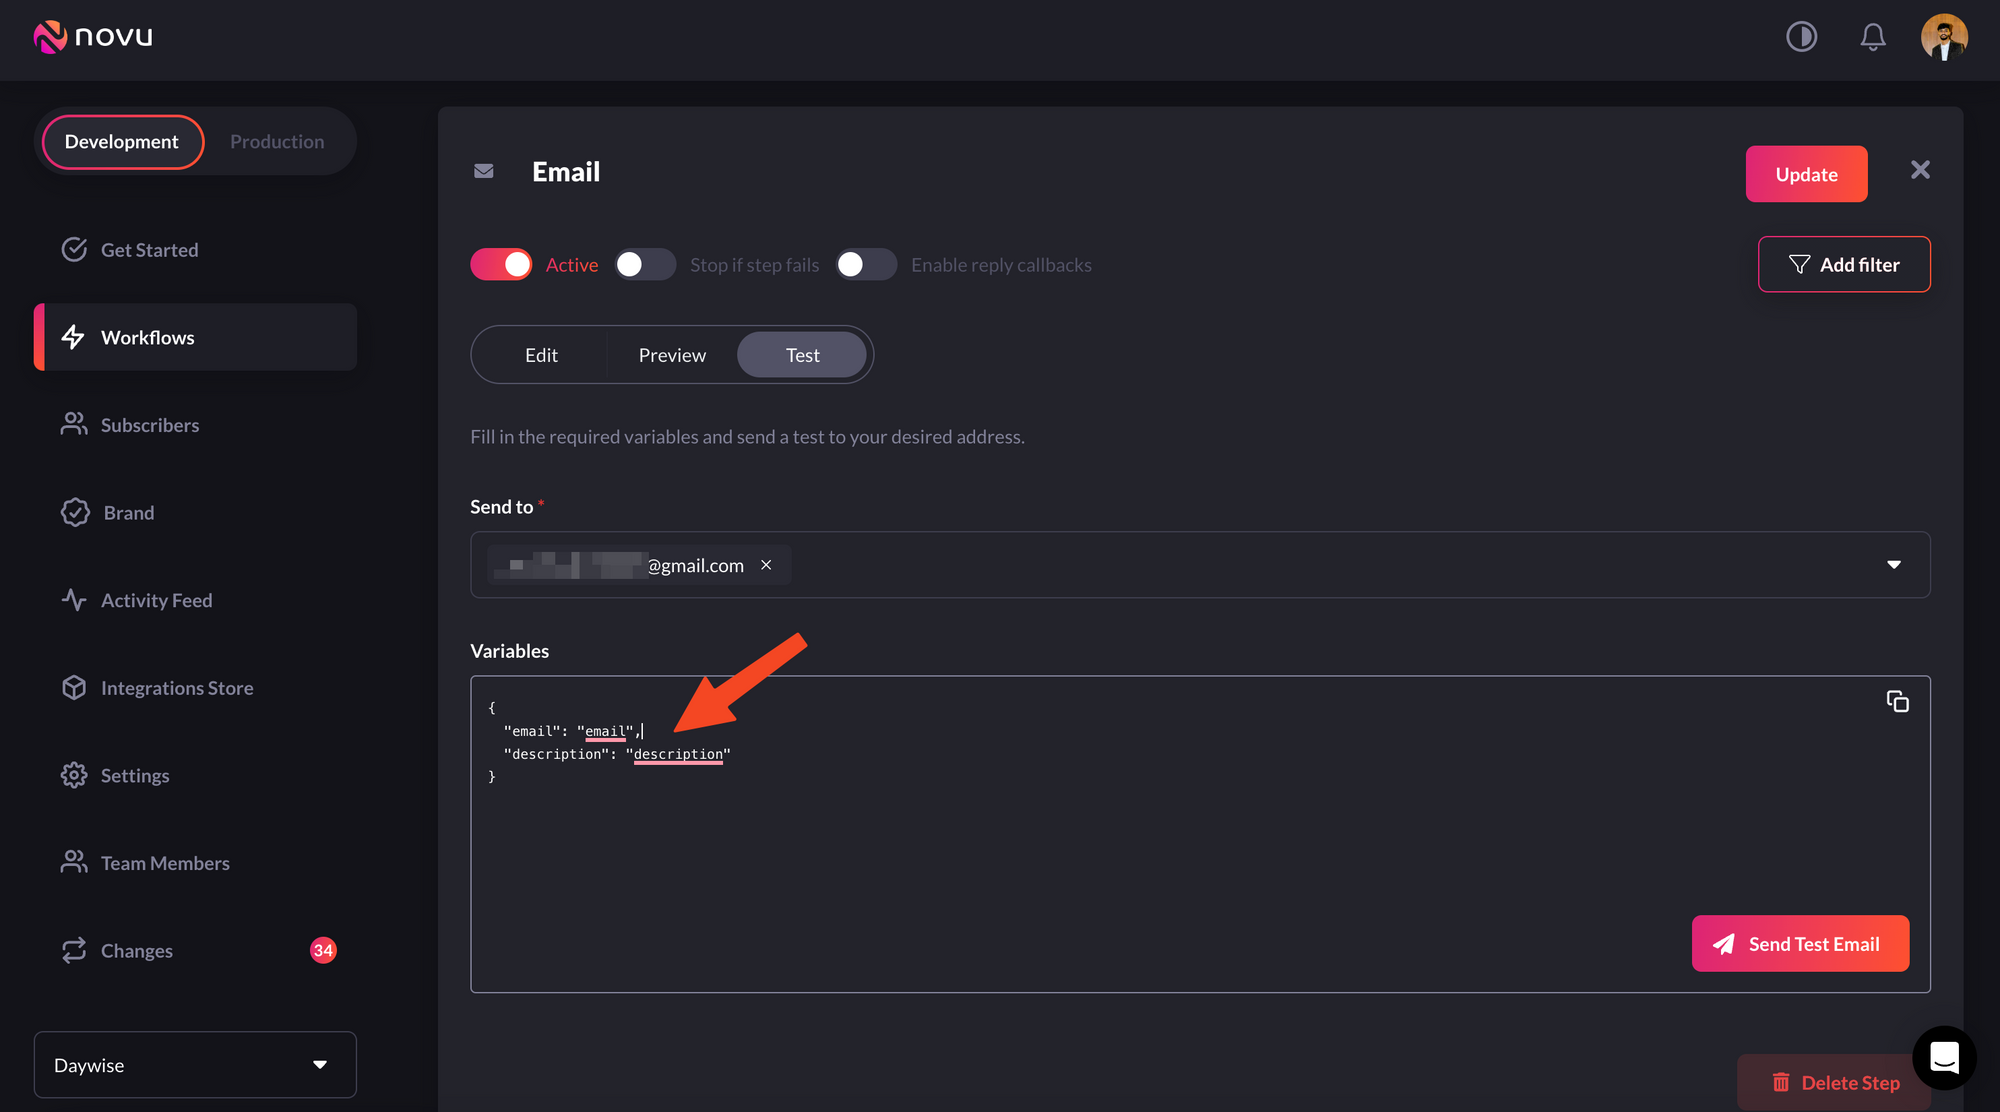
Add variables and send a test email to verify the workflow
Subscribers
In Novu, entities that are supposed to receive notifications are called subscribers. You can see all the subscribers in the ‘subscribers’ tab in the left menu on the Novu web portal. There would be one subscriber by default, which is you. This was created when you signed up for Novu. In real-world scenarios, thesubscriber id would be a unique id generated automatically by the database. So for our demo purpose, we’re using a simple subscriber id of ‘1234567890’ in our app.
We’ll first create a subscriber using the following code:
1234567890 and now we’ll send a notification to the subscriber with this very subscriber id by triggering an email notification like follows:
Create the route and define a function in that route
Now, create apages directory in the root of the project and create a file in it. Give it a name and remember that it will automatically become a route.
In our case, we’re creating a directory called api in our pages directory, and inside api we’re creating a file called sub.js. In this case, our path will be: http://localhost:3000/api/sub
In this file, we simply need to define a function that will handle a POST request to our API. It’ll extract the ‘description’ and ‘email’ variables from the ‘request’ body that will be generated every time we make a POST request and call the function to send an email notification with those plugged in.
We’d used these variables in the workflow we had created in the Novu dashboard and also specified the same in the trigger function above.
The function in our route is quite simple and looks like this:
http://localhost:3000/api/sub
Also, make sure that in the body, you’re passing the two variables we’re extracting above, namely - email and description, as follows:
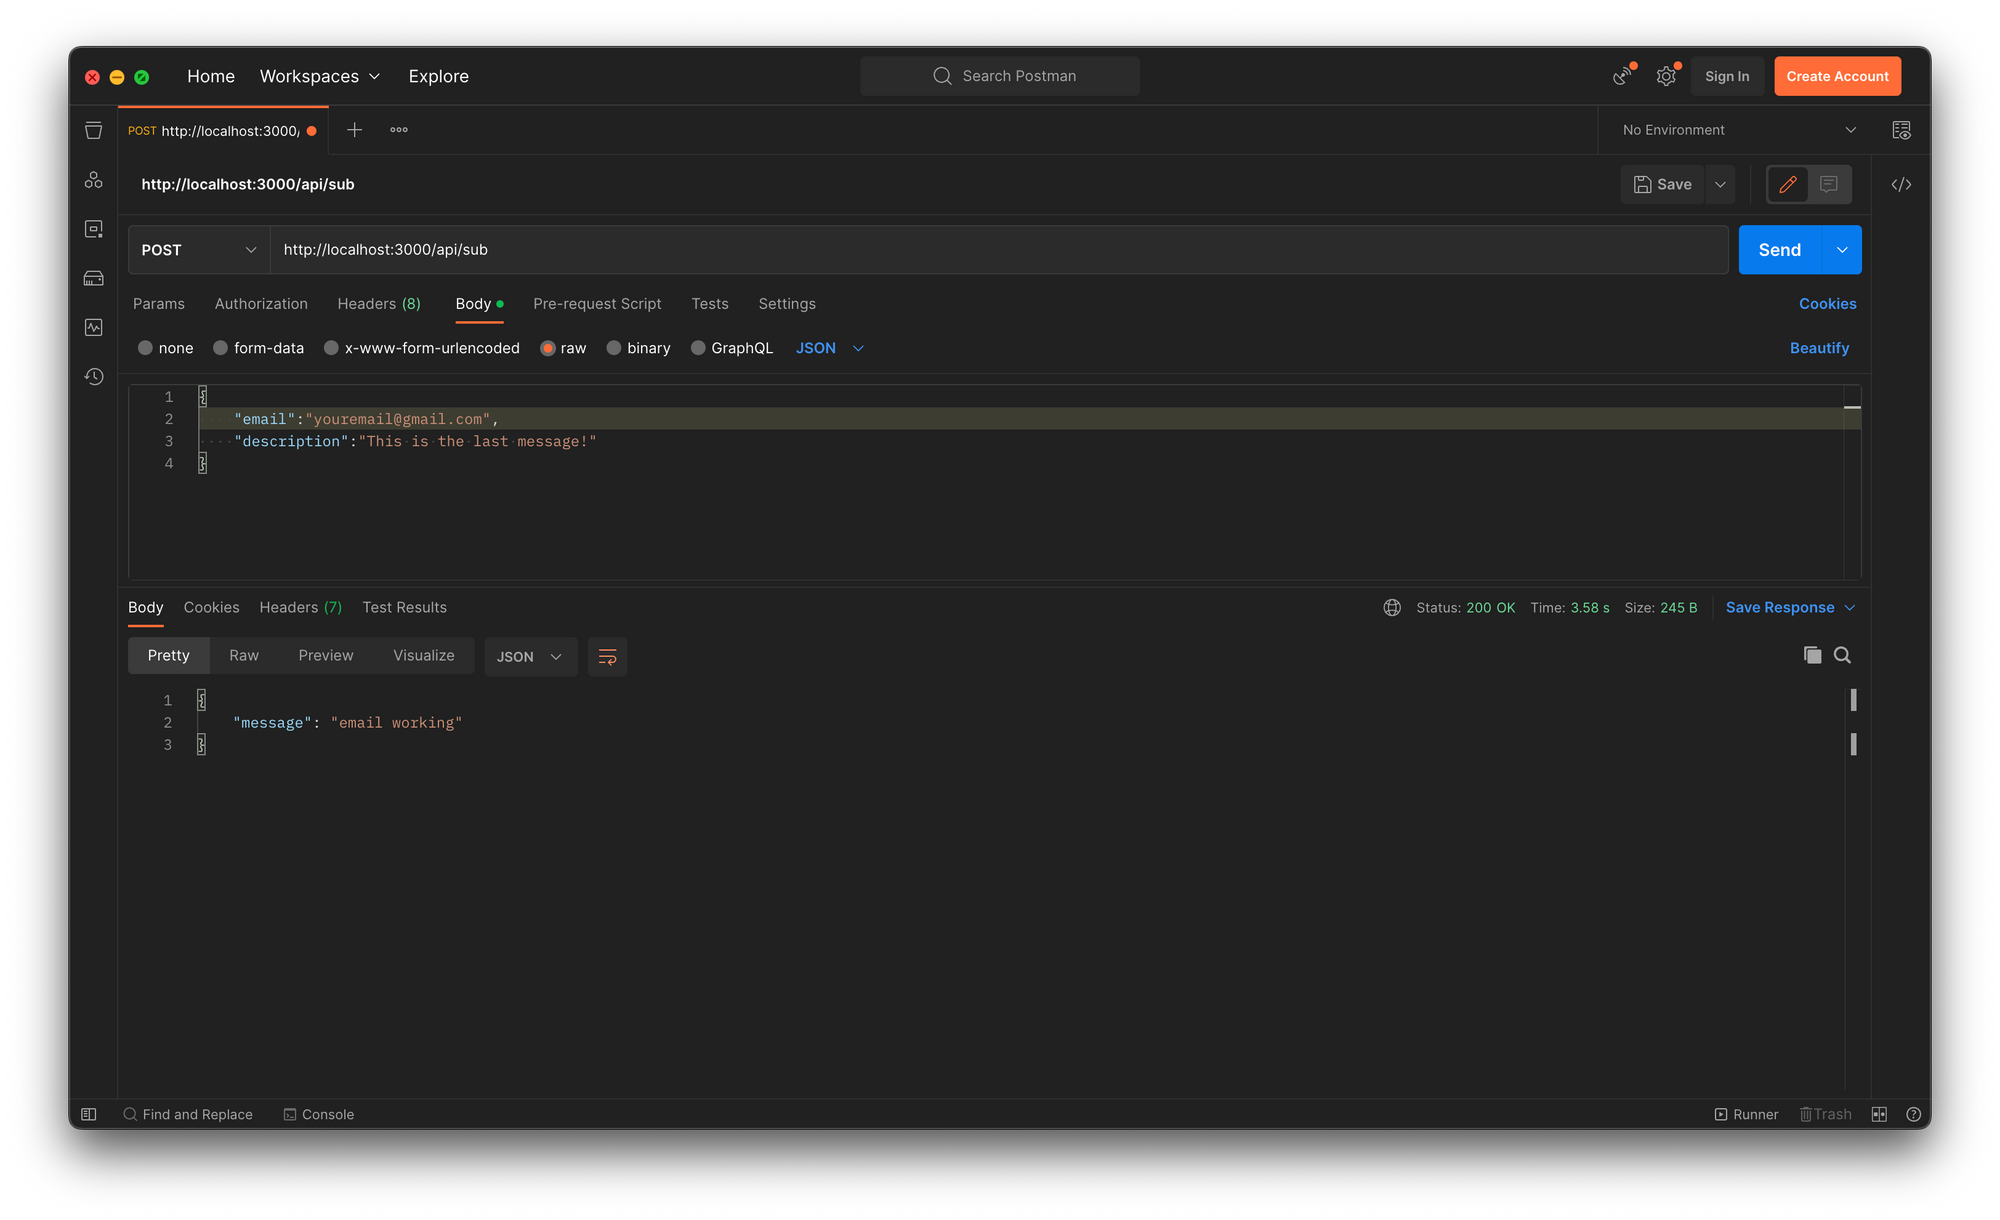
Testing on Postman
In place of youremail@gmail.com, use your actual email and once you send it, you should see the ‘message: email working’ on the bottom as in the image above.This means that the email notification was sent successfully. Now go to your inbox and you should see an email notification like the following:
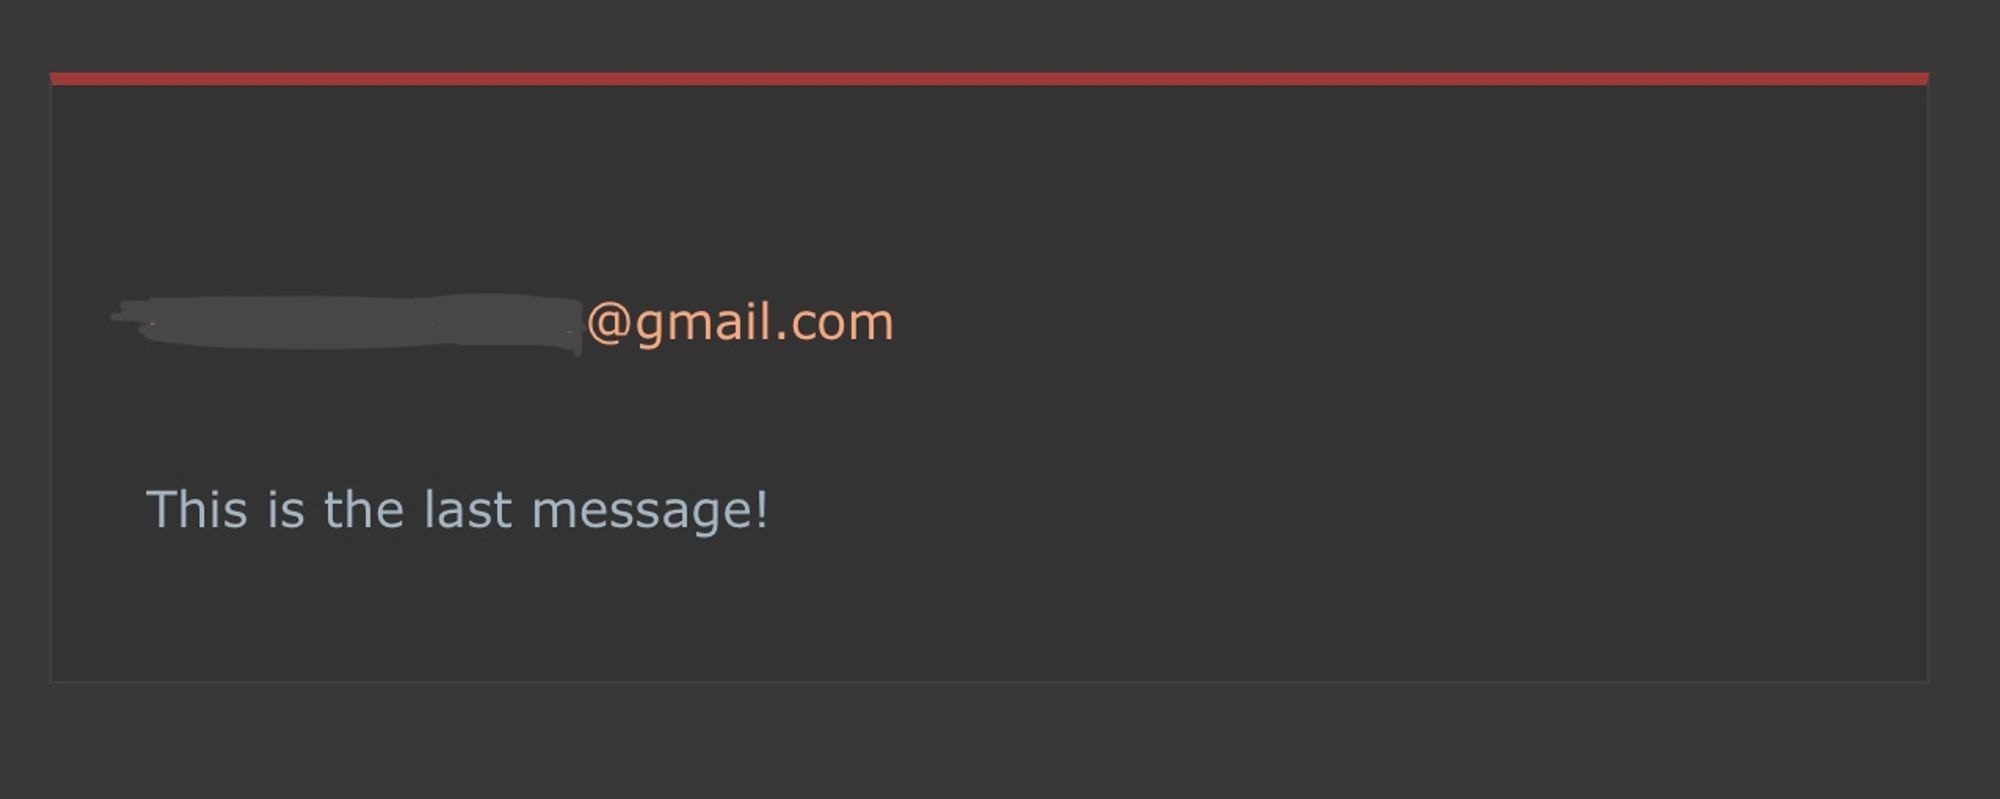
The triggered email notification in the inbox
Topics
Novu simplifies the process of triggering notifications to multiple subscribers with an API called “Topics”. By utilizing the Topics API, you can effortlessly manage bulk notifications easily. Each topic is uniquely identified by a custom key specified by the user, serving as the primary identifier for interacting with the Topics API. This intuitive approach streamlines notifications management, empowering users to focus on delivering targeted messages to their subscribers without the hassle of intricate implementation details.Make sure that you use a unique key for a Topic. Keys once used, can’t be changed later!You have the flexibility to assign a descriptive name to a topic. Unlike the topic key, this name does not require uniqueness and can be modified using the provided API. A topic can have multiple subscribers associated with it. These subscribers will receive notifications whenever a notification is dispatched to the respective topic.
Create a topic
You can create a topic using two entities -key and name. Keys are unique identifiers for topics and a name is just something you assign to a topic for convenience.
create method on the topics property of the **novu**instance. This method creates a new topic in the Novu system using the provided key and name values.
If you test this on your local machine, you should get something like this:
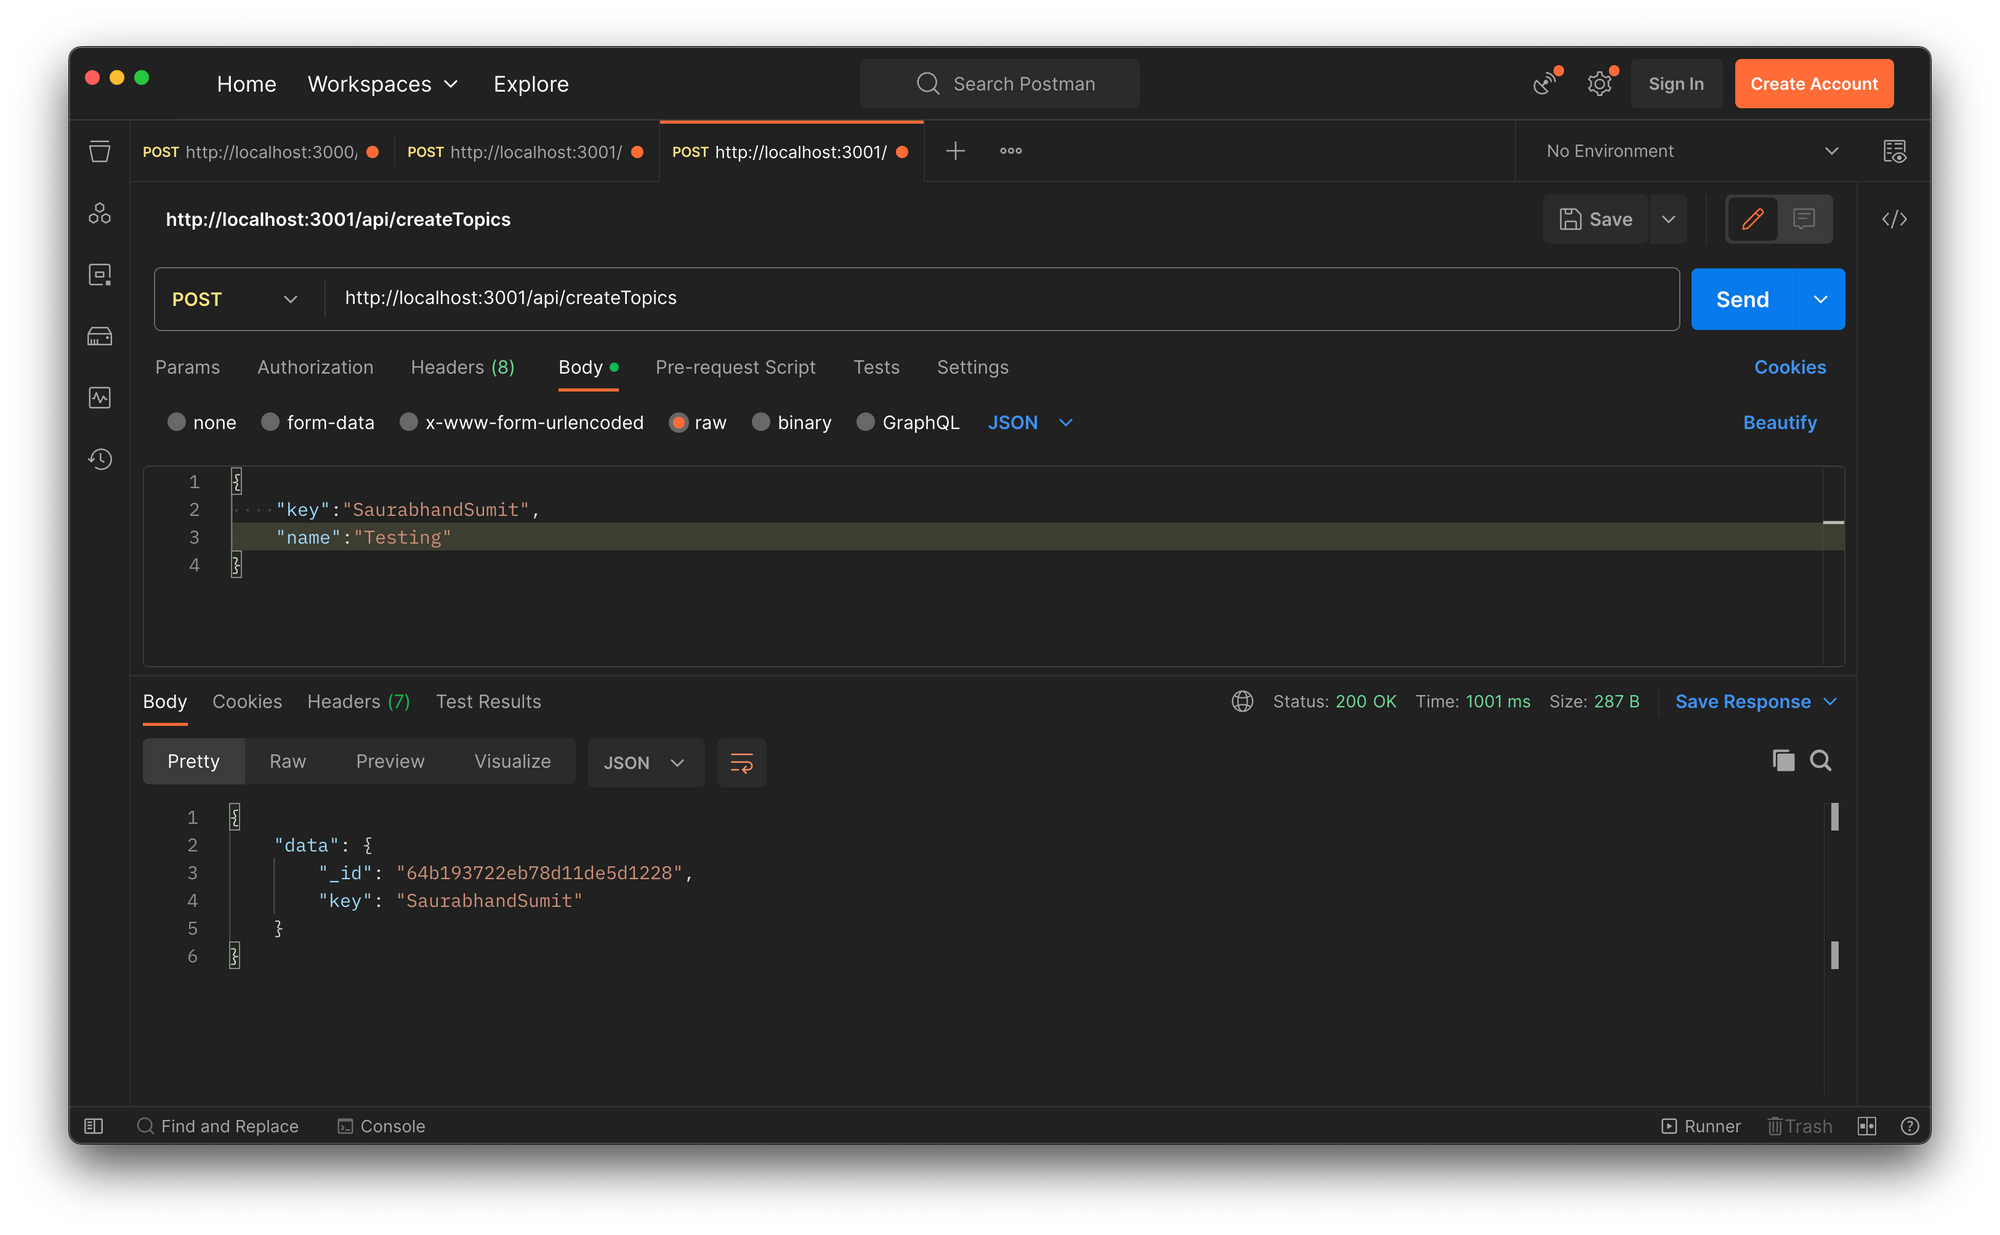
Topics created successfully
Note how the return object contains the key I sent from my request body. That signals successful creation!
Add subscriber to a Topic
The code for adding a subscriber to a previously created topic is as follows:You can only add those subscribers to a topic that you’ve already created. You can see all the subscribers in the Novu web dashboard?utm_campaign=docs-quick-nextjs
subscriberID and topicKey from the request body and call the addSubscribers method on the topics property of the novu instance, passing the topic key and an object with an array of subscribers.
This adds the subscriber with the subscriberID we’d passed to the array of subscribers, which in the above case contains just one subscriber.
If you check this on Postman, the returned array will contain the subscriberID that we had passed in the request body, signalling that it was added to the topic successfully.
If, on the other hand, you find the passed subscriberId in the notFound array inside the failed object, it means the subscriber wasn’t added to the topic.
You can read more about it here.
The image below shows the case where the subscriber has been added successfully:
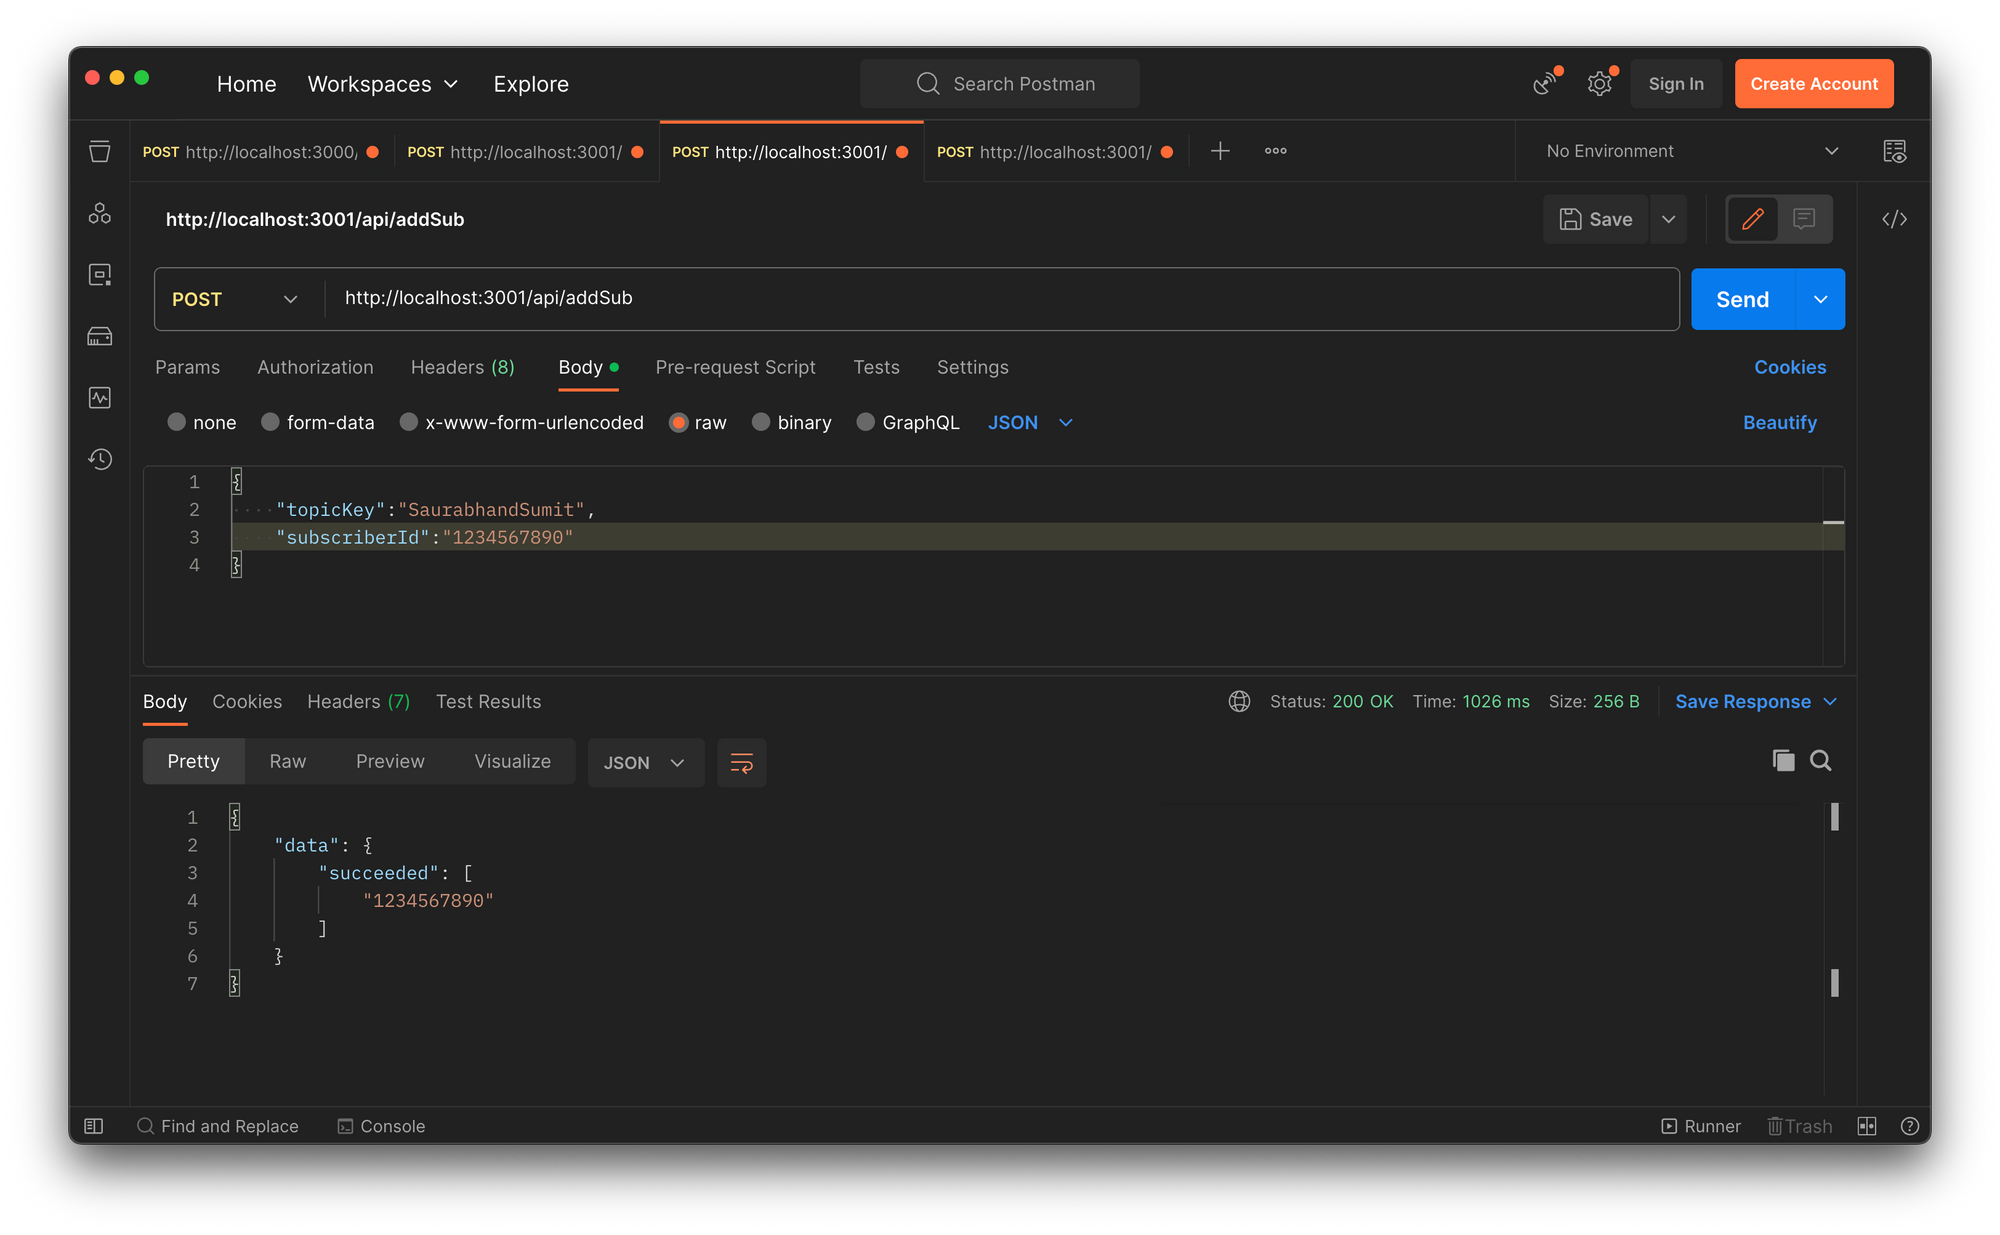
Subscriber added to the topic
Sending notifications to a topic
Sending notifications to a topic is not a complex task. You need to extract the topic key to which you want to send notifications and trigger Novu’s method on that topic key with the message in the payload: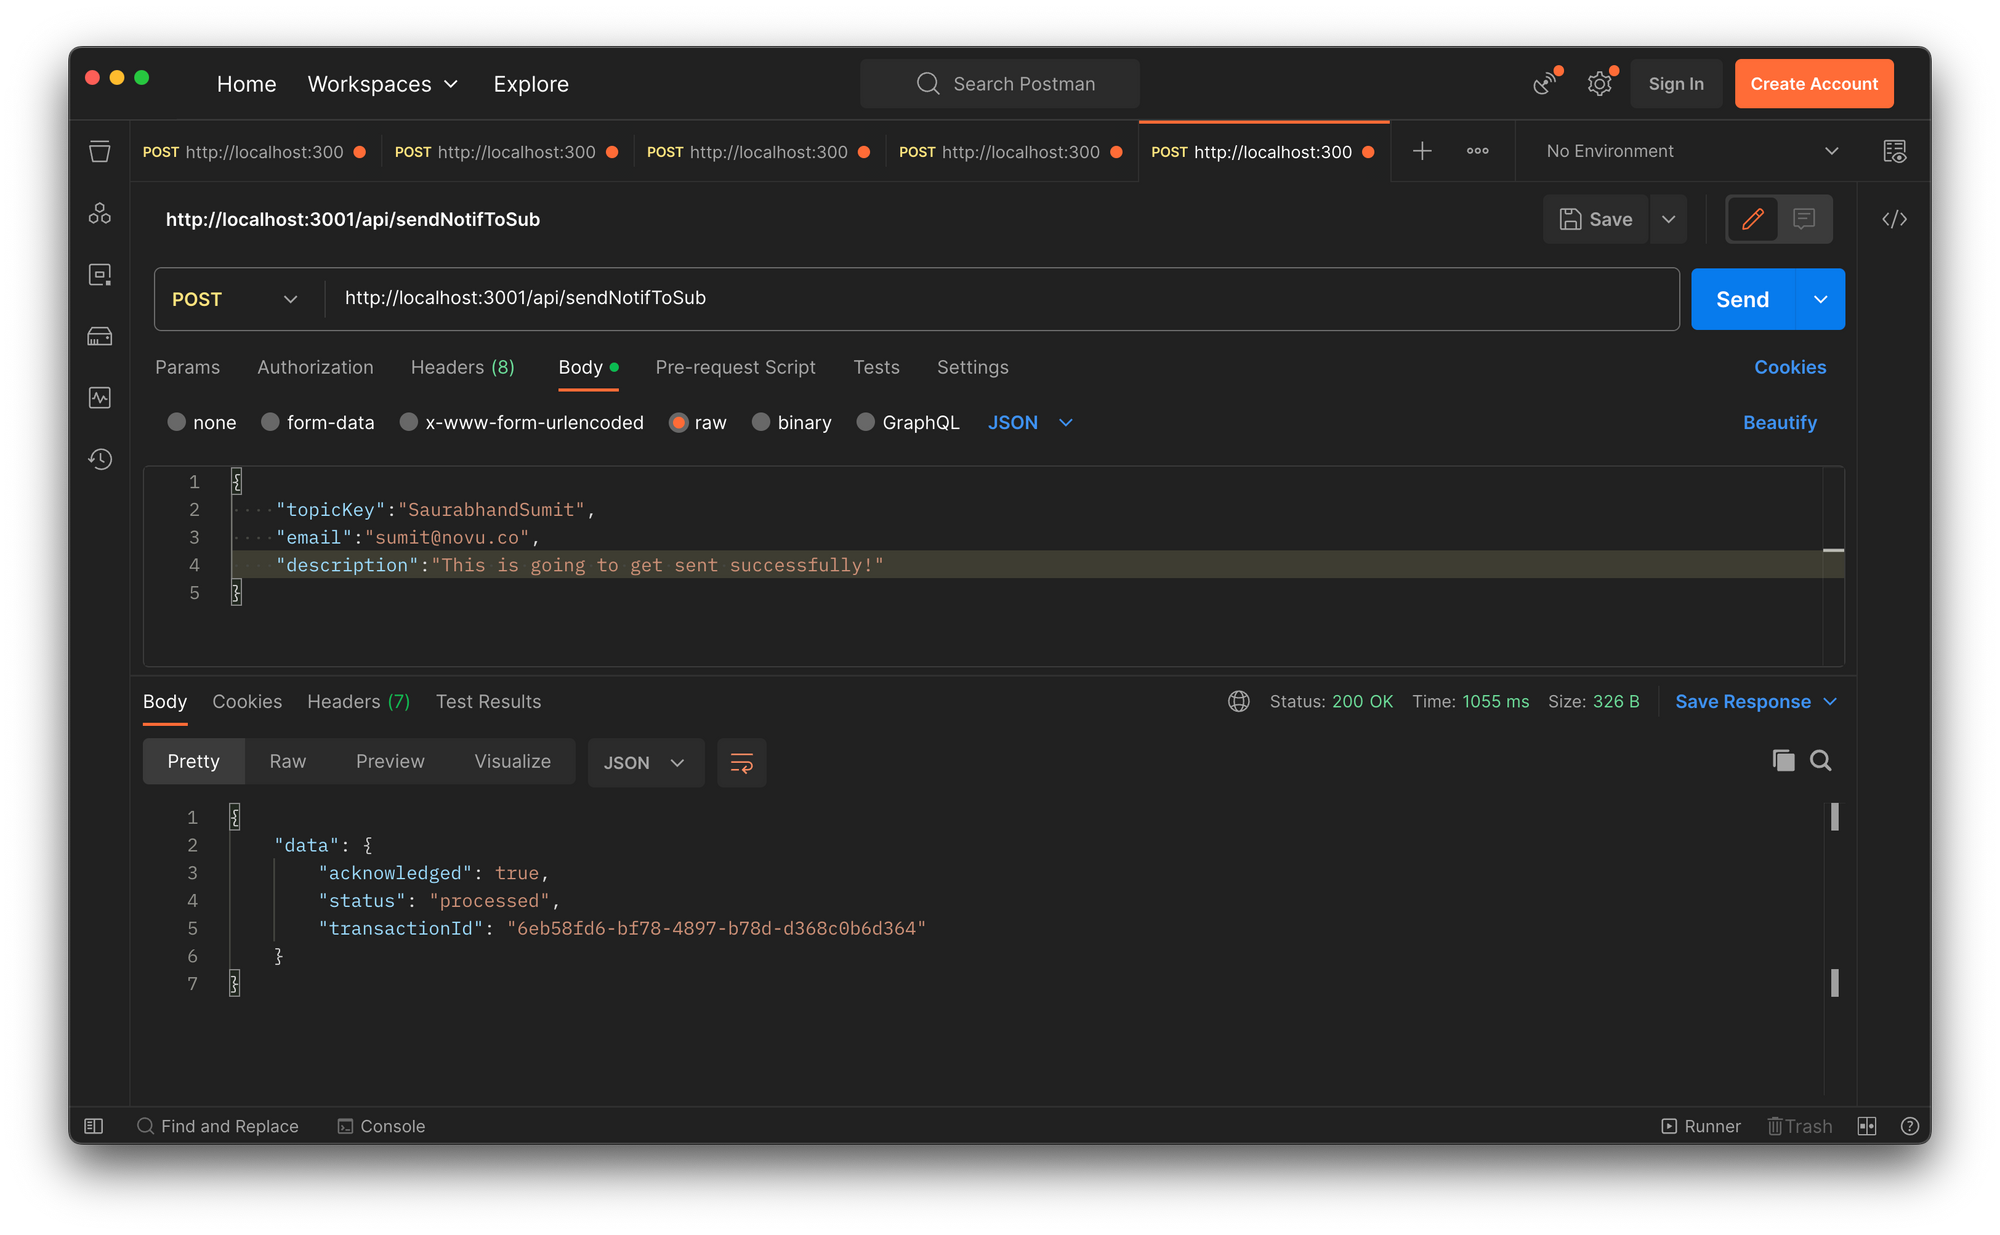
Notification successfully sent
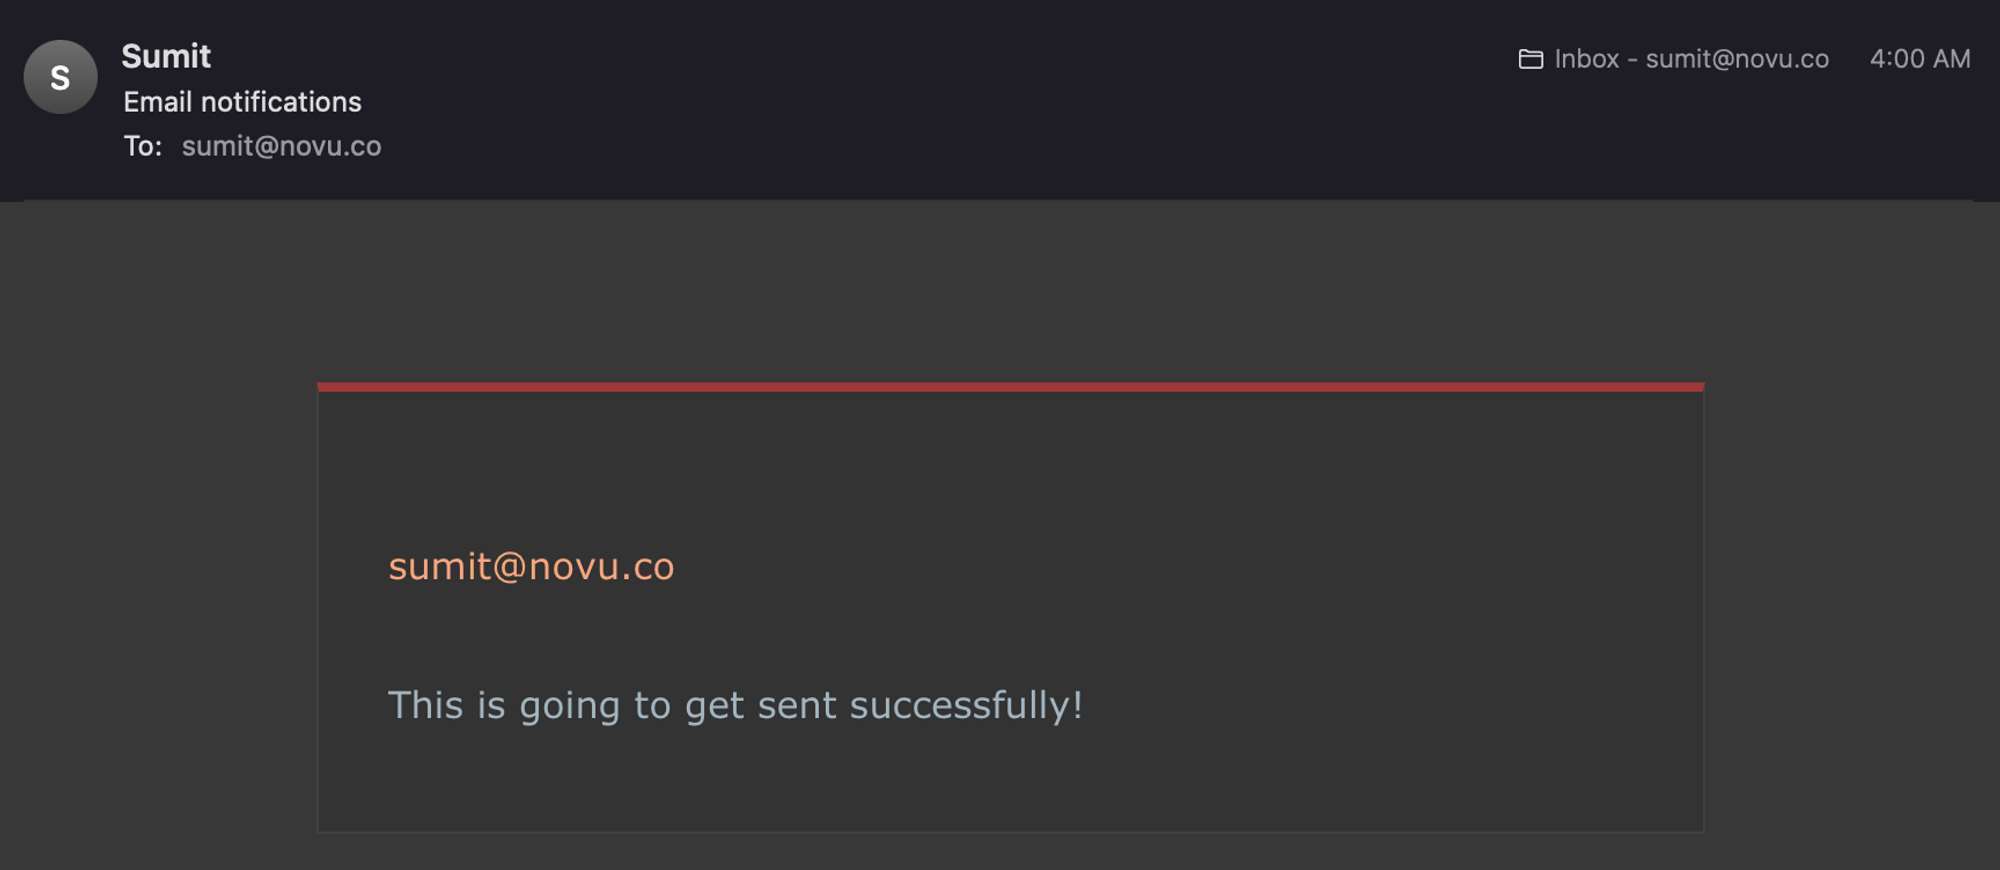
Notification in my mailbox